When performing chamfering operations in UG-CAM, practical challenges frequently arise, primarily concerning tool selection, path generation, geometric recognition, and machining accuracy.
However, optimizing machining efficiency and quality remains the paramount concern.
To address this, the author proposes two core solutions: first, directly forming the chamfer profile using standard form tools; second, employing R-shaped tools for contouring to create the chamfer profile.
This paper details the creation methods for form chamfering tools and custom chamfering tools, key application points, and tool tracking point configuration strategies.
It also systematically outlines the characteristics of various chamfering methods, such as flat chamfers, profile chamfers, and hole chamfers.
The aim is to provide comprehensive technical reference for process engineers, helping to enhance the efficiency and quality of chamfering operations.
Introduction
Chamfering is widely applied in mechanical product manufacturing.
It not only removes burrs generated during part machining and enhances product aesthetics but also facilitates part assembly and effectively reduces stress concentration.
Chamfer types are diverse. Common examples include bevel chamfers (e.g., 60°, 90°, and 120°, often used on hole openings), round chamfers (frequently applied to the top of end face slots), and irregular chamfers composed of multiple straight lines and curves.
As the mechanical manufacturing industry continuously elevates demands for product precision and quality, process engineers must master chamfering techniques under various conditions while continuously researching and optimizing machining processes.
UG NX software offers significant advantages in generating chamfering programs, providing effective solutions for chamfering diverse components.
Currently, chamfering primarily employs two processing modes: directly forming the chamfer profile using form tools, or creating the profile by contouring with R-cutting tools.
Therefore, in-depth research into the characteristics of chamfering tools and the machining methods of different tools is crucial for improving chamfering quality and efficiency.
Chamfering Tools
Form Chamfering Tools
Chamfering tools fall under the category of form chamfering tools.
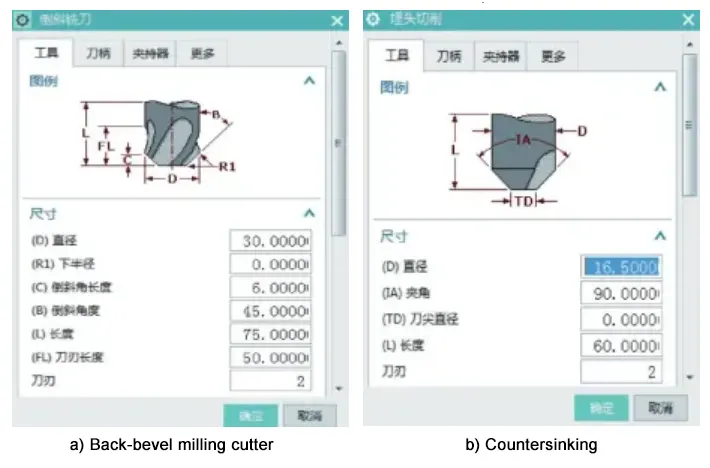
While numerous methods exist for creating chamfering tools, practical experience has shown that using the “CHAMFER_MILL” function under the “mill_planar” (planar milling) operation and the ‘COUNTER_SINK’ function under the “holl_making” (hole making) operation in UG software are simple and intuitive.
These methods align with actual production requirements and can generate all types of chamfering tools.
The creation of form chamfering tools is illustrated in Figure 1.
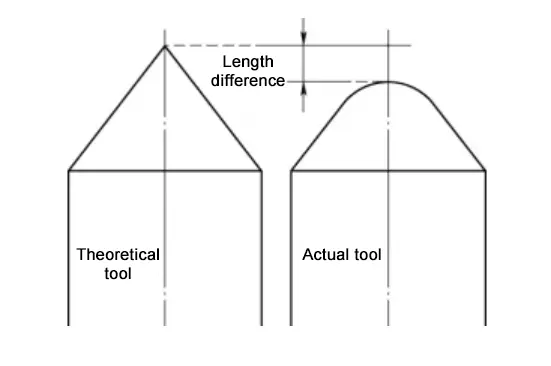
In practical applications, when using a tool with a sharp tip angle, machinists must account for the difference between the actual tool and its theoretical model.
Since the actual tool tip has a rounded edge, the highest point during tool setting is not the theoretical tool tip, resulting in a gap between the two.
Figure 2 illustrates the difference between the theoretical tool and the actual tool. Programming using the theoretical tool tip may lead to excessive chamfering during part machining.
To prevent this, you should calculate the actual tool tip length values using trigonometric functions before machining.
Alternatively, programming can use the theoretical tool tip while tool setting employs the actual tool tip to ensure machining accuracy.
Custom Chamfer Tools
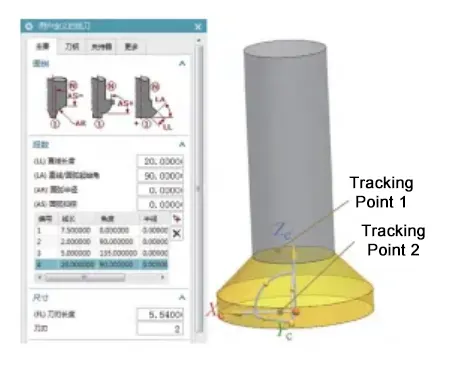
Both rounding chamfer tools and irregular chamfer tools are classified as custom tools. They can be created under the “MILL_USER_DEFINED” (Custom Tools) section within the “mill_planar” operation.
Custom tools are formed by rotating a generatrix around a centerline. The generatrix typically combines straight segments and circular arc segments.
Straight segments are defined in polar coordinates (line length LL and starting angle LA for lines/arcs), while circular arc segments are represented by arc radius AR and sweep angle AS.
For complex curved segments, continuous small line segments or arc segments can be used for approximation.
As long as the tool’s generatrix can be mathematically described, it can be quantified using four parameters: line length, angle, radius, and sweep.
Custom tools are shown in Figure 3. Custom chamfer tools are only applicable for 2D planar contour milling.
Tool Tracking Points
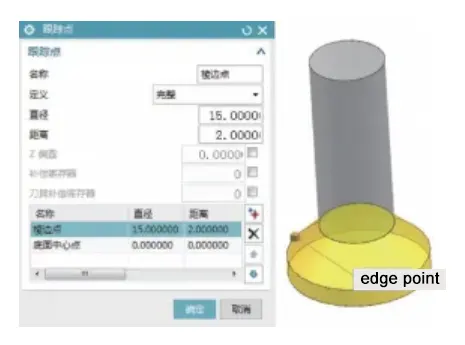
Regardless of the tool generation method, tool tracking points can be configured in the tool dialog box.
Tool tracking points serve as driving points, precisely controlling the contact area between the tool and the selected workpiece. Multiple tracking points can be set for a single tool.
Properly setting and selecting “tracking points” helps simplify programming operations. Note that tool tracking points are unrelated to the final output program points. Setting tracking points is shown in Figure 4.
Forming Tool Machining
Drilling
When drilling, specify the top surface and hole in the drilling interface. Edit parameters in the “Standard Drill” cycle and set the shoulder depth value to 0.
During tool setting, define the tool length as the position on the tool taper where the part’s maximum chamfer diameter is located.
When machining multiple chamfers of different depths with the same chamfering tool, set the tool shoulder position as the tool length during tool setting.
In the “Standard Drilling” cycle, configure the shoulder depth value (typically negative) based on the chamfer depth.
This method is applicable when the maximum diameter of the chamfering tool is ≥ the maximum chamfer diameter of the hole.
It offers advantages such as fewer tool paths, simpler programming, and higher machining efficiency.
Surface Milling and Profile Milling
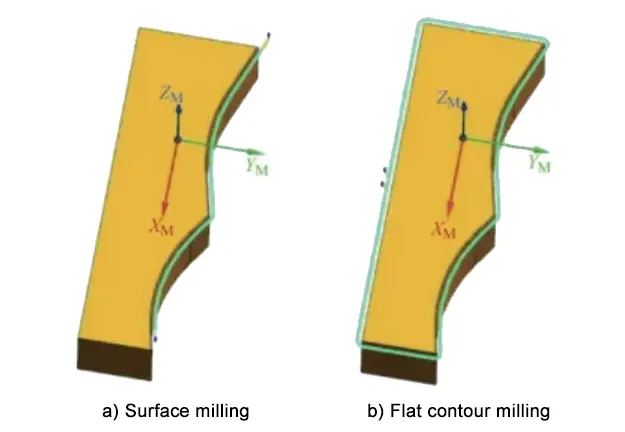
For surface milling, select the chamfer edge on the end face in the “Specify Component Boundary” interface and set the “Tool Side.”
When setting “Specify Bottom Surface,” choose the chamfer edge on the hole wall and offset it slightly toward the hole depth to compensate for potential tool setting errors..
For contour milling, select the end face on the “Specify Part Boundary” interface. Similarly, select the chamfer edge on the hole wall for “Specify Bottom Surface” and apply an offset.
Flat milling is primarily used for chamfering open boundaries, while contour milling is suitable for closed boundaries. Applications of flat milling and contour milling are illustrated in Figure 5.
Hole Chamfer Milling
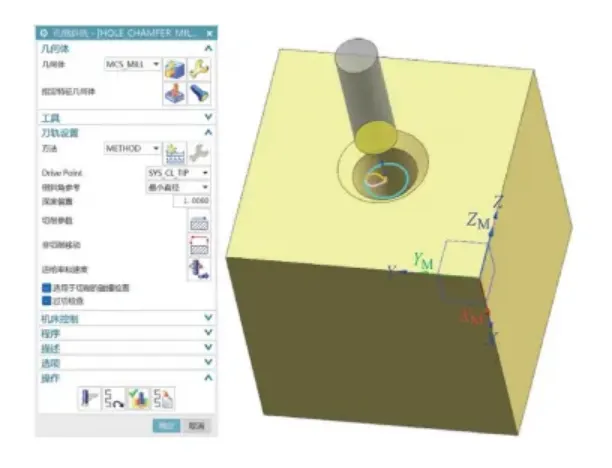
In the “holl_making” interface, use a chamfer milling cutter. Select the chamfer feature in “Specify Feature Geometry,” choose the tool tracking point in “Drive Point,” and select the starting position as depth offset in the chamfer reference.
Ensure the tool tracking point aligns with the depth offset positions of the minimum and maximum diameters selected in the chamfer reference.
Properly utilizing the relationship between these three elements simplifies programming and improves efficiency. The hole chamfer is shown in Figure 6.
Counter Chamfer Machining
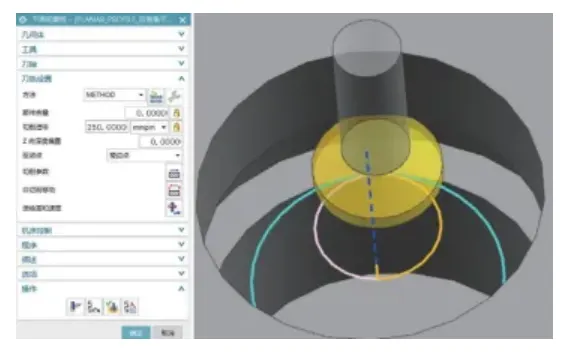
In the Plane Contour Milling interface, select the intersection line between the chamfer and the top surface of the internal groove under “Specify Part Boundary.”
Choose a custom tool and select the edge point defined in Figure 4 as the drive point to machine the counter chamfer.
The counter chamfer machined via Plane Contour Milling is shown in Figure 7.
Machining with R-Tooling
R-tooling includes ball-nose cutters, R-radius end mills, and R-radius T-slot cutters.
Depth Contour Milling
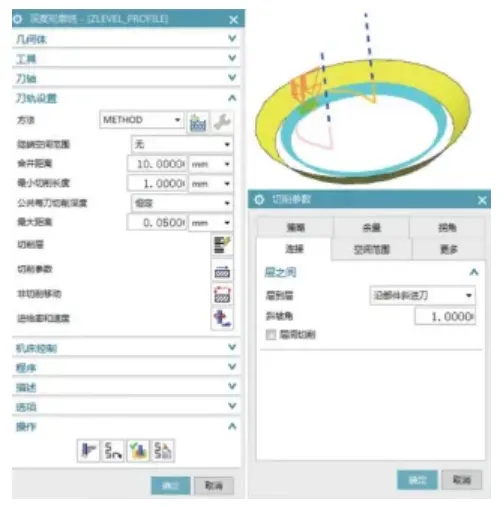
In the “Depth Contour Milling” interface:
– Under “Specify Cutting Area,” select the chamfered surface.
– Set “Common Per-Cut Depth” to Constant.
– Enter 0.05 for “Maximum Distance.”
– Select a ball-nose cutter or an R-radius end mill.
In the Connection tab of the cutting parameters dialog box, select “Along part” for “Layer to layer” and enter 1 for “Ramp angle” to achieve contour chamfering.
The depth contour milling contour chamfering process is shown in Figure 8.
Fixed-Axis Contour Milling
In the “Fixed Contour Milling” interface, select a ball-nose cutter or a straight-toothed end mill with an R radius.
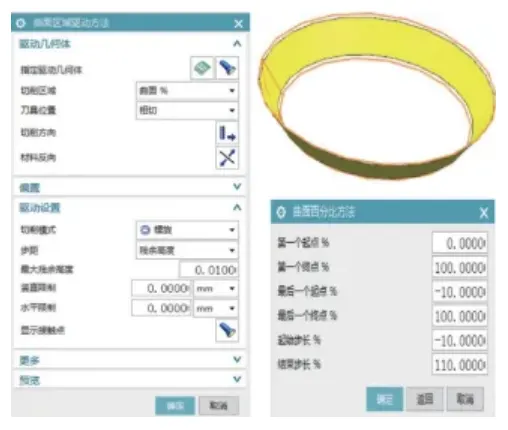
When the drive method is set to “Surface Area,” select the chamfered surface as the “Specified Drive Geometry.” For the cutting area, choose “Surface %” to enter the Surface Percentage Method dialog box.
Set the start step to -10 and the end step to 110 to extend the tool path beyond the chamfered surface. Figure 9 shows the machined surface area.
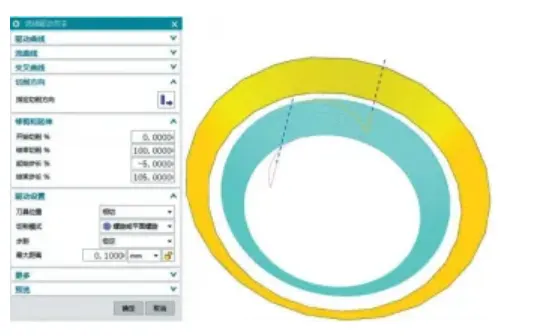
When selecting “Streamline” as the drive method: – Specify the part as the component. – Select the chamfered surface as the cutting area. – Specify the cutting direction. – Choose “Helical” or “Planar Helical” as the cutting mode. – Set the pitch to ‘Constant’. – Enter 0.1 for the maximum distance. – Under “Trim and Extend”, set the start pitch to -5 and the end pitch to 105.
This also extends the tool path beyond the chamfered surface. Figure 10 shows the streamline machining process.
Reverse Chamfering
You can apply both the surface area and streamline methods under “Fixed Contour Milling” for reverse chamfering. Basic settings remain consistent with Section 4.2.
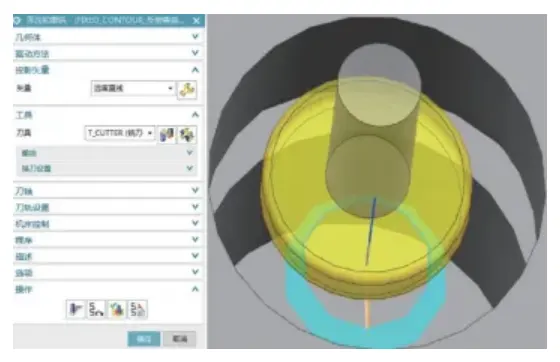
Select an R-radius T-slot milling cutter. Choose “Away from Line” for projection vector, specify the hole centerline as the vector, and select the hole’s center point. Figure 11 illustrates reverse chamfering.
Conclusion
This paper systematically investigates two machining approaches using UG CAM: direct chamfer contour generation with form tools and contour tracing with R-radius tools. We summarize practical machining insights.
UG CAM offers powerful functionality and flexible application with diverse chamfering methods.
We hope this work provides a valuable reference for peers and helps collectively advance chamfering technology in mechanical machining.
FAQ
What are the main challenges faced during chamfering operations in UG-CAM?
The main challenges include tool selection, toolpath generation, geometric recognition, and maintaining machining accuracy. These factors directly influence the quality and efficiency of chamfering operations in UG-CAM.
What are the two primary methods for performing chamfering in UG-CAM?
UG-CAM mainly uses two chamfering methods: forming the chamfer profile directly with standard form tools, and generating the chamfer contour using R-shaped tools such as ball-nose or radius end mills.
Why is chamfering important in mechanical part manufacturing?
Chamfering removes burrs, improves product aesthetics, facilitates assembly, and reduces stress concentration. It is an essential finishing step for enhancing both functionality and appearance.
What are the most common types of chamfers used in machining?
Common chamfer types include bevel chamfers (60°, 90°, 120°), round chamfers, and irregular chamfers composed of straight and curved segments. Each serves different functional and design needs.
How does UG-CAM simplify the creation of chamfering tools?
UG-CAM simplifies tool creation through functions like CHAMFER_MILL for planar milling and COUNTER_SINK for hole making. These intuitive tools align with production requirements and support diverse chamfering tasks.
How can engineers ensure accurate chamfer machining in UG-CAM?
To ensure accuracy, engineers should calculate the actual tool tip length using trigonometric functions before machining or use the theoretical tool tip for programming while referencing the actual tip during setup.
What is the difference between form chamfering tools and custom chamfer tools?
Form chamfering tools are standard tools used for predefined shapes, while custom chamfer tools are designed for complex or irregular geometries and can be generated under the “MILL_USER_DEFINED” section in UG-CAM.
What is the function of tool tracking points in chamfering operations?
Tool tracking points control the contact between the tool and the workpiece, simplifying programming and ensuring precision. They guide the tool’s path but do not affect the final output program points.
How does contour milling improve chamfer machining efficiency?
Contour milling—especially depth contour and fixed-axis contour milling—allows smoother tool paths, fewer passes, and higher efficiency. These methods are ideal for complex or curved chamfer surfaces.
What advantages does UG-CAM offer for advanced chamfering applications?
UG-CAM provides powerful, flexible programming options that support diverse chamfering methods, optimize toolpath control, and enhance machining quality—making it a top choice for precision chamfering in modern manufacturing.
