With the rapid advancement of technology, an increasing number of industrial components featuring complex curved surfaces have emerged.
Consequently, demands for the machining quality and precision of these products have also risen. CNC machine tools are commonly employed to process complex irregular curved surfaces, with machining accuracy and quality typically ensured by the program and the machine tool itself.
Currently, some conventional CNC machines lack probe measurement capabilities. They can only determine the dimensional accuracy of part contours through tool radius compensation based on tool radius and part curves.
Without precise measurement tools, they cannot accurately control the machining dimensions of complex surfaces.
This paper introduces a method utilizing an optical edge finder to measure machining allowances on complex surfaces, enabling control and improvement of dimensional accuracy for complex part surface contours during processing.
Working Principle
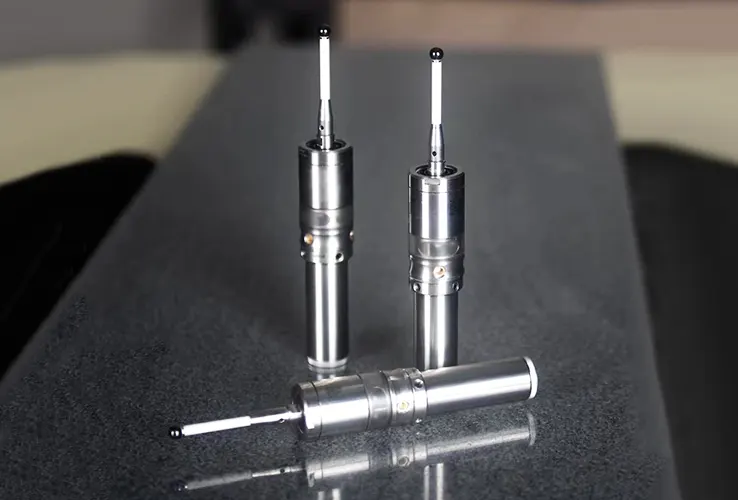
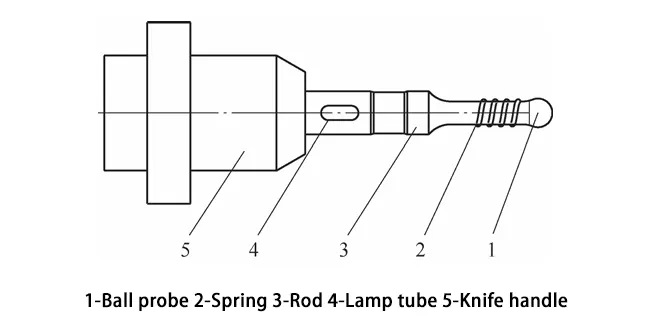
The optical edge finder operates by exploiting the workpiece’s conductivity. When the spherical probe tip contacts the workpiece surface, it forms a circuit, triggering audible and visual alarm signals. Its structure is shown in Figure 1.
The ball probe is spring-loaded to the main body. By combining the indicator readings of the photoelectric edge finder with the machine tool coordinate positions, the coordinate location of the measured surface can be determined.
Leveraging these characteristics, mounting the edge finder on the spindle of a CNC machine tool enables its use for tool setting, alignment, and workpiece measurement.
During alignment or measurement with the photoelectric edge finder, the machine tool spindle remains stationary, ensuring high safety and preventing damage to the workpiece surface.
It also delivers high precision in alignment and measurement, proving highly effective for ensuring positioning accuracy in re-clamping or reworking workpieces.
Optical Method for Curved-Surface Allowance Detection
When machining complex irregular curved surfaces, CNC processes often employ roughing → semi-finishing → finishing for high-precision complex contour curves.
Based on accuracy requirements, the machining area is frequently divided into mating zones and non-mating zones, following a process flow of roughing → non-mating zone (local) finishing → mating zone finishing.
Should unexpected issues arise during machining—such as tool wear or zero-point offset—it becomes necessary to measure the precise stock allowance of the part contour online.
Procedure is as follows:
1) Re-align the workpiece and establish the G54 zero point, ensuring consistency between the zero point, the theoretical model’s WCS (Work Coordinate System) origin, and the programmed zero point.
2) The method for determining machining allowance is shown in Figure 2.
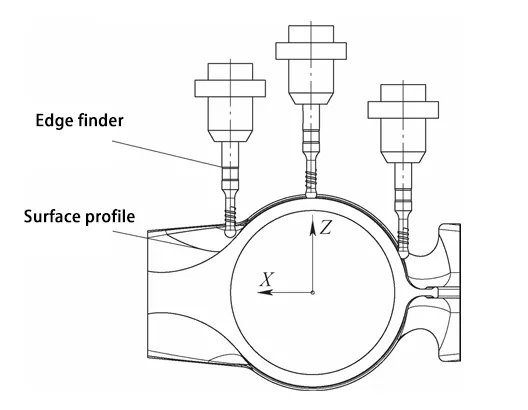
After local finishing, mount the edge finder on the spindle. Manually move the coordinate axes to position the edge finder near the measured contour. Use the photoelectric edge finder to take multiple sample points pn = {p(xi, yi, zi), i=0,1, 2,…,n}false.

3) Record the coordinates of the sampling points Pn false and import the sampling points into the NX part 3D model.
4) Calculate the distance between the actual sampling point coordinates and the theoretical model contour.
Taking a spherical probe as an example, the radius of the spherical probe is D, and the perpendicular distance from the measured sampling point to the theoretical model surface is ds.
If ds > D, there is a machining allowance at this location, equal to ds – D. If ds < D, undercutting occurs at this location, with the undercut amount being |ds – D|.
Where the distance formula from point to surface is:

Where:
- p is the coordinate of the point in space;
- S is the expression of the surface;
- q is the foot point of point p on surface S(u, v), also known as the projection point;
- nq is the unit normal vector of surface S(u, v) at point q, positive when pointing toward q and negative otherwise.
From the formula, it is evident that calculating the precise distance from a point to a complex surface transforms into solving for the unit normal vector nq at that point and fitting a surface to discrete points.
The above calculation is commonly used when dealing with a large number of points. For a small number of points, the ds value can be obtained using NX’s built-in measurement tools on the model, thereby determining the machining status.
5) Based on the determined deviation values, write a CNC program to perform part trimming.
Engineering Applications
Taking the locally complex surface of a non-mating area on a landing gear outer cylinder as an example, local finishing was performed using a VC5A4025HA CNC gantry milling machine (see Figure 3).
A two-sided butt-jointing method was employed, but significant tool marks were observed at the joint after machining the reverse side.
Analysis revealed that zero-point offset caused dimensional deviations during reverse-side machining, necessitating rework.
An optical edge finder was employed to measure machining allowance (see Figure 4), enabling supplementary CNC program adjustments for refinement.
Sample Point Acquisition
A φ10mm ball probe edge finder was selected for sample point acquisition based on workpiece characteristics.
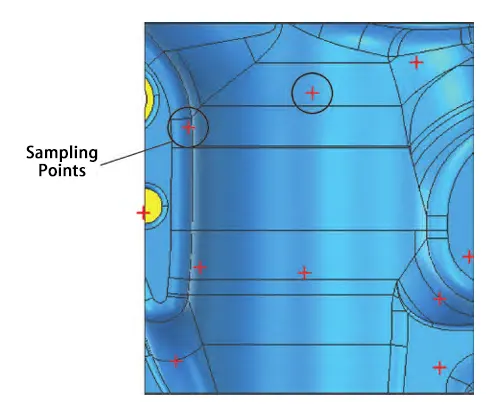
The edge finder sampling is illustrated in Figure 5. Ensuring the WCS aligns with the programming zero point, a series of points were collected at different positions on both the front and back surfaces of the workpiece.
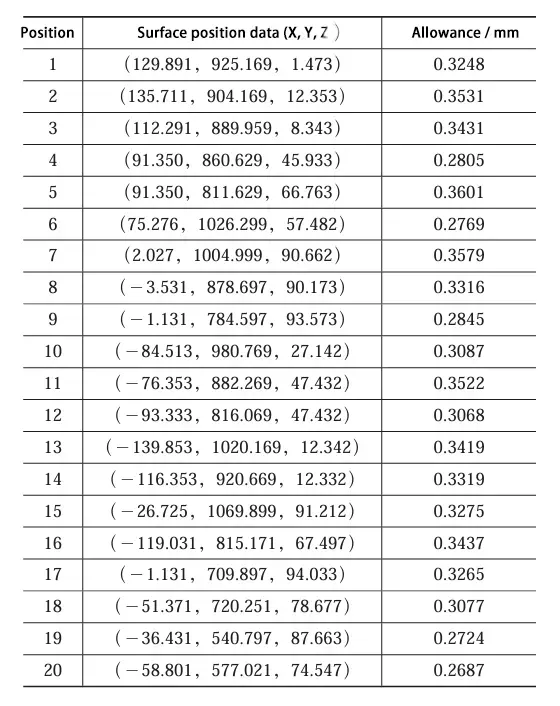
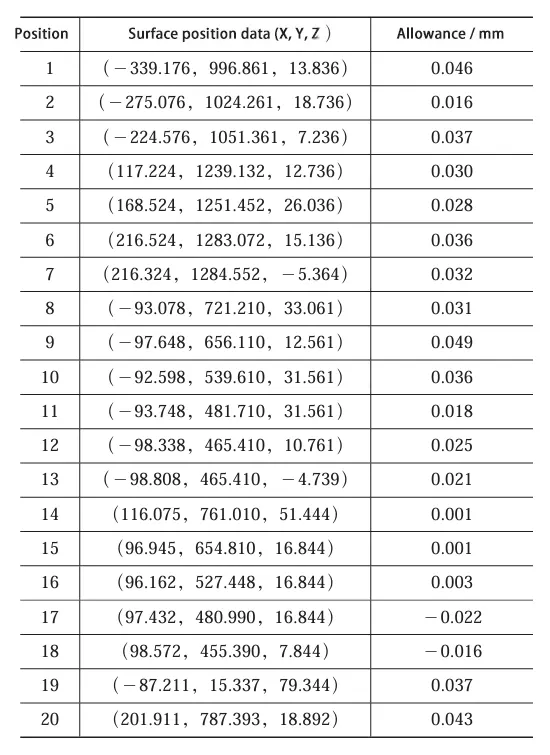
Based on the actual sampling, partial points and the perpendicular distance from the points to the surface (allowance) were organized and calculated.
Measurement points on the front surface are listed in Table 1, while those on the back surface are in Table 2.
Sample Point Import and Calculation
Use the 3D software NX to compare the sample point data. Employ the software’s built-in measurement tools to measure the perpendicular distance from the sampling points to the theoretical model surface. The operational steps are as follows:
1) Consolidate the sampling points into a .dat format file.
2) Optical Detection of Curved-Surface Allowance
Select the “Spline” command, then choose “Through Points,” followed by “Points in File” to import the data into the NX theoretical model.
3) A spline curve fitting the data points appears in the model.
Finally, select “Point Set” to display the imported data points on the theoretical model, as shown in Figure 6.
4) Measure the distance from the sampling points to the theoretical model and record the data.
The machining allowance distribution is shown in Figure 7. Based on the confidence band range, the perpendicular distance from the front-side sampling points to the surface is 0.275–0.350 mm.
The fitted curve indicates the machining allowance distribution stabilizes near 0.30 mm, confirming residual allowance remains on the front side and machining is incomplete.
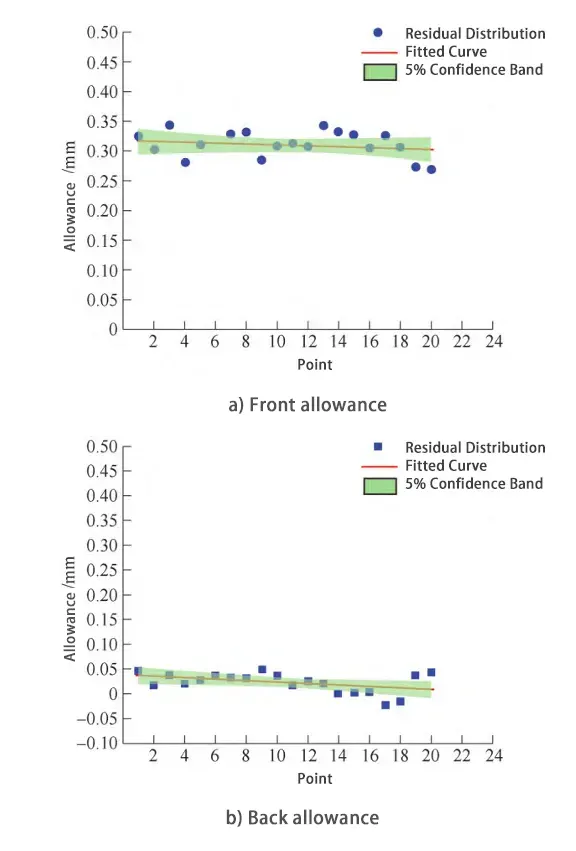
The perpendicular distance from the sample points on the part’s reverse side to the surface ranges from -0.025 to 0.05 mm.
The fitted curve indicates the machining allowance falls within the range of 0 (+ 0.05 to/-0.025) mm, confirming that the reverse side has been fully machined.
Conclusion
As the machining equipment lacked a measuring probe, an optical edge finder was employed to measure both sides of the machined part.
Through analysis and calculation, the respective allowances for the front and back sides were determined. The areas not fully machined were then reworked, ultimately meeting the machining requirements.
FAQ
Why is measuring machining allowance on complex curved surfaces important?
Complex curved surfaces require high precision, especially in industries such as aerospace or machinery manufacturing. Without accurate allowance measurement, issues like undercutting or excessive material can occur, affecting assembly fit, structural performance, and overall machining quality. Therefore, reliable measurement ensures machining accuracy, reduces rework, and guarantees product quality.
Why can’t conventional CNC machines accurately measure complex-surface dimensions?
Many traditional CNC machines lack built-in probe measurement systems. They typically rely on tool radius compensation to estimate contour accuracy, which is insufficient for complex, irregular curved surfaces. Without precise measurement tools, the machine cannot determine exact deviations between the actual machined surface and the theoretical model.
How does an optical edge finder work in curved-surface allowance detection?
The optical edge finder uses electrical conductivity between its spherical probe tip and the workpiece. When contact occurs, it completes a circuit and triggers audible/visual signals. By reading the edge finder’s indicator in combination with CNC machine coordinates, operators can precisely determine the position of the measured surface and collect sampling points for further analysis.
What is the process for determining machining allowance using an optical edge finder?
The procedure includes:
Re-aligning the workpiece and setting the correct CNC zero point (G54).
Collecting multiple sampling points on the curved surface using the edge finder.
Importing the points into NX software.
Calculating the perpendicular distance between each point and the theoretical model surface.
Identifying allowance or undercut and adjusting CNC programs for correction.
How is the distance from a sampling point to a curved surface calculated?
The perpendicular distance is determined by projecting each sampling point onto the theoretical surface model. Using the probe radius D and calculating the shortest distance ds from the point to the surface normal vector, the machining status is evaluated:
If ds > D, machining allowance remains.
If ds < D, undercut has occurred.
NX software can automate these calculations, especially for large numbers of sampling points.
What were the engineering results when applying this optical measurement method?
In the landing-gear outer-cylinder case study, optical edge-finder measurement identified a zero-point offset that caused machining deviations. Sampling and analysis showed residual allowance on the front surface and full machining on the back surface. After correcting the CNC program and reworking the incomplete areas, the final part met dimensional requirements—demonstrating the method’s practical effectiveness.

