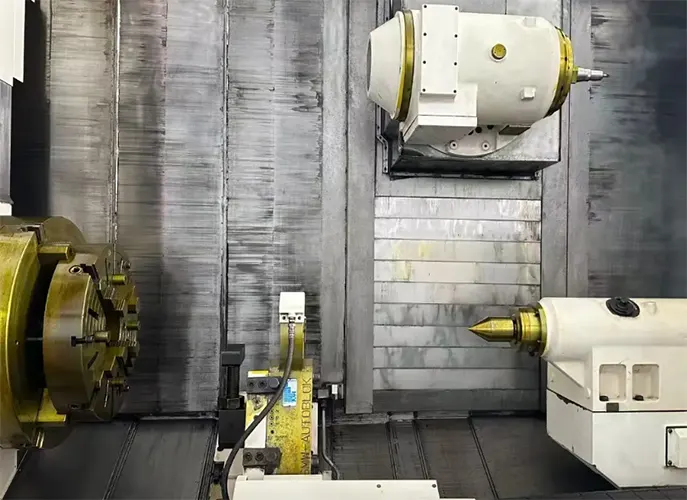
Currently, the MAZAK E670H 6000U-6 m and 4000U-4 m turning-milling composite machines are 7-axis, 5-interpolation turning-milling composite machines.
They integrate turning, milling, drilling, boring, and long-spindle functions, enabling shorter manufacturing process chains and enhanced production efficiency.
They reduce clamping operations, improve machining accuracy, and feature online inspection capabilities for precise dimensional control.
Primarily used for processing disc-shaped and shaft-type components such as rotor shafts, rotor bodies, and conical screws, as well as parts with complex curved surfaces.
Turning–Milling Machining of Large Rotor Shafts
Today, we explore and analyze the turning-milling composite process for large shafts using a large rotor shaft as an example.
First, the rotor shaft is the core component of a closed-type mixer, representing the largest and most precision-demanding shaft part in the equipment.
With a length of 4 m, diameter of 520 mm, and gross weight of approximately 5 t, it qualifies as a large shaft component.
Traditionally, rotor shaft manufacturing involved multiple processes including turning, grinding, layout marking, and drilling.
This approach resulted in fragmented operations and extended manufacturing lead times.
Large-scale turning-milling integrated applications remain rare, particularly within the internal mixer industry, leaving few established processing precedents.
This paper investigates the machining workflow for turning-milling finishing operations, focusing specifically on the integrated use of hardware and software—namely the MAZAK E670H-6000U machine tool and ESPRIT software.
Machine Tool Structure
The MAZAK E670H-6000U features 7 axes: X, Y, Z, B, C, W, V axes with 5-axis simultaneous capability.
It has X-axis travel of 1025 mm, Y-axis travel of 670 mm, Z-axis travel of 6170 mm, a 24″ hydraulic chuck, center support range of 350–700 mm, high-thrust centers, and a maximum load capacity of 7 tons.
It is equipped with a high-torque, high-performance spindle: the main spindle delivers 45 kW, and the milling spindle delivers 37 kW.
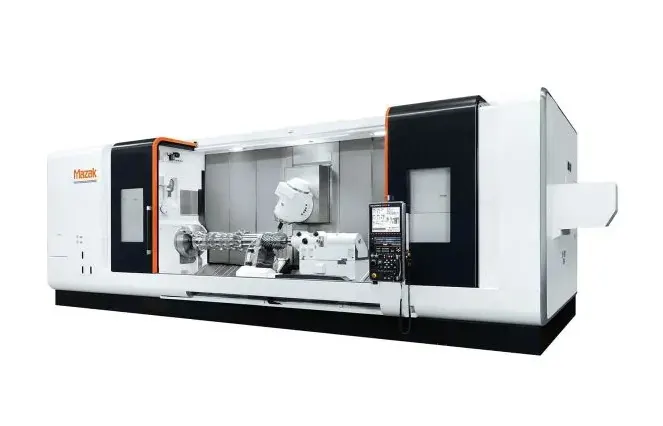
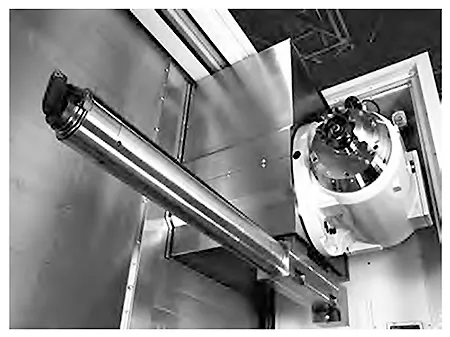
Equipped with LBB long boring bar system as shown in Figure 2, utilizing Sandvik vibration-damping boring bar. Overall length: 1.8 m; internal length: 0.5 m; effective boring length: 1.3 m.
Part Structure
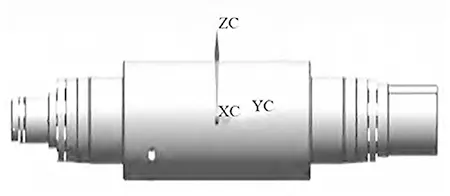
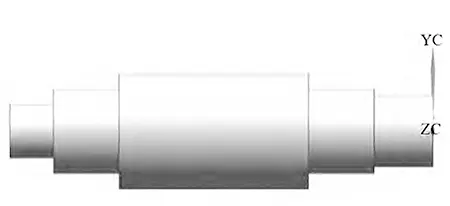
GE1000T rotor shaft as shown in Figure 3, material: 45 steel, quenched and tempered hardness HB220-260, length 4000mm, maximum diameter 520mm.
Key radial features include: Outer circle, square groove, relief groove, arc groove, left-hand and right-hand trapezoidal external threads, metric external threads, D10 oil injection hole, D60 water outlet hole, dual keyway.
Axial: D15 lubrication hole, RC3/4 thread, D95-1.5 m and D80-2.5 m deep holes, end plate holes D110, M48 lifting holes, M10 threaded holes, etc. Surface roughness Ra1.6.
Machining Challenges
Dimensional Control
Outer diameter tolerance: 0.03 mm; geometric tolerances: concentricity 0.03 mm, roundness 0.02 mm, runout 0.02 mm.
Achieving precise control over all dimensional and geometric tolerances requires completing all turning operations on the non-clamping end in a single setup.
Surface Roughness Control
The entire shaft requires a surface roughness of Ra 1.6, ensuring uniformity, stability, and consistency of roughness.
Tool Selection
The mating section with the rotor body measures 2,000 mm in length and 520 mm in diameter. As a mating dimension, it must be machined in a single setup.
High-speed turning with VC250 requires 1.5–2 hours, with wear controlled at 0.01–0.02 mm, imposing extremely high demands on tooling.
Deep Hole Machining
D15, depth 800 mm, representing 55 times the diameter.
Process Design
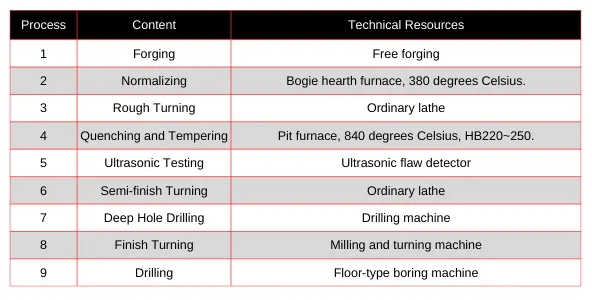
Process design details are shown in Table 6.
Step 6 performs semi-finishing turning on a conventional lathe. This primarily removes the black skin formed after tempering, flattens both end faces to the required 4,000 mm dimension, reserves precise machining allowance for finishing, and machines process holes in both end plates along with M48 lifting holes.
Here we emphasize the advantages of performing Operation 6 on a conventional lathe.
Although mill-turn machines possess robust machining capabilities, their application must be comprehensively evaluated based on product requirements to avoid excessive process concentration.
(1) Machine Tool Aspects
Taking a medium-sized rotor shaft as an example: length 3.5 m, diameter 350 mm. After tempering, the shaft’s midsection may exhibit bending, potentially reaching 3–5 mm.
The mill-turn machine uses a 24″ hydraulic three-jaw chuck that cannot be adjusted. The conventional lathe employs a four-jaw chuck, which is more easily adjustable.
(2) Production Costs
Performing semi-finish turning on a conventional lathe to remove the black skin after quenching and tempering facilitates subsequent machining on the turning-milling center, reducing tool and machine wear.
Non-critical dimensions can be machined here, minimizing operations on the turning-milling center and preventing excessive process concentration.
(3) Drilling deep holes after semi-finish turning is preferable to drilling them after finish turning, as it avoids surface scratches during part transfer.
(4) Process 9 can be performed on a floor-type boring machine, though efficiency will be slightly lower. This falls under capacity balancing considerations.
Semi-Finish Turning of Blank
The semi-finished blank after turning is shown in Figure 4. The flat end face dimensions are accurate, Drill the end plate holes and M48 lifting holes at both ends.
Since we use Sandvik CNMG120408-PR 4425 inserts—which require 12HP high-pressure internal cooling and a 3 mm single-side cutting depth for optimal chip breaking—process 6 ensures a 3 mm single-side allowance.
This primarily accounts for the tooling used to guarantee effective chip breaking.
Positioning and Mounting
For positioning and mounting, set up components as shown in Figure 5, including a chuck, center frame, and center point.
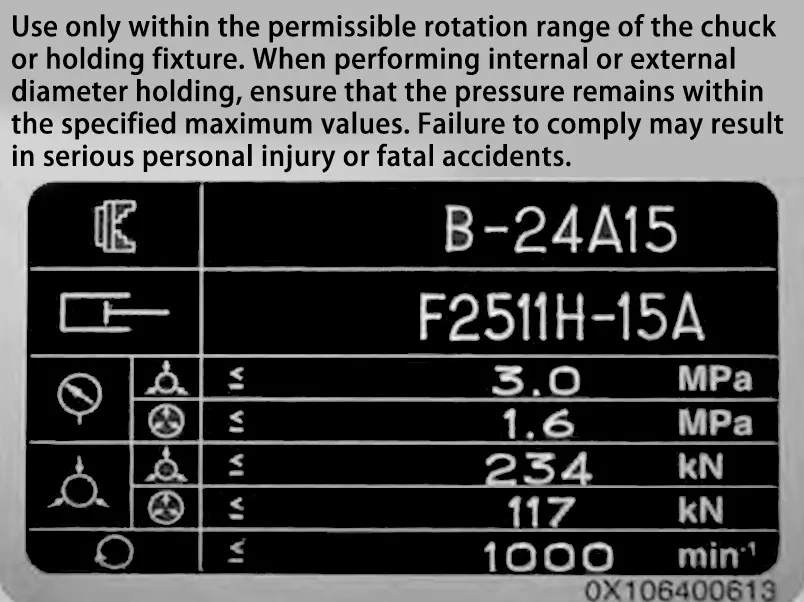
Soft Jaws
Soft jaws maximize repeatable positioning accuracy, ensuring the workpiece centerline perfectly aligns with the spindle centerline.
Crucially, they achieve optimal surface contact with the workpiece, enabling higher torque transmission while preventing damage. Use soft jaws for high-precision shaft components; hard jaws are suitable for milling rotor body parts.
Setting Parameters
Using a 5-ton part as an example: hydraulic chuck clamping force 3 MPa, center support clamping force 2 MPa, center thrust 5 MPa.
The machine’s maximum center thrust is 7 MPa. For machining approximately 7-ton parts, the conversion is roughly 1 MPa = 1 ton.
Block Plate Installation
Install the process block plate on the right end of the rotor shaft as specified.
Part Hoisting
Hoist the part as specified. Due to its weight, exercise caution for safety.
6.5 Center Position Recording
Use M841 to record the center zero position. After installing the workpiece and engaging the center, record this position using M842.
Cutting Tools
Brief descriptions are provided only for finishing turning tools, trapezoidal thread turning tools, and gun drills.
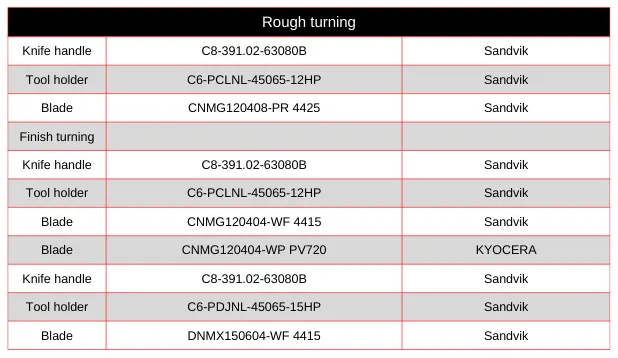
Finishing turning tools from multiple manufacturers were tested (see Table 2). Comprehensive factors such as turning quality and stability, chip breaking capability, and cost must be considered.
This document only references Sandvik 4415 carbide and Kyocera PV720 ceramic tools, which were tested under specific conditions and are provided for reference only.
Finish Turning Tools
Processing Parameters: All test conditions were standardized at Vc=200 and 250, Fn=0.12 mm/r, Ap=0.3 mm. Sandvik requires a cutting speed of 250 m/min, maintaining at least 200 m/min, while Kyocera accepts both 200 and 250 m/min.
(1) Tool Geometric Angles: For C-type 80° tools, only 04-radius options are suitable; 08-radius causes chatter marks. Both Sandvik CNMG120404WF4415 and CNMG120404-WP PV720 are viable.
However, for extended cutting durations, Sandvik tools meet longevity requirements. Overall, D-type 55° tools are also acceptable and offer smoother turning.
(2) Tool Radius: R0.4 or R0.8. For C80° tools, R0.4 is preferable as R0.8 may cause chatter. Sandvik’s CNMG120404-WF 4415 offers extended tool life for 4415 material machining.
When turning mating ends, dimensions remain stable during continuous 1.5–2 hour operations. For D-series 55-degree tools, the 04 radius can be used. Sandvik’s DNMX150604-WF 4415 is recommended.
(3) Chip breaking capability: Under high-pressure M103 conditions, Kyocera’s WP flute type exhibits strong chip breaking capability, producing short, flake-like chips.
(4) Tool Life: Sandvik 4415 exhibits extended tool life, capable of machining 4–5 m. Sandvik is the preferred choice for turning carbon steel.
Gun Drills
Recommended indexable gun drills (see Table 3) are suitable for high-feed machining with feed rates exceeding brazed gun drills.
The indexable insert system significantly reduces tool management costs by eliminating the need for regrinding drills. Indexable gun drills simplify operator use and handling.
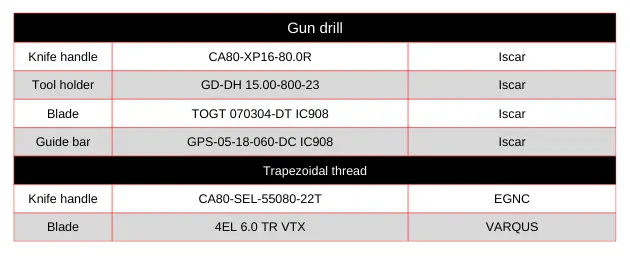
(1) Trapezoidal Threads: Using VARGUS’s VRX series enables higher linear speeds and improved machining efficiency. When turning P6 threads with radial feed, high-quality threads can be achieved.
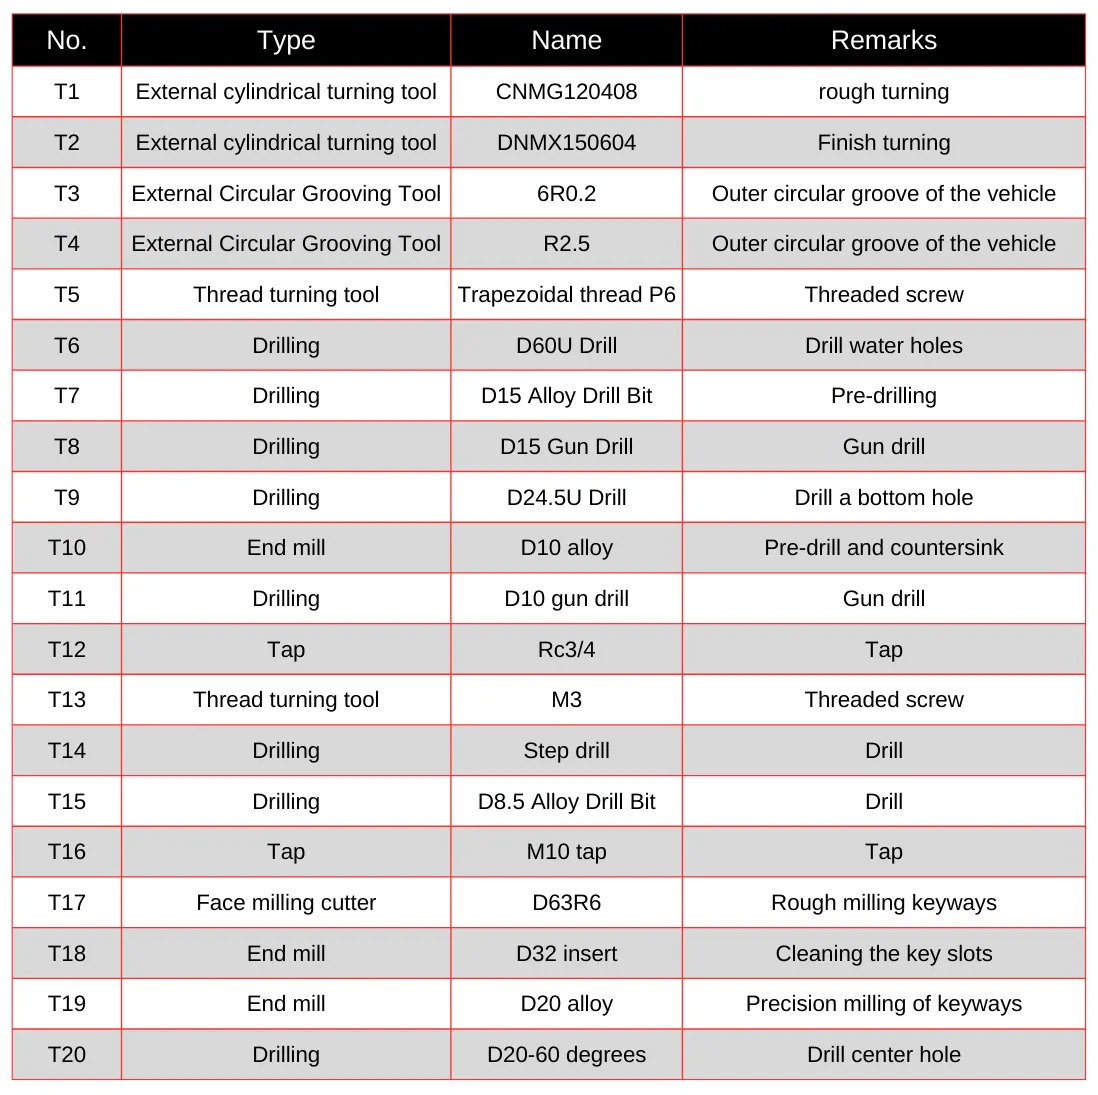
Table 4 lists the tool types required for each machining step, their custom names, and brief details of each tool’s machining content. Due to the extensive range of tool grades, specific grades are not included.
Process Design
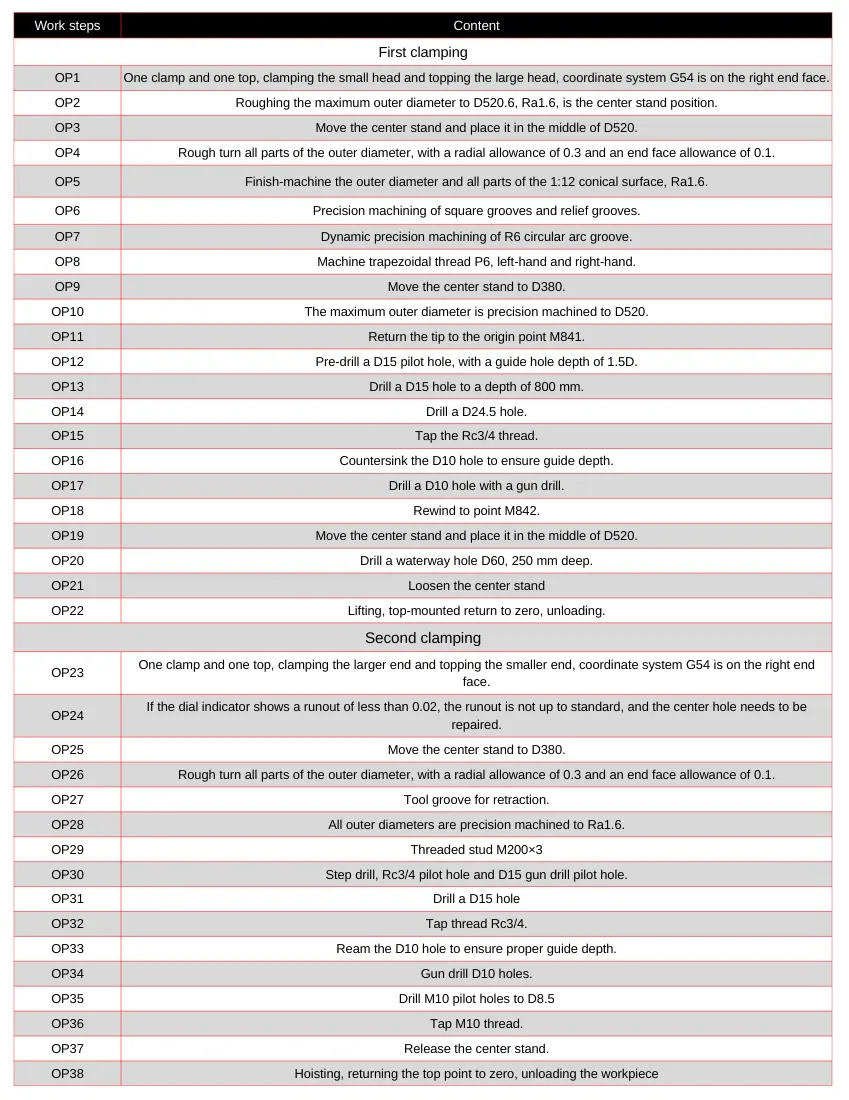
Table 5 outlines the process sequence and brief descriptions for each operation in the turning-milling composite finishing process. The overall process route design demonstrates that 90% of the machining is completed in a single setup.
This not only achieves high machining efficiency but also effectively ensures dimensional and geometric positional accuracy, fully leveraging the advantages of turning-milling composite machining.
Processes and related resources can be flexibly adjusted based on actual requirements. This document is for reference only.
Below is a brief breakdown of key considerations for specific operations during machining.
OP1 Setup
As shown in Figure 6, after installing the part, set the M842 position. Set G54 at the right end face of the part. Using a Renishaw probe, measure the machining origin of the part and set the coordinate axes on the machine tool.
Center Support Positioning
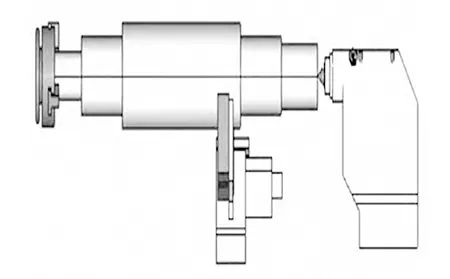
Position the center support at the shaft’s midpoint as shown in Figure 7. A surface roughness of Ra 1.6 is recommended for the support surface. Install soft material protection on top of the center support as illustrated in Figure 8.
During rough turning, chip formation occurs in blocky patterns. Regardless of the turning direction (left-to-right or right-to-left), chips flow toward the center.
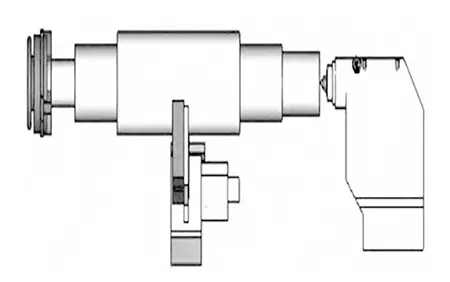
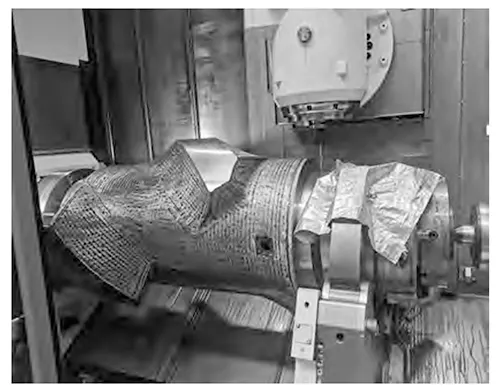
These chips can easily bounce into the center support rollers, damaging both the support and the workpiece. To effectively address this issue, attach magnets to the left and right surfaces of the center support.
OP4 Rough Turning
Rough turning radial allowance: 0.3 mm; face allowance: 0.1 mm. Avoid excessive face allowance—0.1 mm is optimal.
Using Sandvik CNMG120408 inserts with Ap ≥ 3 mm ensures reliable chip breaking. In CAM software, ensure optimized equal-interval cutting depth for rough turning to guarantee effective chip breaking.
OP5 Finishing Turning
Finish turning all external circles. Set the spindle speed to CCS. Given the wide variety of rotor shaft models, configuring linear speed and maximum RPM saves programming time and eliminates complex calculations.
Of course, automated programming is now standard—especially for high-end equipment—where speeds can be automatically calculated for each section based on your needs and preferences.
G92 S250 R1
G96 S200 P1 R1 M204
Finish turning all tapered surfaces. Set the spindle speed to RPM and maintain a constant rotational speed.
G97 S200 R1 M204
For turning/milling small diameters, higher spindle speeds are required. MAZAK machines have two speed ranges: use M238 for speeds below S320 and M239 for speeds above S320 to control the spindle speed range.
OP6 Dynamic Turning
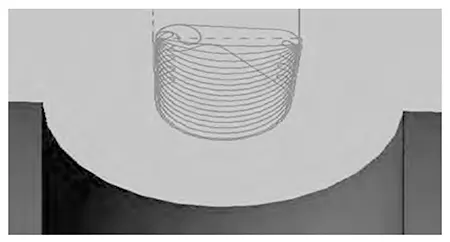
Employing ESPRIT’s Profit dynamic turning with cycloidal motion reduces slot turning time by 50%, enables smoother curved paths, and minimizes tool wear.
Gun Drilling
Previously, pilot guides used guide sleeves for gun drilling. Now, in machining center applications, a pilot hole replaces the guide sleeve (as shown in Figure 10).
The pre-drilled pilot hole diameter is slightly larger than the gun drill’s basic dimensions, with a length approximately 1.5 times the diameter.
This allows the subsequent gun drill entering the machining state to use the pilot hole as a guide sleeve.
The fit between the gun drill’s guide bar and the pilot hole’s guide bar ensures straight-line feed of the gun drill.
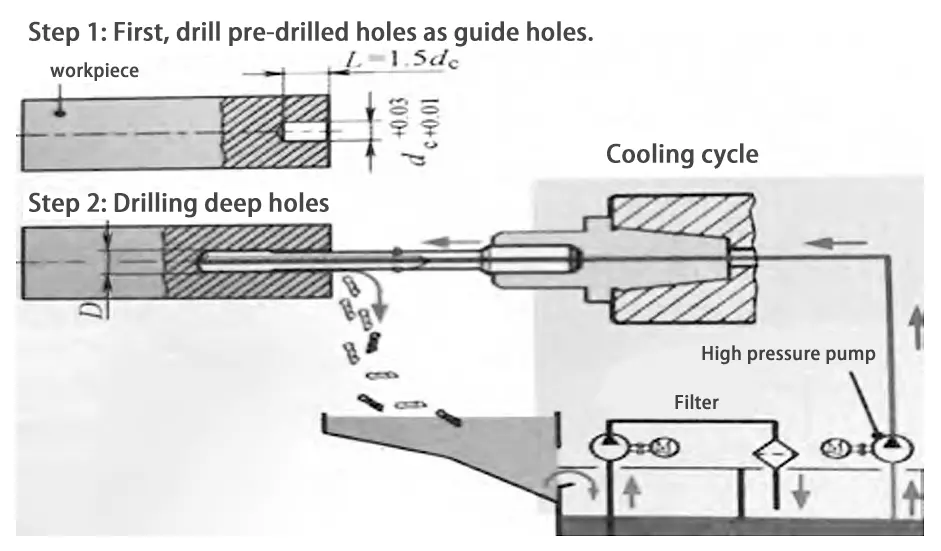
Insufficient guide hole length may cause gun drill deflection, vibration, or even breakage. Guide holes that are too large or too small hinder oil film formation between the guide bar and the hole, accelerating guide bar wear.
For the D15 hole with an 800 mm length described herein, the pilot hole is pre-drilled using a D15 alloy drill bit, with a tolerance of D15 (+0.015 to 0.04), and a drilling depth of 1.5D = 22.5.
Before the gun drill enters the pilot hole, turn off the cutting fluid. Enter the pilot hole at a low speed and feed rate. When 1–2 mm from the bottom, set the speed and feed to normal values for machining. Activate high-pressure internal cooling.
After drilling, turn off the cutting fluid and retract the tool. See Figure 11 for the basic motion code.
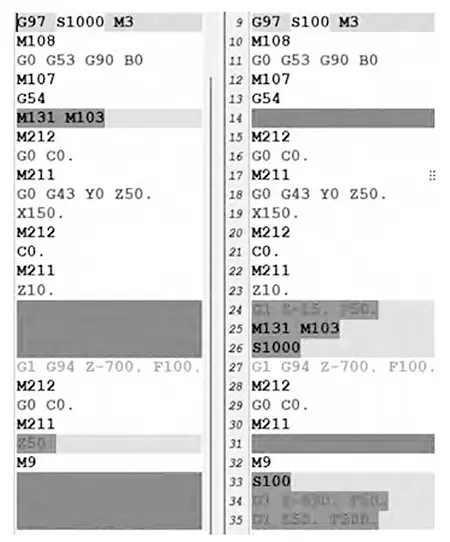
Some standard requirements for gun drill pilot holes are shown in Figure 12. Refer to this table and adjust parameters as needed based on actual requirements.

Machining Parameters
Table 6 lists tool linear speeds and feed rates per revolution or per tooth. These values are based on a rotor shaft material of 45 steel, quenched and tempered to HB 220–250, with a maximum outer diameter of D520 mm and length of 4,000 mm. Due to potential variations in tools and machining conditions, these parameters are for reference only.
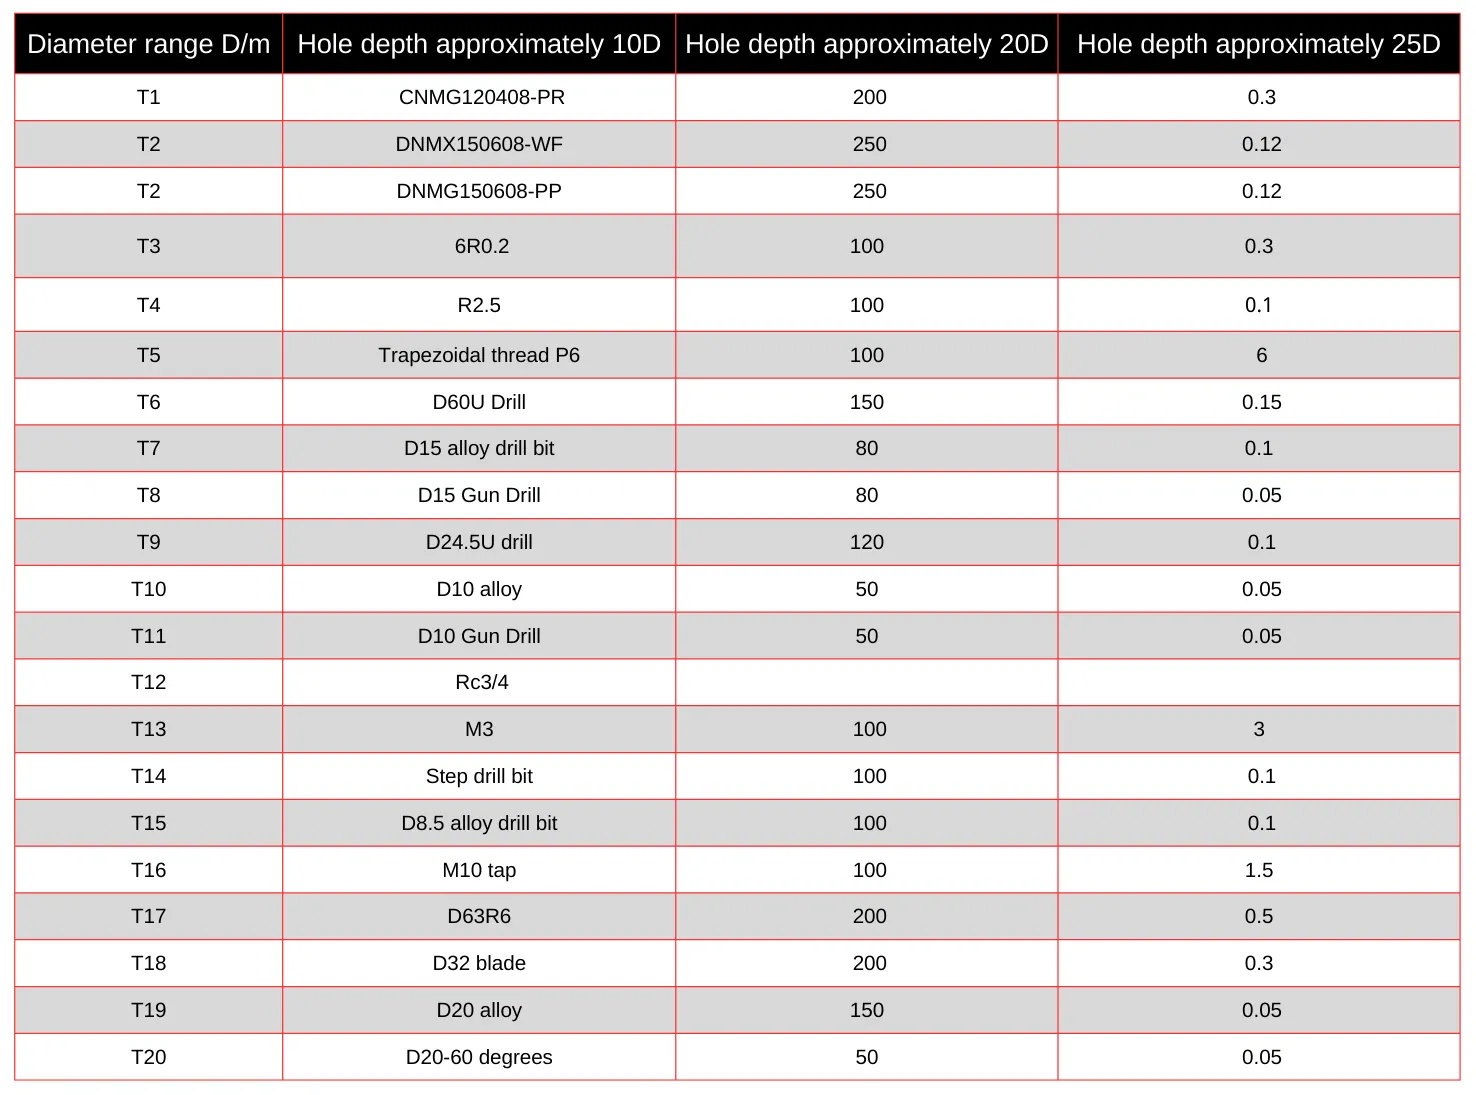
Since rotors are categorized as through-shaft or monolithic types, when machining monolithic rotors during shaft turning, significant centrifugal forces arise due to the irregular curved surface of the rotor body.
Based on actual conditions, appropriately reduce the linear speed to approximately Vc 150-200.
Hardware, Software, and NC
Tool Setup
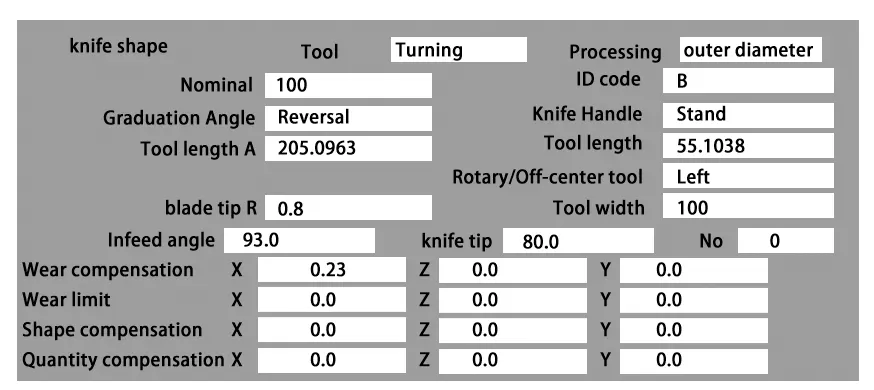
Turning tools are categorized as left-hand, right-hand, or center-mounted.
Our tools are uniformly left-hand. ID code A corresponds to T01.01, with the indexing angle standard facing the operator to achieve right-to-left turning.
B corresponds to T01.02, with the indexing angle reversed away from the operator to achieve left-to-right turning.
Thread Machining
The following code outlines the basic format for MAZAK thread cycles. The table details control methods for tool holder orientation and direction when machining trapezoidal and metric external threads.
The code below represents machining a right-hand thread with the same tool.
This can be used to derive the direction for left-hand threads, right-hand threads, and machining both left- and right-hand threads with a right-hand tool.
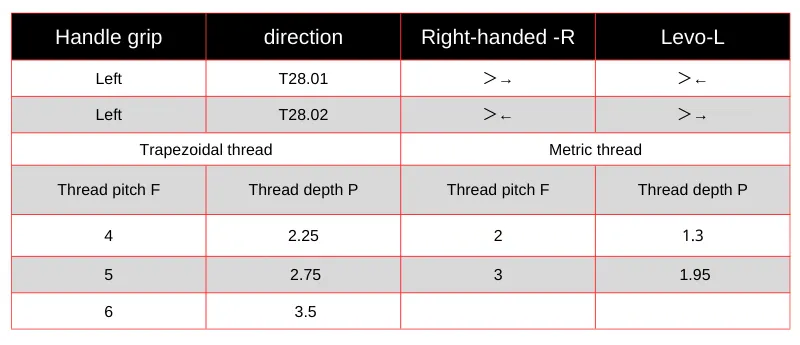
Trapezoidal Threads: Thread depth P = 0.5F + ac; P = 1.5~5 ac = 0.25; P = 6~12 ac = 0.5; P = 14~44 ac = 1
Metric Threads: Thread depth P = 0.65F.
Cooling System
High-pressure cooling involves elevating the cutting fluid pressure to a specific level, then precisely directing it through internal channels to the cutting zone for rapid cooling.
This method yields excellent results for turning tools, U-drills, and gun drills, as shown in Table 8.
However, ceramic milling cutters, CBN tools, and similar materials are not suitable for coolant application.
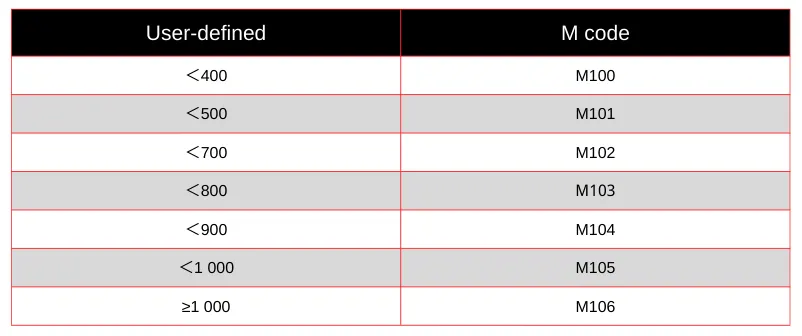
(1) From the perspective of cooling effectiveness.
High-pressure cooling technology precisely directs sufficient coolant directly onto the cutting zone of the insert, maximizing heat removal from the cutting area to achieve rapid cooling.
(2) From the perspective of chip control capability.
High-pressure cooling not only effectively reduces cutting heat but also increases the brittleness of chips, making them easier to break.
(3) Tool Life Perspective
High-pressure cooling reduces tool wear and extends tool life. While increasing cutting speed typically accelerates tool wear, employing high-pressure cooling allows for higher feed rates without a significant reduction in tool life.
(4) High-pressure cooling pressure can be configured within ESPRIT.
Pressure is controlled using M131 M100 or M131 K650. Typically, the mid-range setting M103 suffices.
Dimensional Control
(1) In CAM software like ESPRIT, set all dimensions with precision requirements to the mid-value tolerance. Dimensions without precision requirements should be set to zero tolerance.
(2) During actual machining, select dimensions without tolerances or with lower requirements.
After machining, measure the dimensions and subtract the measured values from the programmed dimensions to obtain compensation values within the machine tool.
If the test-cutting area has precision requirements, modify the CNC program or perform test-cutting after compensation within the machine tool. After test-cutting, perform wear compensation as shown in Figure 15.
(3) After machining both ends, replace the tool before machining the middle section and repeat step 2.
Machining Site
Figure 16 shows the GE1000T at the machining site.
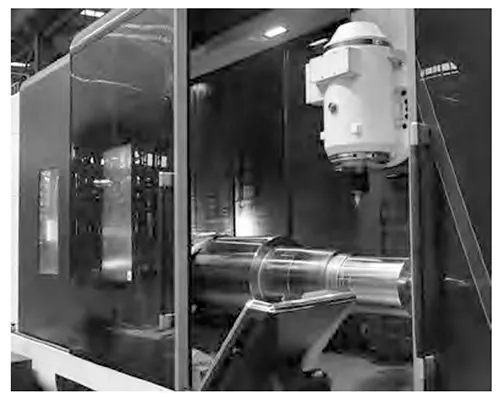
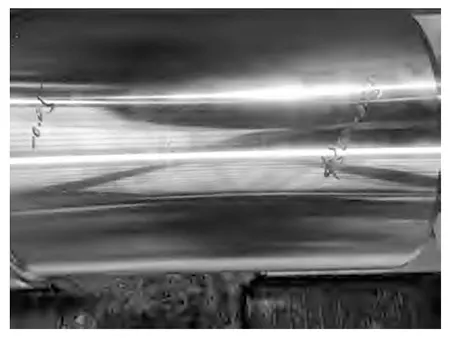
Figure 17 shows partial measurements of the GE1000T shaft. The outer diameter dimensions are stable. Measurements taken with a handheld roughness tester, calibrated using a standard gauge, indicate the rotor shaft roughness achieves Ra 0.8–1.0.
Center Frame and Tailstock Control
(1) Center Frame
The MAZAK E670H-4000U center frame has a clamping range of D135-D460, while the MAZAK E670H-6000U center frame clamps D350-D700. Part machining is scheduled according to these clamping ranges.
(2) Tailstock
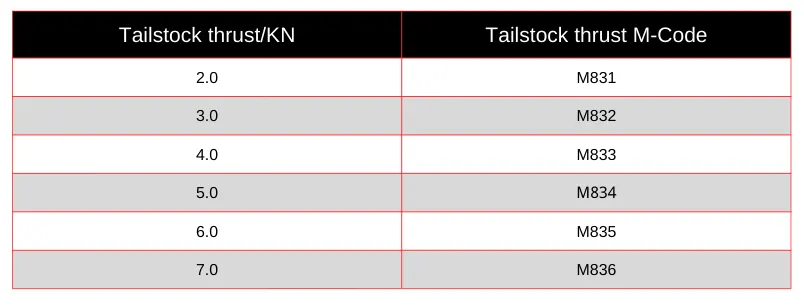
Tailstock thrust control is specified in Table 9.
M841 positions the tailstock to “Position 1” as entered in the set data.
M842 positions the tailstock to “Position 2” as entered in the set data.
M831 Tailstock Thrust Command specifies the tailstock thrust force.
Application of Rolling Process
Although we achieved “turning instead of grinding” for large shafts through turning, a rolling process was added to further enhance surface roughness control for greater reliability.
(1) Selection of Rolling Tools
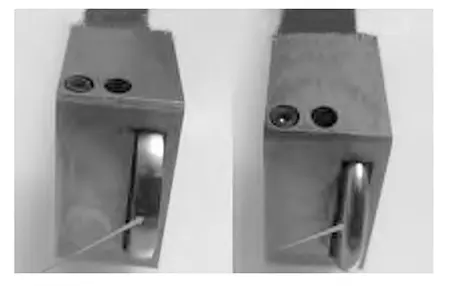
Various rolling tool types exist, as shown in Figure 19, including common diamond and carbide rollers.
How should one choose for large components?
For extended rolling durations—such as rotor shafts—diamond rollers may carbonize over time, making carbide rollers preferable.
(2) Rolling Parameters
Based on testing and manufacturer recommendations, and after considering economic factors, we selected domestic brands priced at approximately 3,000 yuan, while imported options typically range from 15,000 to 20,000 yuan.
The team referenced process parameters from domestic rolling tool products.
After multiple trials on HB220-260 quenched and tempered steel, the following conditions were determined: linear speed 50 m/min, compression depth 0.2–0.3 mm, feed rate 0.3 mm per revolution.
Conclusion
Taking the GE1000T rotor shaft as an example, this paper designed a complete machining process route, established a turning-milling composite process, developed a clamping scheme, and selected cutting tools.
Utilizing ESPRIT programming and a MAZAK E670H 6000U machine, after optimizing various process parameters and tools, excellent results were validated in batch production.
This approach consolidated multiple machining operations—previously requiring turning, milling, drilling, boring, and scribing into a single-station operation.
This approach achieves turning-based grinding and deep-hole drilling—previously challenging processes—significantly reducing labor and material costs while boosting production efficiency.
Rotor shaft machining efficiency doubled, and deep-hole drilling speed increased fivefold, meeting mass production demands.
This demonstrates that turning-milling composite machining shortens process chains, reduces cycle times, and minimizes equipment occupancy, aligning with future CNC machining trends.
Integrated turning-milling equipment remains scarce, with limited technical documentation and reference experience available for specialized fields or product machining.
This necessitates starting from scratch to research and explore solutions for various machining challenges.
After extensive experimentation, the team successfully applied this process technology to machine rotor shafts for all internal mixer models.
It provides valuable reference for future machining of similar shaft-type components.
FAQ
Impedit egestas aliquet?
Lorem ipsum dolor sit amet, consectetur adipiscing elit. Ut elit tellus, luctus nec ullamcorper mattis, pulvinar dapibus leo.
Sapien class quo temporibus?
Lorem ipsum dolor sit amet, consectetur adipiscing elit. Ut elit tellus, luctus nec ullamcorper mattis, pulvinar dapibus leo.
Elementum voluptate sodales?
Lorem ipsum dolor sit amet, consectetur adipiscing elit. Ut elit tellus, luctus nec ullamcorper mattis, pulvinar dapibus leo.

