Table of Contents
In modern manufacturing, the performance and quality of milling cutters directly impact machining precision and efficiency. Surface defects such as chipped edges, burrs, pits, and black skin reduce tool life and increase costs.
Therefore, accurate detection of milling cutter defects is crucial. Traditional manual inspection is inefficient and lacks consistency.
While machine vision technology has improved detection efficiency and accuracy, existing methods primarily focus on cutting edges, with insufficient research on defects like black skin and pitting.
Common algorithms (such as image difference and template matching) struggle to accurately locate defects. They cannot rapidly and precisely extract chipping and burr defects, nor can they detect pitting and black skin defects.
This paper addresses milling cutter surface defect detection, primarily divided into three sections:
① Image preprocessing for milling cutters, establishing image acquisition, denoising, enhancement, and sharpening workflows tailored to different defects;
② An improved inflection point detection algorithm based on machine vision for locating chipped edges and burrs;
③ A combined image difference algorithm with inter-frame difference technology for identifying pits and black skin defects.
Milling Cutter Image Preprocessing
Before detecting surface defects, milling cutter images must undergo careful preprocessing to ensure defect features are visible and distinguishable. Proper image acquisition, noise reduction, and enhancement techniques create a solid foundation for accurate identification of chipping, burrs, pits, and black skin, improving both detection efficiency and reliability.
Milling Cutter Surface Defects
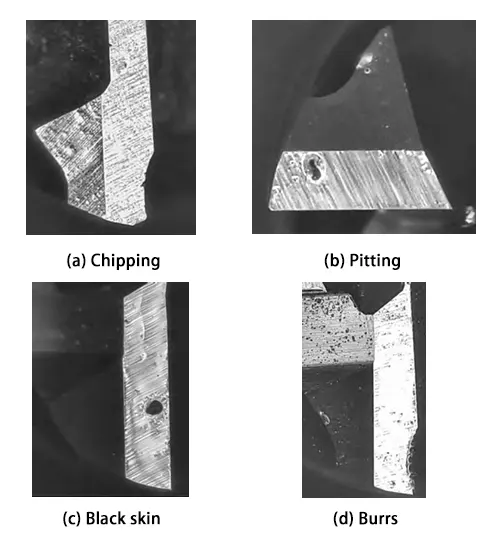
During milling operations, surface defects (e.g., chipping, burrs) often result from improper handling (such as excessive material removal or suboptimal tool parameter settings), leading to non-uniform stress distribution and subsequent material loss at the cutting edge.
Pitting defects originate from collisions between the milling cutter and hard objects, accelerating oxidation to form black skin (black patches or films).
These require additional machining for removal, increasing costs and time while degrading cutter performance and machining quality.
Common types of milling cutter surface defects are shown in Figure 1.
Milling Cutter Image Acquisition and Noise Reduction
When capturing milling cutter surface images, appropriate light sources and illumination schemes must be selected based on defect types.
Chipping and burrs are edge-type defects primarily concentrated along the cutter’s cutting edges; pitting and black skin are area-type defects frequently appearing on the cutter body.
For detecting milling cutter surface defects, this study employs a customized hemispherical elliptical LED illumination source to capture cutter images under varying lighting conditions.
Images captured under strong illumination clearly reveal contour features along the cutting edge, facilitating identification of chipped edges and burrs.
while images under low-light conditions highlight the milling cutter body’s detailed features, aiding in the accurate identification of pitting and black skin defects.
Milling cutter images acquired under different lighting conditions are shown in Figure 2.

Necessity of Image Denoising During Acquisition
During the acquisition or transmission of milling cutter images, interference from numerous random signals often occurs.
Therefore, image denoising is required. Mainstream image denoising methods fall into two categories: filter-based and model-based approaches.
Filter-based methods reduce noise by designing filters (e.g., mean filtering, Gaussian filtering, bilateral filtering). Model-based methods perform denoising based on image statistical models (e.g., Wiener filtering).
Since model-based methods require establishing statistical models for each sample, increasing detection time and workload while reducing universality, this paper employs filter-based methods for milling cutter image denoising.
Bilateral filtering and wavelet transform filtering were applied to milling cutter images under strong illumination, with results shown in Fig. 3.
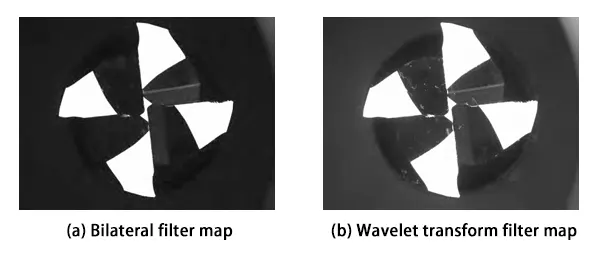
Wavelet transform filtering demonstrates poor performance in removing background noise from milling cutter images and tends to blur cutting edge contours.
Bilateral filtering, however, effectively reduces noise while preserving edge information. It is suitable for detecting milling cutter edges, pits, and black skin areas while eliminating background noise.
Therefore, bilateral filtering is adopted in this paper for milling cutter image denoising.
Enhancement and Sharpening of Milling Cutter Images
During milling cutter image acquisition and processing, defect areas exhibit high similarity to normal regions, making them difficult for detection algorithms to extract.
To address this, this paper employs linear grayscale transformation to enhance milling cutter images after filtering and noise reduction, highlighting differences between defective and normal regions.
The results are compared with histogram equalization effects. Linear grayscale transformation extends the original image’s grayscale dynamic range linearly to a specified range or the entire dynamic range.

where:
- a, b are the minimum and maximum gray levels occupied by the original image;
- c, d are the minimum and maximum gray levels occupied by the enhanced image.
The effects of different enhancement methods on milling cutter images are shown in Fig. 4.
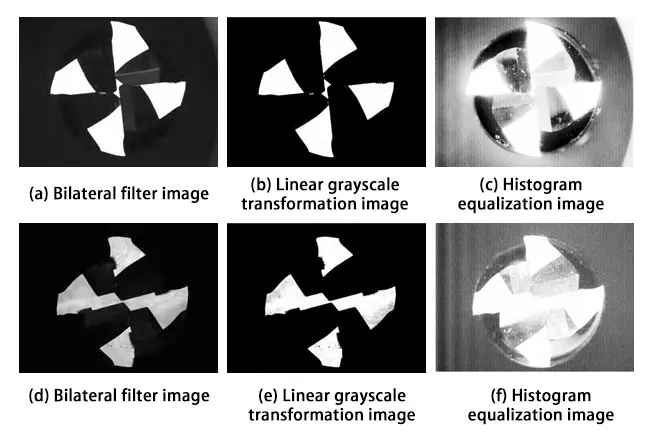
As shown in Fig. 4, the histogram equalized milling cutter image exhibits excessive background enhancement, reducing the contrast between defects and normal areas and hindering accurate defect identification.
In contrast, the linear grayscale transformation enhancement algorithm employed in this study significantly enhances both high-light edges of the milling cutter and low-light defects like black skin, while eliminating residual background noise after bilateral filtering.
Therefore, the linear grayscale transformation algorithm is selected for milling cutter image enhancement in this study.
Edge Sharpening Strategy Under Different Illumination Conditions
Image sharpening enhances edges and details by amplifying high-frequency components. Common algorithms include the Robert operator, Sobel operator, and LOG operator.
For milling cutter images enhanced by linear grayscale transformation under strong illumination, edge sharpening is applied to highlight chipping and burr defects along the cutting edge.
For milling cutter images under low illumination, sharpening is omitted since it alters areas with black skin or pitting defects.
The sharpening effects of different operators are shown in Figure 5.
Figure 5 indicates that the Robert and Sobel operators fail to extract milling cutter edges completely, with indistinct centers and poor sharpening results.
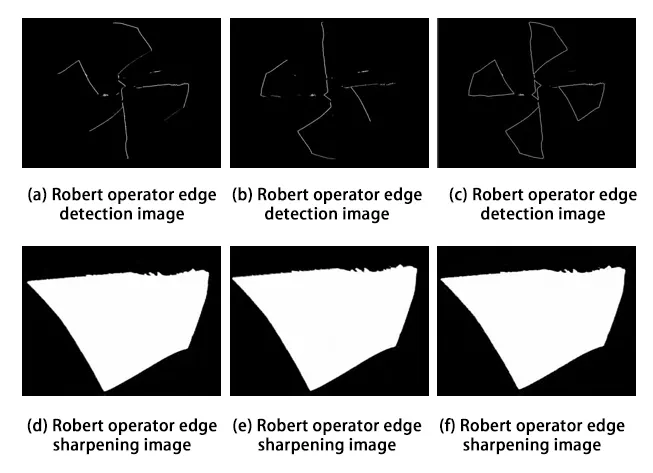
Conversely, the LOG operator combined with Gaussian filtering and Laplacian detection effectively eliminates noise and precisely extracts sharpened milling cutter edges.
Therefore, this paper adopts the LOG operator for edge sharpening.
Improved Multi-Curvature Fusion Inflection Point Detection Algorithm
While traditional multi-curvature fusion inflection point algorithms detect changes along milling cutter edges, they struggle to distinguish actual defects from normal edge variations.
Enhancing this algorithm with machine vision techniques allows for more precise identification of chipped edges and burrs, reducing manual intervention and improving detection accuracy.
Limitations
The multi-curvature fusion inflection point detection algorithm calculates curvature based on milling cutter contour coordinates. While it effectively detects curvature changes along the overall cutting edge, it still suffers from the following issues:
(1) The diversity of milling cutter edges results in detection outputs containing numerous standard corners. This only reflects curvature variations and fails to accurately identify chipped edge or burr defect regions.
(2) The algorithm’s results cannot directly distinguish between defect areas and normal cutting edge features, requiring manual verification.
When marking edge curvature transitions, inflection points may overlap with defect regions, increasing the risk of misclassification.
To address these issues, this paper improves the multi-curvature fusion inflection point detection algorithm using machine vision techniques. The enhancement comprises three main steps:
- Color space conversion and color filtering;
- Image contour detection and contour density calculation;
- Screening and marking of defect areas.
Machine Vision-Based Improvement of Defect Feature Recognition
Inflection points in the algorithm’s detection results are marked in red, and the detection results undergo the following processing:
(1) Convert the image from BGR to HSV color space. Filter red regions using color thresholds to generate a binary image.
(2) Apply morphological operations to the binary image to detect contours of red inflection points and calculate the density of each contour (ratio of contour points to area).
(3) This study filters red inflection points in defect areas by setting a density threshold (S>70) and marks the defect regions identified by the improved algorithm on the original image.
Fig. 6 shows the defect detection results for milling cutter edges using the improved machine vision algorithm. When burrs or chipped edges appear on the milling cutter, the algorithm detects an increased number of inflection points.
By calculating inflection point density and setting appropriate thresholds, we automatically mark defect regions without manual judgment, thereby improving detection efficiency and reducing false positive rates.
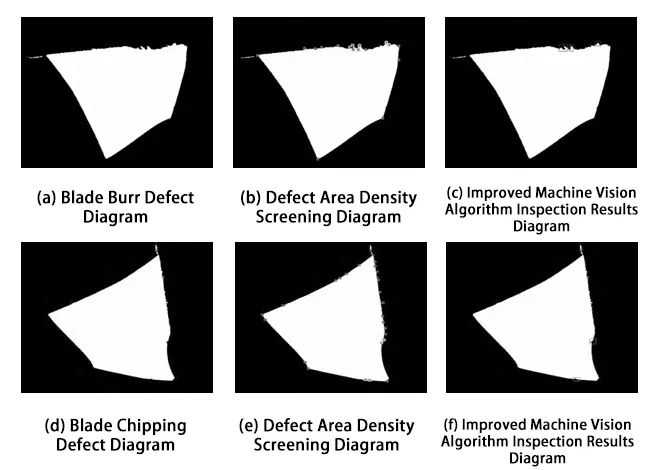
Image Difference Detection Algorithm Based on Flood Filling
Under low-light conditions, black skin and pitting defects on the milling cutter surface appear dark or black due to low reflectivity, creating contrast with surrounding normal areas and facilitating identification.
Since pitting defects often coexist with black skin defects and share similar appearances, this paper classifies them into the same category for detection.
To address this, we employ three techniques—the flood-fill algorithm, image subtraction algorithm, and inter-frame difference algorithm—to identify and localize these defects, enhancing detection accuracy and efficiency.
The flood-fill algorithm identifies connected black regions in the image, gradually expanding from a single point and replacing them with red. This eliminates the dark characteristics of scale areas and highlights defects.
The image difference algorithm compares the filled and unfilled images to capture black skin and pitting areas that turn red after filling, marking them to precisely locate defect positions.
The inter-frame difference algorithm compares the enhanced original image with processed image frames, calculates the absolute difference in gray values, and applies thresholding to mark the black skin and pitting defect areas on the milling cutter.
Core algorithm detection
These steps are as follows:
(1) Calculate pixel differences:
Convert the differential-processed milling cutter image and the original image to grayscale, then compute the absolute difference in grayscale values for corresponding pixel points.
g1(x, y) and g2(x, y) represent pixel values in the milling cutter image before and after filling, respectively. The differential result is:

(2) Adaptive threshold segmentation method (OTSU) to calculate threshold T:
Perform thresholding on the difference image. Set threshold T; pixels above T are marked as foreground, and those below T as background. Calculate threshold T:

(3) Connected component processing:
Extract the contour of the defect area through connected component analysis to accurately detect and mark the defect location.
Figure 7 presents the experimental detection results.
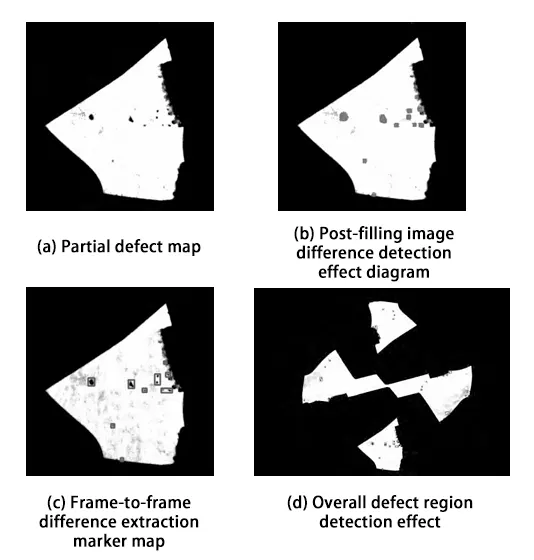
We applied filling and differential processing to milling cutter images that we had filtered and enhanced under low-light conditions.
This successfully detected and identified minute black skin and pit defects on the tool surface. Inter-frame differential algorithms extracted and marked the defect regions, yielding significant detection results.
Experimental Results
This study experimentally evaluated the defect detection algorithm using 50 defect samples each for three defect categories: chipped cutting edges, burrs on cutting edges, and pits/black skin on tool bodies.
Table 1 shows that pitting and black skin defects achieved the highest detection rates with the shortest processing times, with false negatives occurring only when black skin areas were extremely small.
Burr defects exhibited the lowest detection rate due to their minute size and tendency to be misclassified as normal cutting edges.
Chipping defects demonstrated superior detection performance compared to burrs due to the pronounced curvature changes along the cutting edge.

Conclusion
Experimental validation confirms that the proposed machine vision-based improved algorithm successfully extracts chipped edges and burrs on milling cutter edges through density calculation and threshold processing, achieving an average detection rate of 95% with a single-image processing time of 653 ms.
For pitting and black skin defects, a fill-based image difference detection algorithm combined with inter-frame difference marking achieved a 98% detection rate, with single-image processing taking 437 ms.
Both algorithms meet the requirements for high efficiency, high accuracy, and automated inspection, reducing labor costs while mitigating the impact of milling cutter defects on machining safety and quality.
FAQ
Why is detecting milling cutter surface defects important?
Surface defects like chipped edges, burrs, pits, and black skin reduce tool life, compromise machining precision, and increase costs. Accurate detection ensures high machining quality and efficiency.
What types of defects commonly occur on milling cutters?
The main milling cutter surface defects include:
Chipping and burrs: Edge-type defects along the cutting edges.
Pits and black skin: Area-type defects on the cutter body.
How are milling cutter images captured for defect detection?
A customized hemispherical elliptical LED illumination source is used. Strong illumination highlights edge defects like chipping and burrs, while low-light conditions reveal area defects such as pits and black skin.
How is noise removed from milling cutter images?
Bilateral filtering is applied to reduce random noise while preserving edge information. Wavelet transform filtering was found less effective due to blurring of cutting edge contours.
How are milling cutter images enhanced for better defect detection?
Linear grayscale transformation is used to enhance the contrast between defects and normal regions. Edge sharpening with the LOG operator highlights chipping and burrs under strong illumination, while low-light images are not sharpened to avoid altering pits and black skin.
Which algorithm detects chipped edges and burrs on milling cutters?
An improved multi-curvature fusion inflection point detection algorithm is used. It calculates inflection point density and applies thresholds to automatically mark defective regions, improving accuracy and reducing false positives.
How to
How to Capture and Preprocess Milling Cutter Images for Defect Detection?
Capturing high-quality milling cutter images is the first critical step in detecting surface defects accurately.
Proper lighting, stable positioning, and effective preprocessing—such as denoising and contrast enhancement—ensure that both edge defects (chipping, burrs) and area defects (pits, black skin) are clearly visible, providing a reliable foundation for subsequent machine vision analysis.
Required Tools:
Things Needed?
Steps to configure the HowTo widget:


