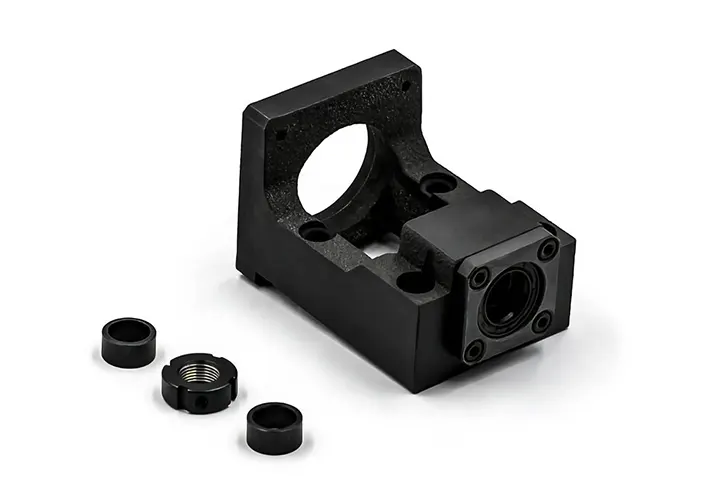
The process performs precision milling of the base surface and semi-finish boring of the borehole on a high-precision horizontal machining center.
Table of Contents
With the increasing demand for high-precision and high-efficiency machining in modern manufacturing, the application of CNC machine tools in mechanical processing has become increasingly widespread.
As the core component connecting the servo motor and ball screw in CNC machine tools, the machining quality of the motor base directly impacts the positioning accuracy and dynamic response performance of the machine tool.
Currently, motor bases are predominantly cast from HT200 gray cast iron. Their design must balance lightweight construction, vibration resistance, and thermal stability.
However, traditional split-machining processes suffer from cumulative reference conversion errors, frequent clamping operations, and poor interchangeability among grouped components.
These issues result in low machining efficiency and difficulty meeting stringent geometric tolerances (e.g., hole coaxiality ≤ 0.01 mm).
This paper investigates the Z-axis motor base of a T5.2 CNC lathe.
Research Focus and Proposed Process Optimization Strategy
Considering its structural features (e.g., ball screw bearing mounting holes, motor locating faces) and precision requirements, it systematically analyzes machining challenges:
① Impact of multi-reference surface selection and conversion on geometric tolerances;
② Allocation of roughing/finishing allowances and cutting parameter optimization;
③ Integrated design of finishing operations and requirements for flexible fixtures.
To address these challenges, a unified process scheme based on the bottom surface as the reference plane is proposed.
This combines aging treatment with a graded allowance strategy and incorporates multi-station milling fixtures, integrated roughing-finishing boring fixtures, and common-reference assembly fixtures.
These enable multi-feature machining within a single setup. The innovation of this paper lies in establishing a precision assurance chain encompassing the entire process of “milling-boring-assembly.”
This approach achieves synergistic improvements in both machining efficiency and accuracy, providing theoretical foundations and engineering references for process optimization of similar complex components.
Analysis and Determination of the Machining Process Plan for the CNC Machine Tool Motor Mount
-
Analysis of Structural Design Features of Motor Mount
As the core component connecting the servo motor and ball screw, the motor mount (see Figure 1) is a small box-type part. Its design must satisfy the following fundamental requirements:
(1) Lightweight and Rigidity Balance:
Minimize weight while ensuring structural strength and rigidity.
(2) Vibration Resistance:
Suppress forced vibrations, controlling amplitude within permissible limits.
(3) Thermal Stability and Processability:
Achieve rational thermal field distribution while accommodating casting and machining processes.
(4) Comprehensive Optimization:
Maintain a clean, aesthetically pleasing appearance alongside favorable economic viability.
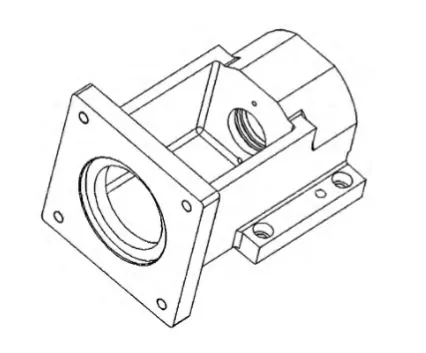
The motor mounts for linear feed systems in current CNC machine tools commonly employ HT200 gray cast iron.
Their typical structural features include a positioning reference base surface, side surfaces, mounting reference holes for ball screw bearings, bearing cap mounting mating surfaces, motor mounting positioning reference holes, and axial positioning end faces.
The subject of this study, the Z-axis motor base of the T5.2 CNC lathe, is shown in Figure 2. Key structural features and precision requirements for this motor base are listed in Table 1.
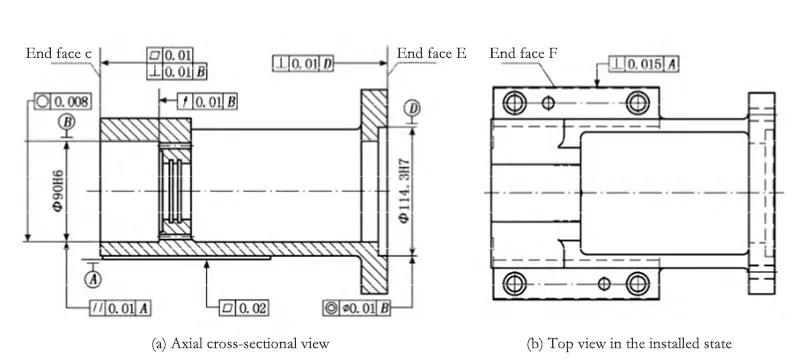
| Feature Location | Accuracy / Tolerance Requirements |
|---|---|
| Lead screw bearing mounting reference hole B | Diameter ⌀90 H6;Roundness tolerance 0.008;Perpendicularity of hole centerline to datum surface A: 0.01 |
| Bearing mounting orientation datum surface | Runout relative to the centerline of hole B: 0.01 |
| Press-fit mounting mating end face C | Flatness 0.01;Perpendicularity to the centerline of hole B: 0.01 |
| Motor mounting reference hole D | Diameter ⌀114.3 H7;Coaxiality of hole centerline with hole B centerline: ⌀0.01 |
| Motor shaft orientation datum end face E | Perpendicularity to the centerline of hole D: 0.01 |
-
Analysis of Technical Challenges and Key Focus Areas in Motor Base Machining
Through analysis of the structural characteristics of the Z-axis motor base on the T5.2 CNC lathe, the machining process requires focused control over the following technical challenges:
(1) Optimized Selection of Locating References.
In machining box-type components, the choice of locating reference surfaces directly impacts machining accuracy and the feasibility of the process plan. This motor base involves five external surfaces requiring machining:
the reference base surface A, the mounting mating surface C for the lead screw bearing cap, the axial mounting locating surface E for the motor shaft, and the two side surfaces perpendicular to surfaces C and E.
Among these, the base surface A, end surface C, and end surface E are all viable candidates for machining reference surfaces.
Therefore, when formulating the machining process plan for the motor base, careful consideration must be given to assembly functional requirements and machining accessibility.
A rational reference conversion system should be established to ensure dimensional and geometric tolerance requirements between all machined surfaces.
(2) Rational Selection and Allocation of Machining Allowances.
The proper distribution of machining allowances is central to ensuring dimensional accuracy and machining efficiency, directly impacting the forming quality of critical features.
Therefore, during the design of the part machining process plan, the key focus should be on constructing the allowance allocation model and optimizing the cutting strategy.
For core features of this motor base—such as the Φ90H6 bearing bore and the Φ114.3H7 motor mounting locating holes—high precision requirements within the component structure (diameter dimensional tolerance ≤0.02 mm, concentricity ≤0.01 mm) necessitate a separate roughing and finishing strategy.
Therefore, the process design must incorporate a machining allowance gradient.
Through toolpath optimization and dynamic matching of cutting parameters, dimensional stability errors are controlled within design requirements while ensuring machining efficiency.
(3) Integrated Finishing Process Design.
To achieve geometric tolerances ≤0.01 mm for critical features, the finishing operation employs composite fixtures for multi-feature integrated machining.
This enables precision machining of key features—such as bearing bores and locating faces—in a single setup, eliminating cumulative errors from multiple setups. Consequently, fixture design must prioritize precise locating and clamping mechanisms.
(4) Collaborative Precision Consistency Assurance.
ithin the servo feed system, the center height deviation between the motor mounts and bearing seat bore centers at both ends of the lead screw must be controlled within 0.005 mm.
Traditional separate machining processes struggle to consistently meet this precision requirement, not only hindering production efficiency gains but also increasing manual setup and adjustment costs.
Consequently, the new process solution must prioritize center height consistency as a core control metric, achieving precision assurance through process innovation.
-
Principles for Determining Machining Process Plans for Motor Bases
Process plan formulation shall adhere to the following principles:
(1) Unified Benchmark Principle:
Establish the motor base bottom surface as the primary machining benchmark.
Select the side surface in the width direction (design benchmark surface) as the auxiliary positioning benchmark.
Following the benchmark precedence principle, prioritize machining the bottom surface to establish the process benchmark.
All subsequent operations shall uniformly use the bottom surface as the sole machining benchmark.
(2) Stress Control Principle:
Incorporate stress-relief treatment after rough machining to eliminate residual stresses.
Schedule drilling operations between semi-finish boring and finish boring to ensure finish boring is the final machining operation, thereby minimizing the impact of clamping and machining deformation on precision.
(3) Machining Allowance Grading Principle:
Apply a three-tier allowance allocation through roughing, semi-finishing, and finishing operations to progressively correct errors from preceding processes.
(4) Efficiency Optimization Principle:
Integrate CNC equipment with modular fixtures to achieve multi-feature machining in a single setup, reducing fixture changes and enhancing productivity.
(5) Precision Assurance Principle:
Centralize finishing operations for paired components to guarantee dimensional tolerance consistency post-machining.
-
Determination and Implementation of the Machining Process Plan for the Motor Base
Based on the aforementioned principles, the machining process flow for the motor base, as shown in Figure 2, is established as follows:
Casting preparation → Layout marking → Rough milling of bottom surface → Rough milling of contour → Rough boring of hole → Aging treatment → Finish milling of bottom surface → Semi-finish boring of hole → Drilling → Finish boring of hole → Deburring → Surface treatment. Key implementation points are detailed below:
(1) Casting Preparation.
For mass production, the Z-axis motor base for the T5.2 CNC lathe employs metal mold casting.
This process leverages the mold’s high rigidity to ensure dimensional stability and consistent batch quality. Post-casting, annealing is required to eliminate residual stresses within the casting.
For small-batch or single-piece production scenarios, due to significant dimensional deviations in the raw material, lost foam casting is typically employed.
Subsequent full-dimension layout processes are required to correct casting defects.
(2) Layout Marking.
As a critical preparatory step before machining, layout marking primarily serves to inspect blank dimensions and screen for casting defects, enabling timely detection and handling of non-conforming parts.
During this process, issues like blank deformation or eccentricity can be compensated for using the “material borrowing” technique, ensuring subsequent machining aligns with the marked positioning.
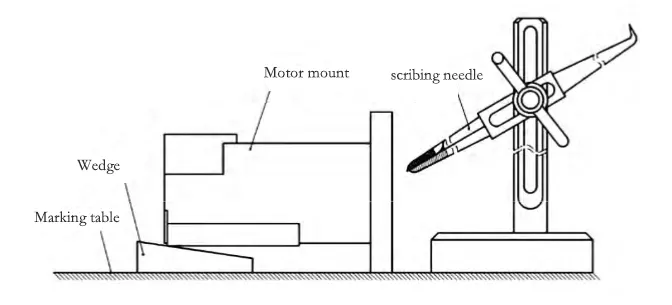
For the layout process of machine tool motor bases, after adjusting the base surface parallel to the layout table’s working surface using shims, a center punch is used to locate the centerline of the mounting reference hole B (for the lead screw bearing) and the motor mounting reference hole D.
Based on this reference, the bottom surface and outer contour machining lines are sequentially marked, as shown in Figure 3.
It is noteworthy that marking process requirements vary significantly across different production scales:
In batch production, leveraging fixtures to ensure machining accuracy, marking only the bottom surface and hole centerlines suffices, substantially boosting processing efficiency.
However, in single-piece or small-batch production, due to the high dimensional dispersion of lost-foam casting blanks, full-dimension layout marking must be performed.
This enables the early detection and correction of dimensional deviations during initial machining, thereby preventing rework in subsequent processes.

(3) Rough milling the bottom surface.
As the core process datum for the motor base, the machining quality of bottom surface A directly impacts the precision of subsequent operations. During machining, use the casting surface of the blank as the rough datum.
Clamp the part widthwise in a vise, level it using a universal tool—a center—and align the part according to the machining lines marked in the “layout sequence.”
The roughing allowance for the first part is controlled between 0.5 mm and 1 mm.
During batch production, rapid calibration can be performed based on the positioning parameters of the first part.
This operation is completed using a vertical machining center to ensure the preliminary formation of the reference surface.
(4) Rough milling the contour.
Using the rough-milled bottom surface A as the reference, locate the part via its cast blank surface. Clamp the part at its midpoint to machine all four contour surfaces.
The roughing allowance for the cover mounting interface surface C and the motor shaft locating surface E is 1 mm to 1.5 mm, while the remaining two side surfaces have an allowance of 0.5 mm to 1 mm.
To enhance workbench utilization and machining efficiency, this process employs a horizontal machining center with a multi-station fixture to simultaneously clamp and process multiple workpieces.
(5) Rough boring of holes.
Under the combined constraints of the locating base surface A and side surface F, perform rough boring on the ball screw bearing mounting reference hole B and the motor mounting locating reference hole D, leaving a single-side allowance of 2 mm to 2.5 mm.
This process utilizes a horizontal machining center and an integrated roughing/finishing boring fixture to ensure positional accuracy between the two holes and uniformity of machining allowances, laying the foundation for subsequent finishing operations.
(6) Stress Relief Treatment.
To prevent deformation of the motor base after finishing and ensure dimensional and geometric tolerance stability, the base undergoes 12-hour natural stress relief after rough machining to fully release residual stresses from casting and machining.
For high-precision or special-requirement motor bases, tempering or vibration stress relief processes may be employed.
Compared to natural aging, tempering or vibration aging increases manufacturing costs but achieves superior stress relief.
The specific aging method should be selected based on the part’s precision grade and cost budget.
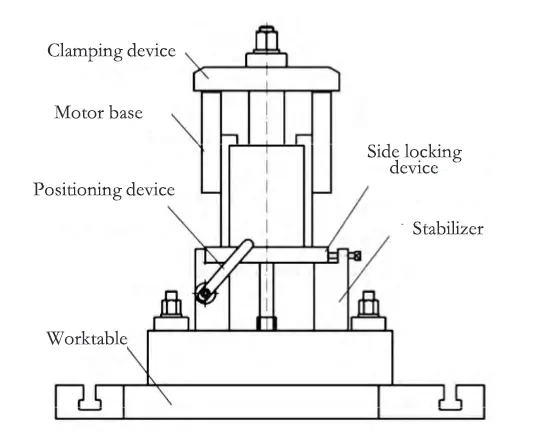
(7) Precision milling of the base surface.
To prevent thermal deformation interference with dimensional stability, the process separates roughing and finishing equipment.
The precision milling operation focuses on machining the locating reference surfaces: bottom surface A and side surface F.
Specifically, bottom surface A requires a flatness of ≤0.02 mm and a perpendicularity to side surface F of ≤0.015 mm. Flexible clamping technology replaces traditional fixtures.
The clamping setup for precision milling the motor base surface, as shown in Figure 4, ensures reliable clamping while reducing fixture complexity.
(8) Semi-finish boring.
The semi-finish boring operation retains the clamping method from the rough boring process, focusing on machining the threaded shaft bearing mounting reference hole B and the motor mounting positioning reference hole D.
The single-side allowance for holes B and D, as well as the allowances for the flange mounting mating surface C and the motor axial positioning surface E, are all 0.5 mm.
All other machined areas must meet the final dimensional and precision requirements specified in the part drawing. Use fixtures identical in design to those for rough boring.
To prevent fixture accuracy degradation from affecting machining quality, strictly differentiate between rough boring and semi-finish boring fixtures.
(9) Drilling.
To prevent deformation of the finished motor base from re-clamping, the process completes drilling before finish boring.
For mass production, use a radial drill for drilling; for small-batch production, integrate this operation with semi-finish boring to minimize process changeover time.
(10) Finish Boring.
After mounting the cover on the high-precision horizontal machining center and aligning the mounting face C with the motor shaft positioning face E, precisely bore the screw bearing mounting reference hole B and the motor mounting positioning reference hole D.
Simultaneously with boring hole B, precisely machine the bearing mounting axial positioning surface.
To ensure consistency in center height between the motor base and bearing housings used in sets, a fixture synchronizes the clamping of both components.
Through common-reference machining, the process maintains center height consistency within ≤0.005 mm.
Design and Process Validation of Motor Base Fixture
Based on the machining process plan for the Z-axis motor base of the T5.2 CNC lathe, a fixture ensures machining accuracy and efficiency.
The involved operations include contour milling, rough boring, semi-finish boring, and finish boring. The specific implementation methods and technical features are as follows:
-
Multi-Station Milling Profile Fixture Design
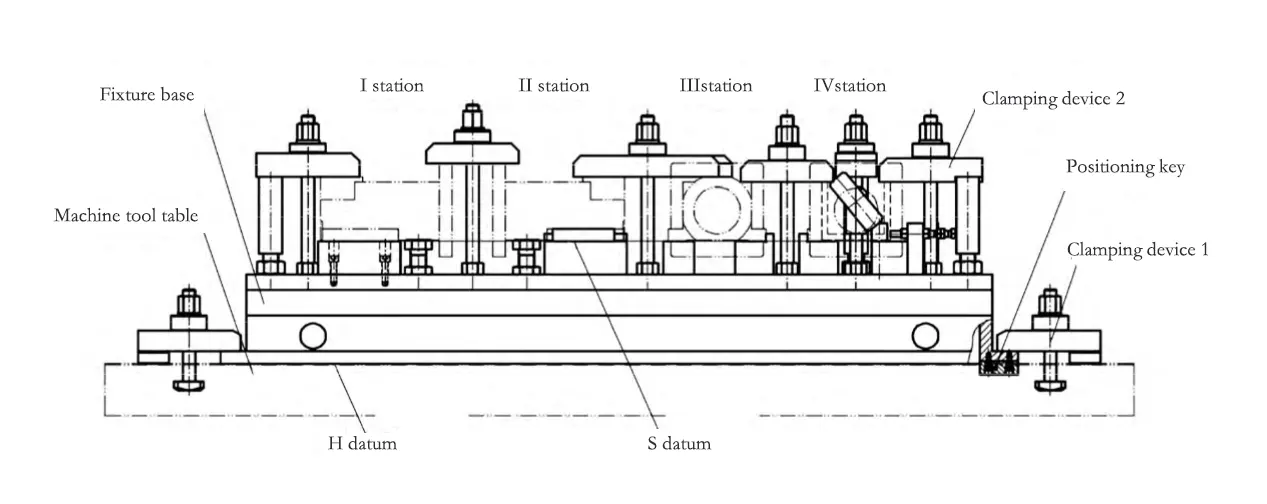
To achieve unified machining references and optimized efficiency in milling operations, an innovative four-station milling profile fixture enables integrated milling. The fixture features a base, locating keys, and clamping devices.
It employs a composite structure featuring adjustable locating stations (Stations I and III) and fixed reference surfaces (Stations II and IV).
A significant advantage of this composite structure is its ability to resolve positioning deviations caused by dimensional variations in castings.
The flatness of the base reference surface H is ≤0.01 mm, matching the horizontal machining center worktable.
After positioning via locating keys installed in the T-slots of the machine tool worktable, the base forms a rigid connection with the worktable under the action of the clamping device 1. The upper surface of the base features four workstations.
The reference surfaces for positioning motor mounts on each workstation are coplanar and designated as reference surface S. Reference surface S is parallel to reference surface H with parallelism ≤0.015 mm.
Clamping device 2 secures motor mounts to the corresponding reference surfaces at each workstation.
The rational design of workstations and clamping methods enables continuous machining of four feature surfaces in a single setup.
Compared to traditional single-piece processing, this approach achieves over 200% efficiency improvement and reduces dimensional consistency standard deviation from 0.12 mm to 0.04 mm (sample size n=50), significantly mitigating the risk of cumulative errors in subsequent processes.
-
Design of an Integrated Rough/Finish Boring Fixture
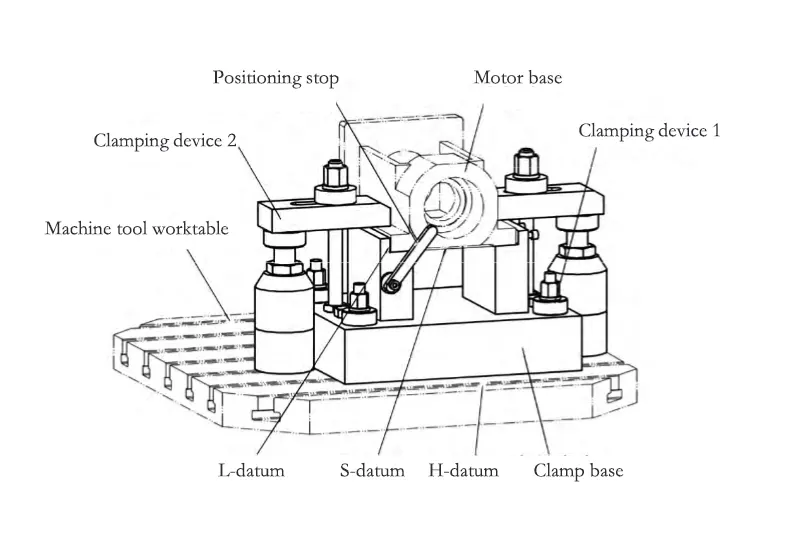
To achieve efficient integration of motor base machining processes, a rough/semi-finish boring fixture supports integrated machining operations.
It is suitable for composite machining of the Φ90H6 bearing mounting hole, Φ114.3H7 motor locating hole, and their associated end faces, as shown in Figure 6.
The fixture employs a three-level datum system: – Datum surface H (flatness ≤ 0.01 mm) serves as the primary mounting datum, rigidly connected to the machining center table via clamping device 1; – Datum surface S (parallelism to surface H ≤ 0.015 mm) forms the motor base mounting plane; – Datum surface L (perpendicularity to surface S ≤ 0.01 mm) establishes the spatial positioning datum.
This reference system strictly controls the axial deviation and end-face positional accuracy of machined features within ≤0.01 mm.
The fixture employs an adjustable positioning block structure, enabling multi-position machining of boring and semi-finish milling of end faces in a single setup.
Compared to traditional sequential machining requiring multiple fixture changes, this design integrates the semi-finish milling operation directly into the boring process through the spatial repositioning capability of angle-adjustable blocks. This eliminates reference offset errors caused by repeated setups.
Practical application demonstrates that this design not only successfully eliminates repeat clamping errors but also boosts machining efficiency by over 40%.
It further endows the process system with flexible machining capabilities, significantly expanding the fixture’s process compatibility to adapt flexibly to diverse machining requirements.
-
Innovative Design of a Common-Reference Assembly Fixture for Grouped Machining
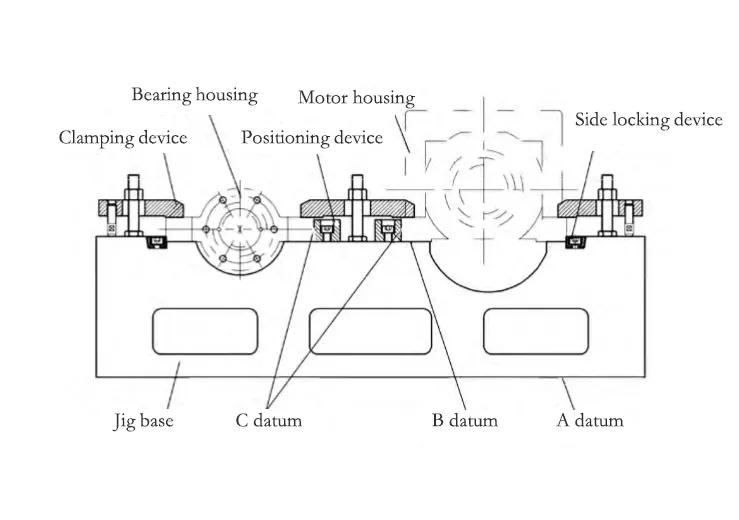
To meet the high-precision requirement of ≤0.005 mm center height consistency for grouped motor bases and bearing housings, a common-reference assembly collaborative machining fixture enables allowance finishing during semi-finish boring operations (as shown in Figure 7).
This fixture comprises a fixture base, clamping mechanism, and positioning device, where the clamping and positioning mechanisms employ a dual-head clamp plate with a beveled locking composite structure.
With flatness ≤0.005 mm, the base reference surface A forms a rigid connection with the machine tool worktable.
Reference surfaces B and C, used for positioning the motor base and bearing housing, require precision adjustment: – Parallelism of surface B relative to reference surface A ≤0.008 mm; – Parallelism of surfaces B and C relative to the machine tool spindle axis ≤0.005 mm; – Perpendicularity of reference surface C relative to reference surface B ≤0.005 mm.
› Fixture Precision Control Requirements and Functional Characteristics
Perpendicularity of reference surface C relative to reference surface B ≤ 0.005 mm. Production statistics indicate:
This fixture design reduced installation and fitting time for the motor mount and bearing housing from (150±5) min to (55±3) min, achieving a 63.3% efficiency increase.
The interchangeability pass rate for grouped parts rose from 89.7% to 98.3%. This fundamentally resolves the challenges of time-consuming fitting and insufficient interchangeability inherent in traditional processes.
› Process Performance Improvements and Engineering Applicability
This fixture system establishes a precision assurance chain covering the entire process of “milling-boring-assembly” through the organic integration of benchmark system optimization, composite workstation innovation, and flexible structural design.
In terms of machining efficiency, it reduces the processing cycle per unit by over 50% through multi-station continuous machining and process integration technology.
In terms of quality, it reduces key dimension standard deviation by 66% to 75% and elevates assembly precision by an order of magnitude.
Regarding process economics, its flexible design lowers production line conversion costs by 30% and increases equipment utilization by 25%.
These systematic breakthroughs in technical metrics provide a universally applicable process solution for the efficient precision machining of complex structural components.
Conclusion
This paper presents an integrated solution combining process optimization and fixture innovation to address the machining requirements of the Z-axis motor mount for the T5.2 CNC lathe.
Through unified reference points, stress relief, and graded allowance strategies—coupled with multi-station milling and an integrated fixture design for rough and finish boring—the process enables machining of critical features in a single setup.
This effectively eliminated repeat positioning errors.
After adopting the common-benchmark grouped fixture, the center height consistency error between grouped motor bases and bearing housings was ≤0.005 mm.
Installation and fitting time decreased by 63.3%, and interchangeability qualification rate increased to 98.3%.
Process validation demonstrates that this solution reduces the single-piece processing cycle by over 50%, lowers the standard deviation of critical dimensions by 66% to 75%, and increases equipment utilization by 25%.
Research findings indicate that synergistic optimization of the process chain and flexible fixture design can significantly enhance the machining efficiency and dimensional stability of complex box-type components.
Future efforts will explore the integrated application of intelligent fixtures and adaptive machining technologies to meet higher precision and customized production demands.
FAQ
Impedit egestas aliquet?
Lorem ipsum dolor sit amet, consectetur adipiscing elit. Ut elit tellus, luctus nec ullamcorper mattis, pulvinar dapibus leo.
Sapien class quo temporibus?
Lorem ipsum dolor sit amet, consectetur adipiscing elit. Ut elit tellus, luctus nec ullamcorper mattis, pulvinar dapibus leo.
Elementum voluptate sodales?
Lorem ipsum dolor sit amet, consectetur adipiscing elit. Ut elit tellus, luctus nec ullamcorper mattis, pulvinar dapibus leo.

