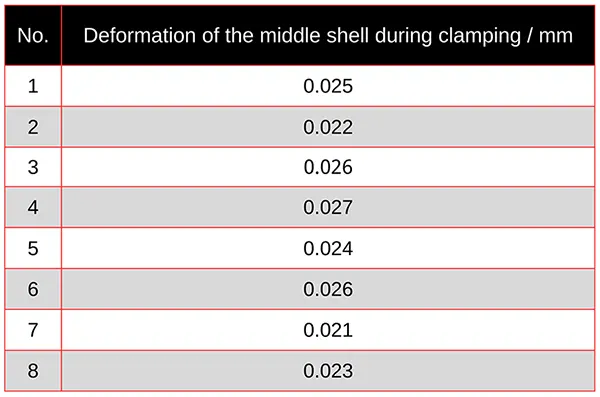
Engineers consistently controlled housing clamping deformation within 0.02–0.03 mm (see Table 1), demonstrating a significant reduction in deformation.
Table of Contents
The machining process for automotive transmission housings is complex, with stringent requirements for dimensional accuracy and positional precision.
Characterized by large volume, intricate geometry, and machining challenges, the manufacturing process necessitates the selection of appropriate mechanical processing methods, precise machining references, scientifically optimized combined process routes, and the design of suitable cutting tools and fixtures to ensure both the machining quality and efficiency of housing components [1].
Fixture clamping deformation during machining of cast aluminum housings causes significant workpiece distortion. Large dimensions and complex structures lead to post-machining stress release deformation.
This paper focuses on the performance of specialized fixtures for transmission cast aluminum center housings, designing an adjustable boring-milling fixture that reduces clamping distortion, enhances bearing bore geometric accuracy, and offers significant practical reference value.
Boring and Milling Fixture for Transmission Middle Housing Machining
Machine tool boring and milling fixtures are mobile, follow-up fixtures (see Figure 1) primarily used in automated production lines, machining centers, and flexible manufacturing systems to position and clamp workpieces.
Typically employed for irregularly shaped workpieces that are difficult to automatically locate, clamp, and transport, these fixtures ensure production efficiency and enhance machining productivity.
They serve as essential tools for machining housing components.
Fixture positioning and clamping errors directly impact the geometric accuracy of hole systems.
Since cast aluminum middle housings undergo deformation during clamping, affecting bearing bore geometric accuracy, designing high-precision, highly flexible fixtures significantly improves transmission housing machining [2].
Typically, the workpiece is mounted on a traveling fixture, which requires additional positioning and clamping on the machine tool’s worktable before machining or assembly operations can proceed.
The current follow-up fixture used for machining the cast aluminum transmission housing employs a four-point rigid support for positioning.
While this enhances machining rigidity, it causes deformation during clamping of the cast aluminum housing, affecting the positional accuracy of the bearing bore.
Clamping deformation ranges between 0.03 and 0.07 mm. The positional tolerance requirement for the bearing bore in the deep cavity surface is ±0.03 mm.
Poor bearing bore positional accuracy results in approximately 40% of products exceeding tolerances during actual production, with a bearing bore process capability CPK of only 0.8.
Low gear meshing precision directly impacts the noise performance of the transmission assembly.
To enhance the geometric accuracy of the bearing bore while ensuring complete positioning of both the workpiece and fixture [3], the structure of the follow-up fixture has been optimized through redesigned.

Design and Analysis of Boring and Milling Fixtures
Optimized Design Approach for Boring and Milling Fixtures
Boring and milling fixtures achieve positioning through rigid four-point support, constituting over-constraint.
In actual production, over-constraint should be avoided whenever possible. Generally, there are two approaches to eliminate over-constraint:
First, enhance the positional accuracy between the part’s locating surfaces and the locating fixture;
Second, modify the fixture structure to eliminate redundant degrees of freedom.
This paper integrates both approaches by redesigning the fixture structure to eliminate over-constraint.
Research on optimizing fixture positioning to enhance the geometric accuracy of the intermediate housing minimizes clamping deformation while enabling machine tool machining to correct fixture positioning surfaces.
The existing four-point rigid support fixture is modified to a three-point rigid support with one auxiliary limiting support.
Since the intermediate shell blank is supported and positioned, the height of the three rigid support points must be reasonably adjusted to ensure uniform distribution of allowances across all precast holes and end faces of the blank.
This guarantees clamping rigidity and minimizes clamping deformation.
Since the middle shell blank is supported and positioned, and some blank positioning surfaces have casting draft angles, the fixture structure is designed to allow adjustment of support height and angle via milling on the machining center. This ensures positioning accuracy and consistency of the workpiece.
The fixture support end faces are designed with appropriate end face patterns to guarantee workpiece clamping rigidity and clamping consistency.
Structural Optimization of Boring and Milling Fixture
The original four rigid support columns were redesigned as three adjustable supports + one auxiliary support. The three supports feature a structure of support base + shim + support seat.
The support base was designed with an angle of 1.45° ± 0.1° (see Figure 2), allowing milling adjustments on the machine tool.
One auxiliary limiting support employs a structure of support base + adjustment pad + adjustable support seat for supplementary support, preventing clamping deformation caused by over-constraint.

Four clamping bases of varying heights are designed based on part geometry, securing components via support rods, screws, and clamping plates;
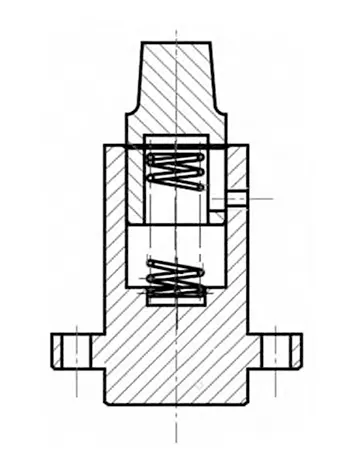
Utilizing the part’s pre-cast 2-M24 holes as locating pins, two elastic locating pins are designed (see Figure 3) to assist in part fixation. The cross-section of the elastic locating pin is shown in Figure 3.
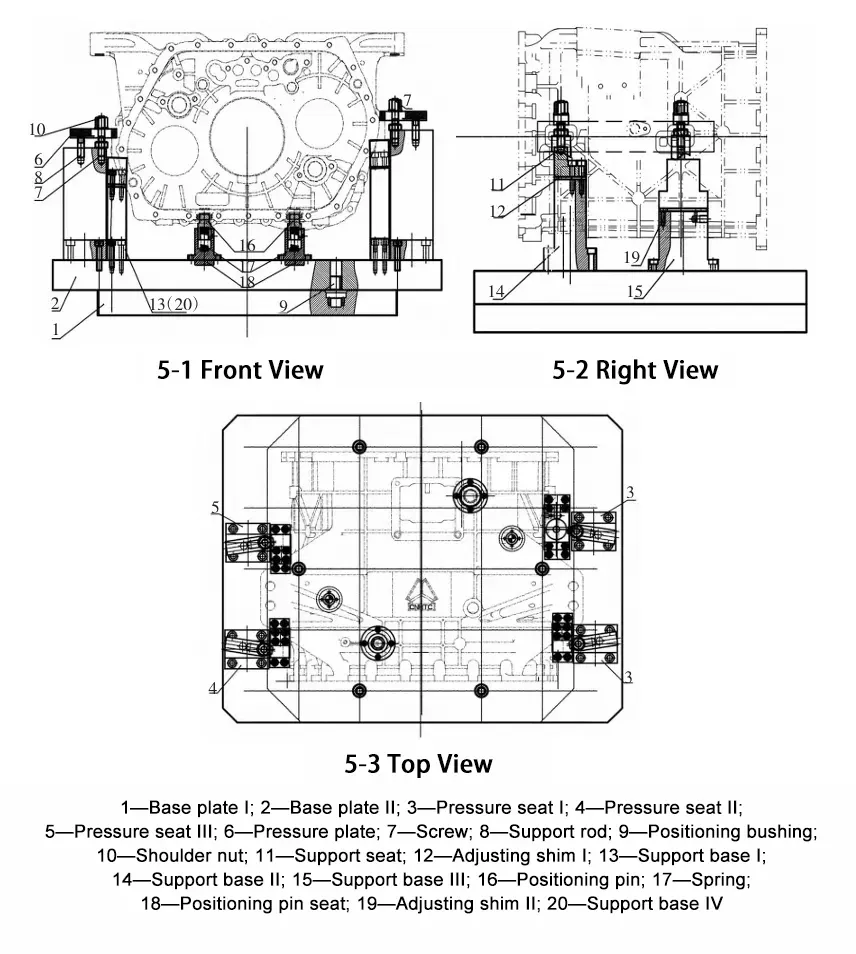
The boring and milling fixture comprises: Base plates—Base Plate I, Base Plate II;
Clamping Assembly—Clamping Base I (2), Clamping Base II, Clamping Base III, Clamping Plates (4), Screws (4), Support Rods (4), Positioning Bushings (2), Shoulder Nuts (4);
Supporting components—support bases (3), adjustment shims I (6), support base I, support base II, support base III, adjustment shims II (2), support base IV;
Positioning Components—Positioning Pins (2), Springs (4), Positioning Pin Holders (2), etc. The assembled boring and milling fixture forms a three-dimensional structure (see Figure 4), with a plan view after part clamping shown in Figure 5.


Performance of Boring and Milling Fixture
The optimized boring and milling fixture demonstrated remarkable effectiveness during machining of an aluminum cast transmission housing. Field performance tracking revealed:
The critical quality indicator—CPK value for the housing bearing bore process capability—increased from 0.8 to 1.34 (see Figure 6);
Overall production efficiency has markedly increased.

Figure 6: Process Capability CPK Using New Fixture
Conclusions
The optimized boring and milling follow-up fixture demonstrates multiple technical advantages when applied to machining cast aluminum transmission middle housings:
1) Innovative adoption of dynamic follow-up compensation technology enables real-time correction of fixture positioning surface geometric deviations during machining, eliminating cumulative errors;
2) Significantly reduced workpiece clamping deformation (<0.03 mm), ensuring uniform distribution of allowances across all precast surfaces and hole end faces of the center housing blank;
3) Substantially enhanced critical geometric accuracy of bearing holes, establishing a precision foundation for assembly operations.
FAQ
Impedit egestas aliquet?
Lorem ipsum dolor sit amet, consectetur adipiscing elit. Ut elit tellus, luctus nec ullamcorper mattis, pulvinar dapibus leo.
Sapien class quo temporibus?
Lorem ipsum dolor sit amet, consectetur adipiscing elit. Ut elit tellus, luctus nec ullamcorper mattis, pulvinar dapibus leo.
Elementum voluptate sodales?
Lorem ipsum dolor sit amet, consectetur adipiscing elit. Ut elit tellus, luctus nec ullamcorper mattis, pulvinar dapibus leo.

