The challenge of vibration marks in internal thread machining has become a critical factor in advancing overall manufacturing standards. This is because, in high-end equipment, threaded components serve as essential foundational parts whose performance and reliability are vital to infrastructure projects and energy equipment.
Statistics indicate that over 60% of components in modern machinery incorporate threaded structures. Within mechanical processing, approximately 30% of machining tasks involve internal bore processing, with internal thread machining accounting for 14% of this total.
For years, tool developers and process engineers have continuously explored methods to achieve efficient, high-quality internal thread machining. With the emergence of advanced engineering materials (such as high-strength alloys and composites) and manufacturing techniques, internal thread machining processes have also been steadily improving.
This article introduces optimized turning methods and machine tool accessories for thread machining, aiming to reduce or eliminate root-end vibration marks while meeting surface roughness requirements.
Relationship Between Thread Turning and Tool Vibration
During thread machining, thermal–mechanical coupling effects often accelerate cutting-edge wear. As the tool engages the workpiece, continuous friction in the cutting zone alters the thread profile and increases local temperatures, which in turn promotes flank wear, crater wear, and micro-chipping at the tip.
As tool wear progresses, the cutting edge loses sharpness and stability. This directly influences cutting force fluctuations and intensifies regenerative chatter, resulting in reduced thread accuracy, inconsistent pitch, and poor surface finish.
Therefore, understanding how vibration signal characteristics correlate with surface roughness—and monitoring sudden changes in cutting force to evaluate tool wear—provides a practical basis for determining tool replacement or regrinding intervals.
Effective monitoring ultimately ensures consistent machining accuracy, prolongs tool life, and improves the quality of the finished thread.

Primary Causes of Tool Vibration During Thread Turning
From a machinist’s standpoint, the main contributors to vibration in thread turning include:
1. Tool Geometry Issues
Worn or chipped cutting edges increase cutting resistance and promote chatter.
Incorrect rake or clearance angles can cause rubbing instead of cutting, accelerating vibration.
Inadequate nose radius may cause unstable chip load—especially critical in fine-pitch threads.
2. Workpiece Material Characteristics
Hard or uneven material structures (e.g., work-hardened zones, cast inclusions) create intermittent loads.
Materials with poor thermal conductivity (stainless steel, titanium) generate localized heat, softening the tool and inducing vibration.
3. Insufficient Tool Holding Rigidity
A long overhang of the boring bar significantly increases deflection and vibration.
Poor clamping or worn toolholders reduce system stiffness and cause resonance at thread cutting depths.
4. Machine Tool Rigidity and Condition
Loose slides, worn spindle bearings, or inadequate damping decrease machining stability.
Threading often requires rapid and precise synchronization; any backlash or mechanical play will amplify vibration.
5. Cutting Parameters & Synchronization
Excessive cutting speed or depth per pass introduces high cutting force fluctuations.
Incorrect feed-to-speed matching in manual or CNC threading may cause pitch irregularity and regenerative chatter.
Improper infeed method (e.g., plunging vs. flank infeed) can overload both cutting edges.
6. Chip Evacuation & Coolant Issues
Poor chip control leads to chip entanglement, creating intermittent cutting forces.
Inadequate coolant flow increases thermal load and reduces lubrication, both contributing to vibration.

Practical Notes From Machining Experience
A sharp, properly supported threading tool makes the biggest difference in vibration control.
Reducing tool overhang and using carbide or vibration-damped boring bars dramatically improves stability in internal threading.
Monitoring changes in sound, chip color, and spindle load is often the earliest indicator of tool wear or upcoming chatter.
Using the correct infeed technique—especially flank infeed for metric threads—helps balance forces on both cutting edges.
Issues in Thread Turning and Solutions
Traditional internal thread turning falls under the category of tool-forming machining.
Typically, thread tapping employs form tools to process threaded holes on drilling machines, lathes, tapping machines, and other machining equipment.
Generally, due to limitations in thread turning tool design, internal threads with excessively small diameters cannot be machined on lathes and are typically produced using taps. Internal threads with diameters of 16mm or larger can generally be manufactured through machine tool processing.
CNC thread turning differs significantly from conventional lathe thread turning.
Conventional lathes are driven by gear mechanisms connected to lead screws, meaning the tool holder advances one pitch per spindle revolution. Throughout threading, the transmission chain must remain engaged; otherwise, misalignment occurs.
CNC thread turning is a widely adopted machining method, holding significant importance in mechanical processing due to its operational convenience, consistent product quality, and broad application range. However, CNC thread turning also presents issues such as pronounced vibration marks and non-compliant surface roughness. Consequently, research on vibration mark control during internal thread turning is particularly crucial.
Existing Issues in Thread Turning
During CNC thread turning, the following problems frequently arise due to factors such as equipment, tools/fixtures, and operator skill:
- ) Incorrect thread profile;
- ) Pitch deviation;
- ) Tool galling or thread damage;
- ) Surface roughness failing to meet standards;
- ) Vibration marks appearing on machined surfaces.
Regarding the first three issues, tool wear during thread turning often necessitates re-alignment, particularly during thread repair operations where secondary clamping and alignment are frequently required. Alignment accuracy directly impacts thread integrity.
For trapezoidal threads, roughing both flank surfaces before finishing necessitates frequent tool setting.
This places high demands on machine accuracy and operator skill. Regarding the latter two issues, vibration during thread machining disrupts and compromises normal cutting.
Vibration encompasses forced vibration and self-excited vibration, related to the dynamic characteristics of the process system comprising the machine tool, fixture, tool, and workpiece.
Broadly speaking, vibration primarily originates from deformations in the workpiece system and the toolholder system. During internal thread turning at a certain company:
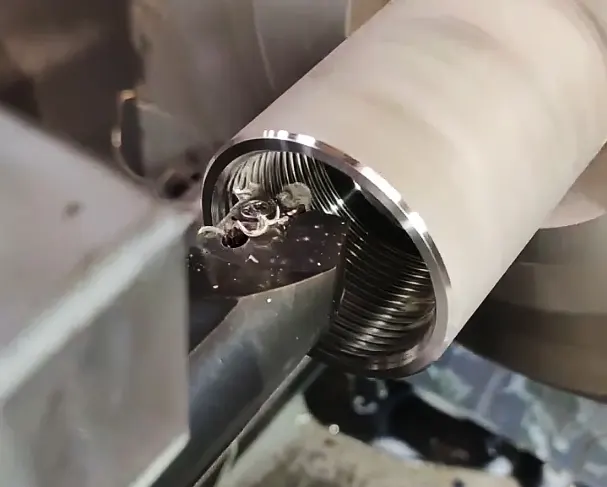
- ) Fine, dense vibration marks appeared on the major diameter surface (see Figure 3);
- ) High-pitched noise was generated;
- ) Significant vibration occurred in both the machine tool and workpiece, often accompanied by carbide insert breakage.
This severely compromised thread quality, failing to meet drawing specifications.

Improvement Measures
To effectively control vibration marks on the major diameter of threads, the research team implemented optimizations across three key areas:
- ) Optimizing feed methods and cutting parameters;
- ) Enhancing fixture stability;
- ) Selecting suitable cutting tools.
By comparing thread vibration patterns, analyzing vibration causes, and implementing corresponding measures, vibration was reduced or eliminated.
(1) Optimizing Feed Method and Cutting Parameters
Feed methods include straight feed, helical feed, and left-right cutting. Selecting the appropriate cutting method for different thread profiles is crucial [5]. Trapezoidal threads feature larger profiles and demand high machining accuracy on both sides.
Therefore, cutting trapezoidal threads often involves deep feed rates, large cutting volumes, and high cutting resistance.
For large-pitch non-standard trapezoidal internal threads, tool strength is limited by the diameter of the thread pilot hole. Thus, selecting an appropriate machining method is necessary.
The original feed method employed linear machining for full-form parts.
The linear method offers the advantage of simplified processing steps. However, its disadvantage lies in the significant cutting resistance caused by multidirectional forces during machining.
Consequently, the linear method is suitable for trapezoidal threads with a pitch P < 4.5 mm, where the tool can intermittently feed in the X-direction to the full thread depth.
> Challenges of Machining Large-Pitch Trapezoidal Threads
For large-pitch threads with a pitch of 6 mm, when machining trapezoidal threads using this method, all three sides of the threading tool participate in cutting. This increases the cutting volume and generates more cutting heat, leading to thread vibration marks caused by tool vibration.
Therefore, to reduce cutting forces, enhance machining stability, and prevent thread vibration marks, the author optimized the feed method and cutting parameters, specifically:
- ) Employ the straight-feed method for rough machining, with a single-side allowance of 1.5 mm on the flank;
- ) Semi-finish machining of both flank surfaces with a single-side allowance of 0.03–0.05 mm;
- ) Finish machining of the root face and both flank surfaces.
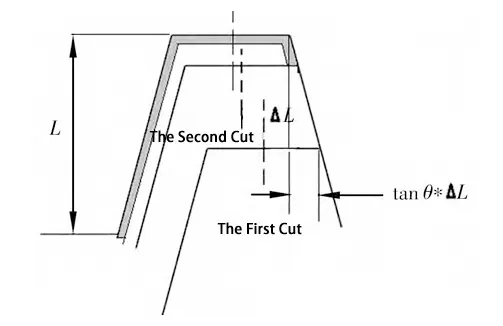
To mitigate vibration caused by excessive force points on the cutting tool, a zoned machining approach is adopted (see Figure 4). Rough machining is first completed using the straight-through method, followed by separate finishing operations for the thread flank and root surfaces.
By controlling the machined thread depth, the flank dimensions are indirectly regulated to ensure no contact between the insert and the root surface. This guarantees that the tool experiences minimal radial (major diameter direction) force during flank cutting.
By separating the flank and root machining and strictly controlling the tool contact area, the tool avoids simultaneously bearing the reaction forces from both the flank and root. This reduces vibration risks caused by multi-point loading and improves workpiece surface quality.
(2) Fixture Optimization
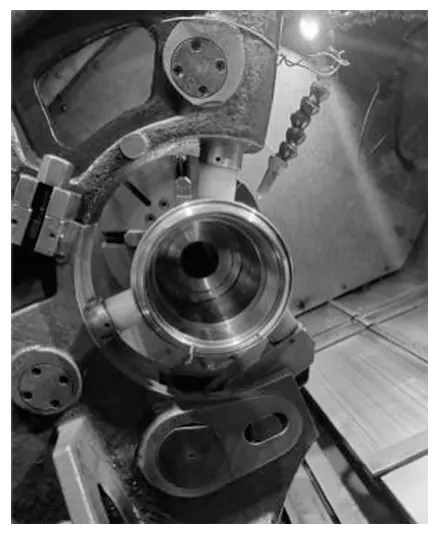
Traditional center frames typically employ a three-point contact structure (see Figure 5), ensuring concentricity during bore and outer diameter machining.
Three nylon blocks are mounted on a semi-circular auxiliary fixture to achieve this three-point contact with the workpiece’s outer diameter.
During high-speed machining, the insufficient contact area between the nylon blocks and the workpiece weakens clamping rigidity and stability, failing to suppress workpiece vibration.
This not only compromises machining accuracy and surface quality but also shortens machine tool lifespan. Therefore, increasing the effective contact area is essential.
Research indicates that increasing the contact area between the center support’s nylon sleeve and the pipe/bar stock’s outer diameter effectively suppresses machining vibration and enhances workpiece stability.
However, the resulting insufficient heat dissipation limits the workpiece’s rotational speed, directly impacting machining quality and efficiency.
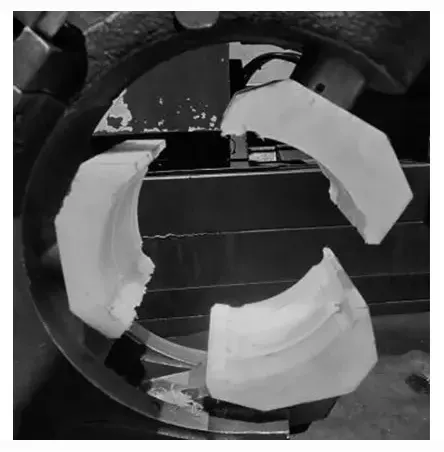
To address this, the author optimized the existing cylindrical nylon support sleeve (see Figure 6). While increasing the contact area, the design ensures heat dissipation capacity matches the contact area by optimizing the water channel layout, cross-sectional shape, and flow efficiency.
(3) Tool Optimization
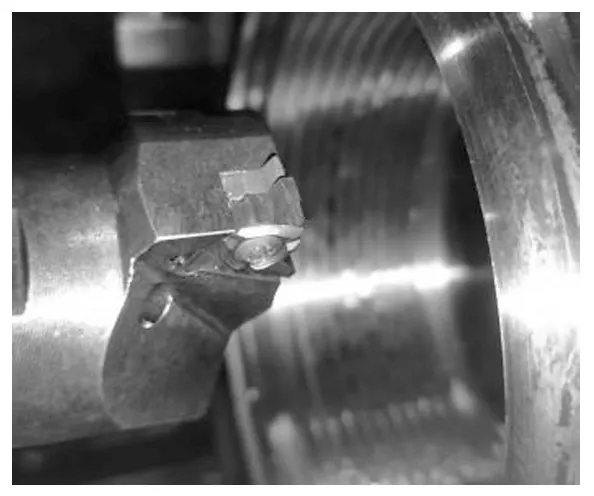
During on-site machining of internal threaded bores, severe tool tip wear and pronounced built-up edges were observed. This led to degraded thread quality and worsened surface roughness. Investigation revealed poor insert stability as the primary cause of vibration marks.
Through literature review and field testing, it was confirmed that tool pads play a critical role in supporting and protecting the cutting edge.
Tests demonstrated that reinforced tool pads effectively suppress vibration, significantly reducing continuous vibration marks at the thread major diameter.
The author supplemented the existing inserts and shank specifications with compatible reinforced inserts (see Figure 7), effectively enhancing the machining quality of internal thread surfaces.
Improvement Results
Through optimized feed methods, cutting parameters, improved fixtures and tools, and subsequent experimental validation, thread vibration marks were successfully eliminated (see Figure 8).

Conclusion
The proposed process improvements significantly enhance thread surface quality, resolve machining bottlenecks, provide robust support for innovation and efficiency gains, and ensure technical reliability for product delivery.
Currently, this method has been successfully implemented with products meeting quality standards. Future plans include extending its application to other internal thread machining operations.
FAQ
What causes vibration marks during internal thread machining?
Vibration marks typically result from factors such as tool wear, improper tool geometry, insufficient rigidity of the boring bar or fixture, poor machine tool conditions, unsuitable cutting parameters, and difficulties in chip evacuation or cooling.
How does tool wear affect thread accuracy and surface quality?
As the tool wears, the cutting edge becomes dull or chipped, increasing cutting force fluctuations. This promotes regenerative chatter, which leads to pitch inconsistency, reduced thread accuracy, and poor surface roughness.
Why is monitoring vibration signals important in thread turning?
Monitoring vibration characteristics and cutting force changes helps detect tool wear and sudden process instability. This allows operators to determine when tools need replacement or regrinding, ensuring consistent machining accuracy and extending tool life.
What machining issues commonly occur during CNC internal thread turning?
Common problems include incorrect thread profiles, pitch deviation, thread damage or galling, poor surface roughness, and noticeable vibration marks on the thread’s major diameter.
How can cutting methods and parameters be optimized to reduce vibration?
Optimization includes using straight-feed roughing, separate flank and root finishing, reducing tool contact points, controlling cutting depth, and using zoned machining. These methods minimize multi-edge loading and stabilize cutting forces.
What improvements can be made to fixtures and cutting tools to prevent vibration?
Increasing fixture contact area, improving heat dissipation, using reinforced nylon sleeves, upgrading tool pads, and selecting high-stability inserts all help suppress vibration. These enhancements improve overall support and reduce tool deflection.

