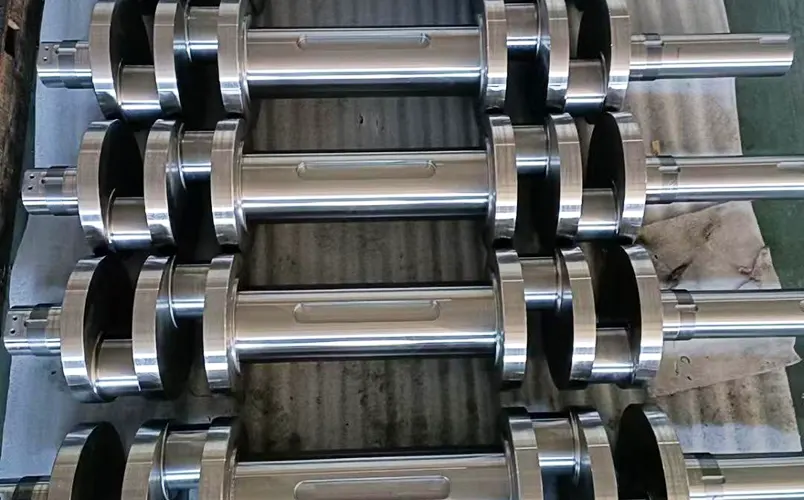
Currently, automotive engines are continuously evolving toward higher power density and lower emissions. As one of the core load-bearing components, crankshafts must withstand extremely high dynamic loads.
They also complete thousands of rotational cycles within short timeframes, requiring significantly enhanced load-bearing capacity. Most existing crankshafts employ conventional quenching and tempering forge processes to enhance performance.
However, this process often leads to issues such as insufficient hardened layers and residual tensile stress concentration, particularly around oil holes and journal circumferences, where defects can form and trigger fatigue cracks.
Heat Treatment and Microstructural Regulation
The combination of thermodynamic pathways during heating, soaking, and cooling stages determines how heat treatment regulates the microstructure and mechanical properties within the steel.
Among these, the influence of cooling rate on fatigue strength is the most complex: excessively high cooling rates can induce quenching cracks, while excessively low rates lead to reduced hardness and strength.
Based on this, this study conducts experiments addressing issues such as temperature non-uniformity and asynchronous microstructural transformation during the heat treatment of automotive engine crankshafts.
The aim is to provide technical solutions for enhancing the fatigue limit of forged steel crankshafts, enabling lightweight designs for high-pressure engines, and ensuring long-term stable service.

Metal Heat Treatment Processes and Theoretical Foundations of Crankshaft Fatigue Strength
Analysis of Metal Heat Treatment Processes
Metal heat treatment alters the arrangement of metal atoms and crystal lattices through external heating energy. Common processes include annealing, normalizing, quenching, and tempering.
Annealing restores lattice distortions caused by cold working, eliminates internal residual stresses, and significantly enhances material plastic deformation capacity, preparing it for subsequent processing;
Normalizing employs a cooling rate between annealing and quenching, effectively refining grain size to impart moderate strength and toughness to components.
Quenched materials exhibit high hardness but poor toughness and ductility, necessitating immediate tempering—reheating the quenched part to a specific temperature below the Ac1 critical point, holding at that temperature, and then cooling at a specified rate.
As the tempering temperature increases, material strength decreases slightly, but plasticity and toughness improve significantly.
For different materials, heat treatment must precisely regulate the three key factors—temperature, time, and rate—based on the actual Continuous Cooling Transformation curve (CCT) or Time-Temperature-Transformation curve (TTT) of the steel grade. This ensures stable target hardness, tensile strength, and fatigue resistance.
Fatigue Strength of Automotive Engine Crankshafts
The automotive engine crankshaft serves as the core power transmission component that converts the reciprocating linear motion of pistons into rotational motion.
During a complete operating cycle, each journal of the crankshaft endures two immense positive pressures during the power strokes of ignition and two opposing tensile forces during the compression strokes, creating asymmetric cyclic stresses.
This asymmetry is the fundamental cause of fatigue failure risk for crankshafts.
The fatigue failure process involves: localized cracks first forming at stress concentration points on the material surface, followed by main crack propagation perpendicular to tensile stress directions, culminating in instantaneous fracture.
Crankshaft fatigue failure not only causes engine shutdown but also risks ejected fracture fragments piercing cylinder walls, triggering severe safety incidents that endanger occupants’ lives and health.
During operation, crankshafts endure complex composite stresses, including:
- alternating bending stresses at crankpin journals due to bending and torque; additional bending loads from journal misalignment;
- torsional shear stresses between main journals and connecting rod journals; centrifugal inertial stresses from high-speed rotation;
- and thermal stresses caused by temperature gradients.
By increasing fillet radii, optimizing oil hole chamfers, implementing precision surface finishing, and applying strengthening treatments, the local stress concentration factor in automotive engine crankshafts can be controlled below 1.5.
This significantly reduces the risk of fatigue crack initiation, minimizes the probability of localized wear and fracture caused by stress concentration, and ultimately enhances overall engine durability.
Simultaneously, employing zone-specific cooling technology accelerates heat removal in high-temperature zones like crank pins to match their thermal capacity.
Transition radii are treated with zoned spray cooling to mitigate stress concentration, with residual stress peak differences ideally controlled below 150 MPa.
Correlation Between Metal Heat Treatment Processes and Automotive Crankshaft Fatigue Strength
The fundamental role of metal heat treatment is to enhance base material hardness and strength.
The martensitic structure formed during quenching cooling contains high-density dislocations and supersaturated carbon atoms in solid solution, significantly enhancing surface strength and resistance to plastic deformation.
This hardening effect prevents initial plastic slip from initiating at oil hole edges under alternating loads, thereby delaying fatigue crack propagation and establishing the material foundation for fatigue strength improvement.
However, excessive cooling can lead to the formation of coarse twin martensite or high-density microcracks in the steel microstructure, which become fatigue propagation pathways.
Meanwhile, undissolved carbides resulting from insufficient soaking become stress concentration points.
Therefore, the core of process optimization lies in achieving a synergistic balance between hardness and toughness.
Additionally, heat treatment processes can reconstruct the residual stress field in automotive engine crankshafts:
Optimized zoned cooling techniques form a steady-state residual compressive stress layer of -430 to -450 MPa, establishing a prestress barrier at critical crankshaft sections to further enhance fatigue resistance.
Practical Heat Treatment Process Optimization and Its Impact
Optimization Directions and Practical Strategies
The first direction in heat treatment process optimization is precise control of heating temperature.
Temperature is the core factor determining the degree of austenitization and microstructural transformation; its fluctuations directly affect the uniformity and properties of the final microstructure.
High-precision furnaces with independent multi-zone temperature control, combined with real-time multi-point feedback via K-type or S-type thermocouples, enable precise temperature regulation.
The heating process must be conducted under nitrogen-based atmosphere protection to prevent surface decarburization and oxidation that compromise fatigue strength.
The second optimization direction involves rationally adjusting holding time. Insufficient holding time may lead to the formation of undissolved carbides, while excessive holding time causes grain coarsening, reducing crankshaft toughness.
During optimization, precise calculations must incorporate the material’s time-temperature transformation curve and the actual effective wall thickness of the workpiece. A “stepwise” holding strategy is employed:
The initial stage uses forced convection for rapid heating to ensure uniform temperature distribution. The subsequent stage maintains temperature at low power to guarantee precise attainment of the holding endpoint.
Optimization of the cooling phase determines the final microstructure and stress state.
This study introduces a water-soluble organic polymer quenching agent. Its cooling capacity is high in the high-temperature phase transformation zone around 300°C but significantly reduced below 200°C, effectively suppressing quenching crack formation.
Experimental Study on Process Optimization
To validate the specific impact of optimized heat treatment processes on crankshaft fatigue strength, typical 42CrMo4 shaft steel was selected as the test material.
Forged annealed crankshaft blanks with a main journal diameter of (95±1) mm were used, with material chemical composition strictly controlled at C: 0.39%–0.42% and Mo: 0.19%–0.25%.
Test equipment included: a multifunctional sealed box furnace with 10-zone independent temperature control (accuracy ±3°C) and an integrated multi-point thermocouple temperature recording system, along with an adjustable polymer quenching tank (cooling equipment).
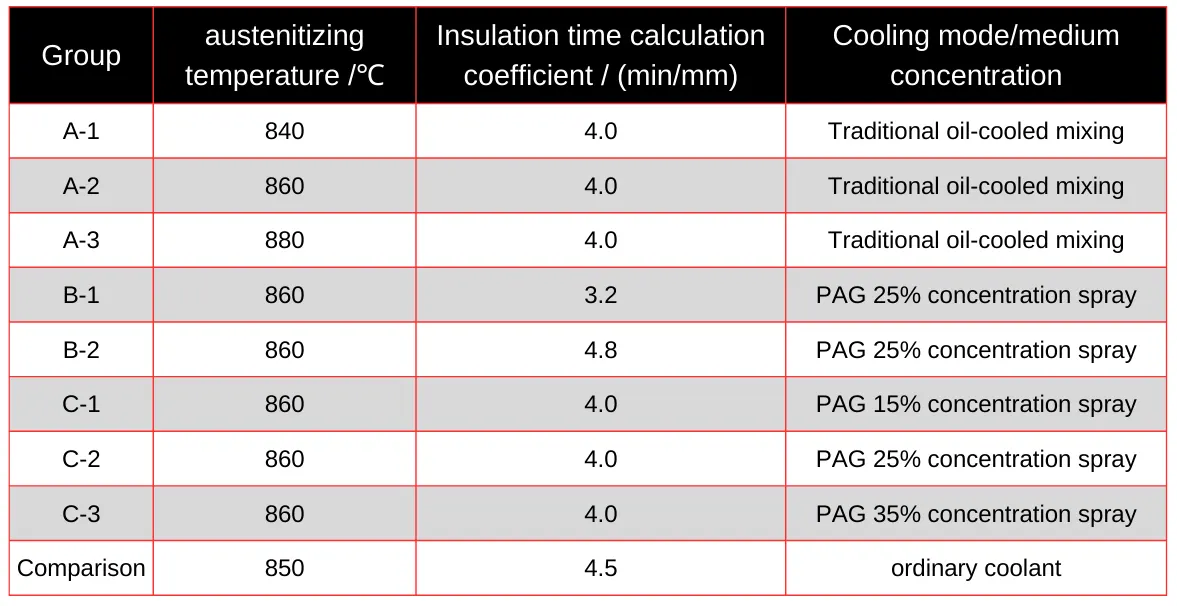
The experiments focused on three key variables: heating temperature gradient (Group A), soak time strategy (Group B), and cooling path optimization (Group C).
Each group comprised five parallel specimens and one original process control specimen. The heat treatment optimization variable test parameters are shown in Table 1.

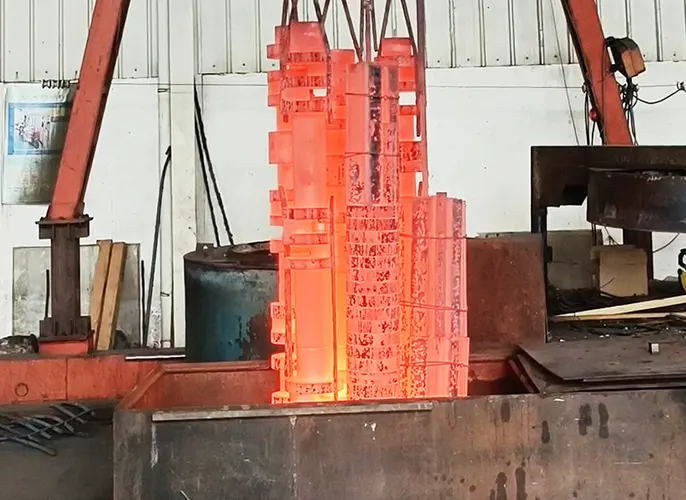
All specimens were transferred to the cooling system after austenitization, with an immersion temperature difference <30℃. Test results showed:
- Specimens in Group A-2 (860℃ soak) achieved uniform, fine-grained full martensite structure with an average lamellar width of 0.23μm;
- Group A-3 exhibited a tendency toward coarse grain growth;
In the C series, when polymer concentration was increased to 25%, scanning electron microscopy revealed a composite microstructure of typical fine martensite (<0.3 μm) and discontinuous film-like retained austenite along grain boundaries.
This structure is considered capable of buffering stress concentration. Table 2 summarizes key performance parameters of the hardened layer.

Table 2 indicates that the C-2 combination achieved sufficient hardening depth after spray cooling in a 25% polyalkylene glycol solution, with a compressive stress field reaching 435 MPa at the surface-20 mm position.
This provides critical support for resisting fatigue damage in automotive engine crankshafts. In contrast, the oil-cooled control sample exhibited insufficient hardening, with residual compressive stress reduced by approximately 25%.
Significant Impact on Crankshaft Fatigue Strength
Based on the hardened layer performance data obtained from the above experiments, this study further validated the practical enhancement of crankshaft fatigue strength through optimized processes via fatigue bench testing.
All samples underwent single-point loading fatigue verification using a resonant fatigue bench (load ratio R=-1, frequency 115Hz).
Results indicate:
Specimens treated with the optimal combined process (Group C-2) achieved a median fatigue strength of 275 MPa, representing a 19.5% improvement over the conventional process control group;
At a loading stress amplitude of 340 MPa, the average fatigue life increased to 2.12 million cycles, marking a 37% increase.
Simultaneously, under the optimized process treatment, crack initiation primarily occurred at the 1.2mm subsurface layer rather than at surface defect points, indicating that the compressive stress field effectively suppressed the risk of early cracking at surface stress concentration points.
This optimized process offers significant advantages:
On one hand, the deeper carburizing process reduces process energy consumption by approximately 40%, with operating costs compressed to two-thirds of the oil-cooling system;
On the other hand, it enables 42CrMo4 steel to achieve properties approaching those of high-alloy forged steel 55CrMo, while reducing material costs by 32%.
Microstructural Evolution and Damage Mechanism Analysis
To elucidate the intrinsic mechanisms by which process parameters influence fatigue performance, this study employed Scanning Electron Microscopy (SEM), Electron Backscatter Diffraction (EBSD), and X-ray Diffraction (XRD) for multi-scale characterization of the optimal C-2 group specimens.
Results indicate that the 25% PAG quenching medium achieves a cooling rate of 45°C/s within the 300–400°C range, effectively suppressing hypereutectoid ferrite precipitation.
This yields a composite microstructure comprising lamellar martensite and thin-film-like retained austenite (volume fraction ~8.5%).
EBSD analysis revealed lamellar bundle sizes controlled below 2.3 μm, with small-angle grain boundaries (2°–15°) accounting for 67% of the structure.
This fine-grained microstructure significantly enhanced fatigue crack initiation resistance through grain boundary strengthening mechanisms.
Residual Stress Distribution and TRIP-Assisted Crack Suppression
XRD stress testing confirmed synergistic protection from the surface residual compressive stress (-435 MPa) and the stress-induced phase transformation effect (TRIP effect) of residual austenite at 0.8 mm below the surface.
When the crack tip stress intensity factor ΔK reached 12 MPa·m½, the martensitic transformation of residual austenite consumed crack propagation energy, reducing the crack growth rate da/dN by approximately 40%.
Fracture analysis revealed that the fatigue source region of the optimized process specimen exhibited a typical mixed cleavage-notch morphology.
Crack initiation occurred at a depth of 1.2 mm below the surface, corresponding to the transition zone where residual compressive stress changes from negative to positive.
Compared to the brittle cleavage characteristics with multiple surface initiation sources observed in conventional oil-cooled specimens, the optimized process extended crack initiation life from 6.2×10⁴ cycles to 1.8×10⁵ cycles.
Notably, under high stress amplitude (340 MPa), the C-2 group specimens maintained a mixed intergranular-extragranular propagation mode, whereas the control group exhibited secondary cracking and extragranular fracture.
This indicates that polymer quenching effectively suppressed grain boundary weakening.
Grain Boundary Chemistry and Hardness Gradient Optimization
Energy dispersive spectroscopy analysis revealed that the optimized process reduced carbide segregation at grain boundaries from 1.8% to 0.6%. This reduction decreased susceptibility to stress corrosion cracking.
Additionally, the hardened layer exhibited a gradual hardness gradient, with HRC/0.5mm reduced to 3.2. This gradient prevented stress concentration at interfaces caused by abrupt hardness changes.
This is particularly critical for enhancing the service life in geometrically discontinuous regions such as oil hole edges.
From an engineering application perspective, this process requires localized adaptation to crankshaft geometric parameters.
Stress gradients as high as 8.5 MPa/mm occur at the transition radius (R) between main journals and crank arms.
Focused spray cooling, with a flow rate of 15 L/min·cm², is recommended in the R-radius zone. This ensures cooling rates exceeding 50°C/s to induce residual compressive stresses above 500 MPa.
For oil holes with a diameter of Φ8 mm, it is recommended to incorporate a 0.5 mm countersink design.
This allows the quenching medium to fully contact the hole walls. It prevents hardness inconsistencies caused by vapor films in traditional oil cooling, where wall hardness can fluctuate HRC 8–10.
This process parameter package has been validated on a 2.0T diesel engine crankshaft test bench.
After 2000 hours of endurance testing under rated power and peak torque conditions, no recordable cracks were detected.Magnetic particle inspection confirmed the engineering reliability of the optimized process.
Conclusion
This study significantly refined the surface martensitic structure of crankshafts.
This was achieved through precise control of austenitizing temperature, rational adjustment of soak time, the use of water-soluble polymer quenching media, and the application of zone-specific cooling technology.
It also generated a residual compressive stress field reaching −435 MPa at the surface. This stress state effectively suppressed crack initiation in stress concentration zones, such as bore radii.
FAQ
Impedit egestas aliquet?
Lorem ipsum dolor sit amet, consectetur adipiscing elit. Ut elit tellus, luctus nec ullamcorper mattis, pulvinar dapibus leo.
Sapien class quo temporibus?
Lorem ipsum dolor sit amet, consectetur adipiscing elit. Ut elit tellus, luctus nec ullamcorper mattis, pulvinar dapibus leo.
Elementum voluptate sodales?
Lorem ipsum dolor sit amet, consectetur adipiscing elit. Ut elit tellus, luctus nec ullamcorper mattis, pulvinar dapibus leo.

