Threaded connections are widely used in mechanical equipment, and their machining quality directly impacts the safety, reliability, and service life of the equipment.
CNC lathes, characterized by high precision, efficiency, and flexibility, play a crucial role in the batch production of threaded components.
However, in actual production, factors such as tool wear, machine tool vibration, unreasonable cutting parameters, and surface treatment processes can easily lead to critical dimensional deviations in thread mean diameter and pitch, or surface defects.
This results in resource wastage, making thread repair economically significant.
Currently, small and medium-sized enterprises predominantly rely on manual experience, employing dies, taps, or conventional lathes for repair.
This approach suffers from high labor intensity, low efficiency, and significant quality fluctuations, making it difficult to ensure consistency in batch repairs.
Existing research has primarily focused on new thread machining and tool optimization, with limited studies on secondary precision repair of formed threads.
A systematic CNC repair technology framework remains unestablished.
Addressing these needs, this paper systematically investigates the entire process of CNC lathe thread repair.
It analyzes the applicability of different thread commands for repair, compares two efficient tool setting methods, and, through batch repair case studies, summarizes a scalable thread repair program and operational guidelines.
This provides practical technical reference for enterprises and supports the refinement of process theory.
Principles of Thread Cutting and Analysis
-
Principles of Thread Cutting and Its Repair Specificity
Thread cutting on CNC lathes achieves precise electronic synchronization between spindle rotation and tool axial feed via the CNC system.
Based on position feedback from the spindle encoder, the system generates specific pulses per revolution.
Using a preset electronic gear ratio, it controls the Z-axis servo motor to advance the tool by one thread pitch.
The encoder’s zero-position signal ensures consistent feed phase for each pass, guaranteeing thread shape continuity.
Thread machining quality is influenced by a combination of factors including tool geometry, cutting path, cutting parameters, and workpiece material.
Thread recutting presents greater complexity than new thread machining, with its distinct characteristics manifesting in three key aspects:
First, recutting involves profile constraints.
Since incomplete thread profiles already exist on the workpiece surface, the tool must precisely align with the original helical groove. Failure to do so may result in profile damage or recutting failure.
Second, Intermittent Cutting in Repair Machining
Repair involves intermittent cutting with significant fluctuations in cutting forces. Combined with uneven allowance distribution and increased cutting impacts, this places higher demands on tool strength and machine rigidity.
Third, Precise dimensions adjustment
Repair requires restoring threads to qualified dimensions, necessitating extremely precise fine-tuning of final dimensions and demanding higher accuracy control.
These unique characteristics make thread repair processes, particularly tool setting techniques, the core and most challenging aspect of the entire repair operation.
1.2 Comparison of Common Thread Cutting Commands and Repair Command Selection Strategy Numerous thread cutting commands exist in CNC systems, such as G32, G92, and G76.
The selection of each command for repair must be tailored to specific circumstances.
› Single-Pass Thread Cutting with G32
As the most fundamental thread cutting command, G32 executes single-pass cutting from start to end.
Its primary advantage lies in high flexibility, allowing programmers full control over entry points, cutting paths (e.g., straight, angled, or alternating left-right), and exit points.
This command is suitable for machining and repairing special threads like constant-pitch threads and non-standard thread profiles (e.g., trapezoidal threads, square-pitch threads), aiding in understanding the fundamental logic of thread formation.
However, its programming process is relatively cumbersome.
Machining a complete thread often requires writing dozens of program segments, involving substantial calculations prone to errors and resulting in low production efficiency.
Regarding repair applicability, G32 is primarily used for single-piece, small-batch, or special thread repairs, and can also be employed for thread finishing.
It is typically utilized when other thread commands cannot meet path control requirements.
› Fixed Cycle Thread Cutting with G92 Command
G92 is a fixed cycle command. By simply setting the thread’s end coordinates and lead, the system automatically completes the “approach-cut-retract-return” cycle.
Its primary advantage lies in simplified programming: fewer program segments, clear logic, and ease of inspection and modification, resulting in significantly higher programming efficiency than G32.
However, this command typically employs a straight-in feed method, causing both cutting edges to engage simultaneously.
This often leads to poor chip evacuation, high cutting forces, vibration issues, accelerated tool wear, and potential thread interference during large-pitch thread machining.
Regarding rework applicability, G92 is particularly suitable for batch reworking of threads with pitches no greater than 3mm and moderate precision requirements.
Its simple program structure facilitates interrupting, inspecting, and adjusting tool offset values at any point during the rework process.
› G76 Compound Thread Cutting Cycle
As a powerful compound thread cutting cycle command, G76 sets multiple parameters—including finishing allowance, minimum cutting depth, thread angle, and final cutting depth—through a single-line program segment.
The system then automatically executes an optimized layered cutting process, typically employing a helical approach for machining.
Its advantages include simplified programming and the realization of single-edge cutting through the helical approach.
This method features low cutting forces, smooth chip evacuation, and excellent heat dissipation, contributing to higher surface quality and extended tool life.
Simultaneously, its intelligent depth-of-cut allocation strategy balances machining efficiency with tool protection.
The drawback of this command lies in its relatively complex parameter configuration, requiring precise understanding of each parameter’s function.
Additionally, the cutting path is automatically determined by the system, offering less flexibility than G32.
Regarding repair applicability, G76 is suitable for thread machining with large pitches, high precision, and stringent surface quality requirements (e.g., trapezoidal threads, worm threads).
However, it is generally not employed in batch repair operations.
For batch thread repair, comprehensive consideration must be given to repair efficiency, quality requirements, operational convenience, and compatibility with tool setting methods.
For common thread repairs, the G92 command is typically the preferred solution due to its ease of programming and adjustment.
Research on Core Tool Setting Methods
-
Axial Dynamic Tool Setting Method
The principle of axial dynamic tool setting involves adjusting the Z-coordinate of the thread starting point in the micro-adjustment program to precisely align the tool tip with the center position of the existing thread spiral groove on the workpiece in the axial direction.
This is typically achieved by modifying the tool offset value.
The operational flow for this repair method is as follows: First, perform a rough tool setting.
Then, run the repair program automatically in single-block mode while closely observing the relative position between the tool tip and the workpiece thread groove.
If misalignment occurs, pause the program. Within the CNC system’s tool compensation interface, make incremental adjustments to the Z-axis offset (or wear value), then rerun the program for observation.
Repeat this cycle of “test cut – observe – adjust” until the tool tip precisely aligns with the center of the helical groove.
This method’s advantages include no special requirements for machine tools or fixtures, high flexibility, and the potential to achieve high tool setting accuracy in theory.
However, the entire process heavily relies on the operator’s observational judgment and experience, often requiring multiple trial cuts.
Additionally, each part requires re-alignment along the Z-axis for repair, resulting in time-consuming and inefficient rework.
Therefore, this method is primarily suitable for single-piece, small-batch, or non-standard thread repairs, as well as when other auxiliary positioning methods are unavailable.
-
Zero-Position Marking Method
This rapid positioning technique leverages circumferential phase synchronization to significantly enhance tool setting efficiency for batch rework. The specific operational flow is detailed in Table 1.
| Step | Name | Method |
|---|---|---|
| 1 | Set Reference | At any position on the machine tool chuck, use a scribing tool to mark a clear zero-position reference line. |
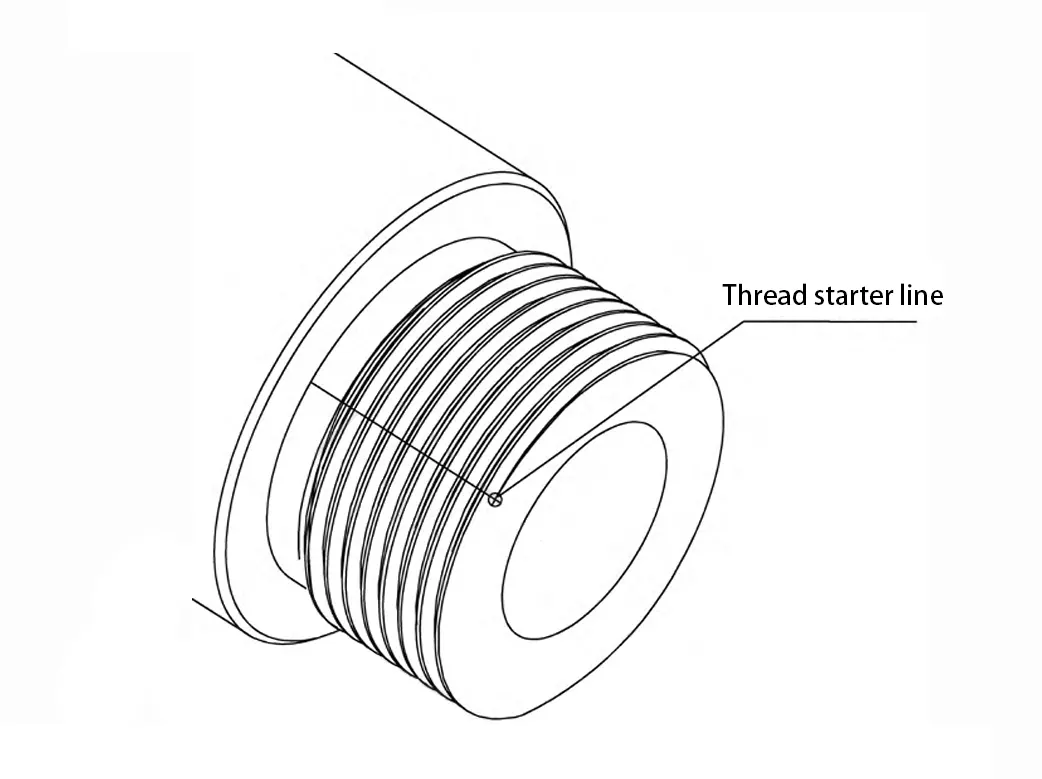
| 2 | Workpiece Marking | On the circumferential surface of each workpiece to be re-machined, mark a clear axial line at the starting thread tooth of the thread, serving as the “thread tool starting position line,” as shown in Figure 1. |
| 3 | Positioning and Alignment | When clamping the workpiece, manually rotate it so that the surface “thread tool starting position line” aligns with the chuck’s “zero-position reference line” within the same axial cutting plane. |
| 4 | Execute Machining | After tool setting is completed, regardless of how many times the workpiece is replaced, as long as these two lines remain aligned, the circumferential phase of the thread tool entry position will remain fixed. |
Table 1: Zero-Position Marking Method Operational Flow
The method’s advantage lies in enabling rapid, precise circumferential positioning, eliminating the need for repeated trial cuts to achieve tool alignment.
This substantially boosts batch processing efficiency. Simultaneously, its simplicity, high repeatability, and ease of standardization make it highly adaptable.
However, this method requires pre-marking the workpiece during prior processes or before rework, increasing auxiliary time.
It also demands high alignment precision and operator responsibility during clamping.
Therefore, it is suitable for batch production and reworking threaded parts with high consistency requirements, serving as a key technology for enhancing batch rework efficiency.

-
Identification and Fine Adjustment of Tool Deviation
After completing preliminary positioning using the above method, minor deviations may still occur during actual tool setting.
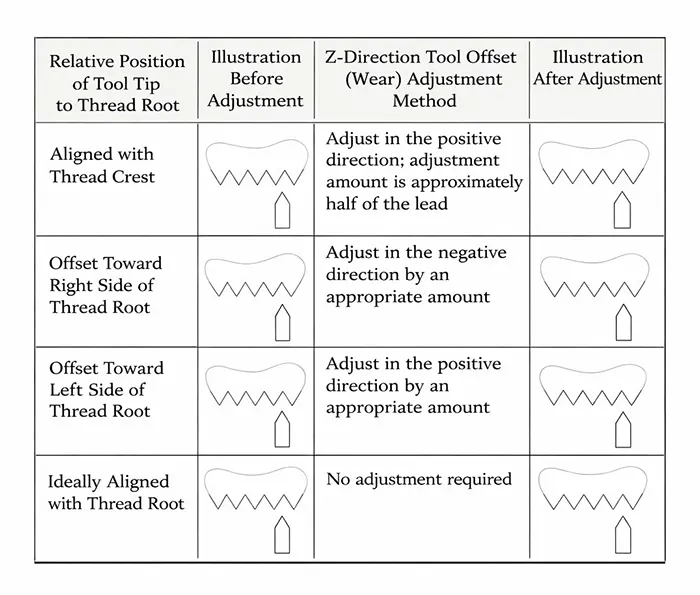
Common relative positions between the tool tip and thread root, along with their adjustment strategies, are shown in Table 2.

Fine-tuning techniques primarily include:
First, the auxiliary observation method:
When the tool tip is distant from the root and visually difficult to judge, apply red lead or mark the thread surface with a marker.
Observe the contact between the tool tip and the marked area to assist precise tool setting.
Second, the micro-test cutting and inspection method.
After initial tool alignment, perform an extremely shallow test cut (e.g., X-axis depth of cut 0.05mm).
Subsequently inspect using a thread micrometer, three-point gauge, or go/no-go gauges.
Based on measurement results, simultaneously fine-tune the tool offset values: – X-axis offset controls the mean diameter; each adjustment should not exceed 0.05mm.
Z-axis tool offset controls tip alignment, with each micro-adjustment of 0.1mm progressively approaching the optimal dimension.
Repairing internal threads follows the same machining principles as external threads.
However, due to limited internal visibility, reliance on coloring methods or trial cutting combined with plug gauge inspection is essential for iterative adjustments.
In practical operation, the thread mouth coloring method can be used to assist tool setting. This involves uniformly coloring the thread mouth.
During trial cutting, the actual position of the tool tip is determined by observing the contact between the cutting marks and the colored area, allowing for further fine adjustments.
Application and Effect Analysis
-
Problem Background
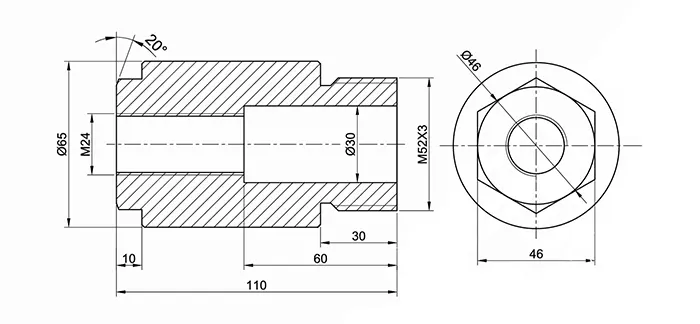
This analysis examines the thread repair of hot-dip galvanized studs for transmission towers at a certain company. The stud part drawing is shown in Figure 2.
Technical requirements stipulate that threads must be machined as hot-dip galvanized threads, with post-galvanizing thread retraction and rust-preventive oil application permitted.

The stud features M24 internal threads at one end and M52x3 external threads at the other.
After hot-dip galvanizing, zinc nodules partially filled the thread grooves, significantly affecting the M52x3 external threads.
This prevented pass gauges from clearing the threads, rendering the parts unfit for assembly.
The original repair process involved tapping the internal threads with taps and manually repairing the external threads using dies.
Manual external thread repair suffers from high labor intensity, low efficiency (averaging about 3 minutes per piece), poor thread profile quality, and low pass rate (only about 70%).
-
CNC Repair Solution Design
A CNC lathe with a FANUC system was selected for the equipment. A carbide thread insert with a 60° rake angle was used as the cutting tool, with the spindle speed set to 400 rpm.
Tool setting employs the zero-mark method:
First, engrave a zero-reference line on the chuck.
Before clamping all studs, uniformly mark a thread starting line at the initial tooth position of the M52x3 external thread.
During clamping, ensure the workpiece’s starting line precisely aligns with the chuck’s zero-reference line.
During the M52x3 external thread repair process, the G92 command is selected for layered cutting in the programming.
Its program structure is concise and clear, facilitating repeated checks of the tool tip position and real-time modification of the tool offset value during the first-piece debugging stage by using the “M1” pause function.
This also helps effectively control cutting force and repair allowance. The specific repair reference program is shown in Table 3.
| Program Block | Explanation |
|---|---|
| O0092 | Program name |
| T0303 | Select threading tool |
| M3 S400 | Spindle rotates clockwise, speed 400 r/min |
| G0 X53 Z5 | Rapid positioning to tool start point |
| G92 X52 Z-28 F3 | Air-cut threading, visually inspect tool tip position |
| M1 | Optional stop; modify No.03 tool offset based on visual inspection |
| T0303 | Re-call tool offset |
| G92 X51 Z-28 F3 | Air-cut threading, continue inspecting tool tip position |
| M1 | Optional stop; modify No.03 tool offset based on visual inspection |
| T0303 | Re-call tool offset |
| G92 X50 Z-28 F3 | Start thread cutting |
| X49 | Second pass |
| X48.5 | Third pass |
| X48.1 | Fourth pass |
| X48.1 | Spring (finishing) pass |
| G0 Z260 | Tool retracts in Z direction |
| M30 | Program end |
Table 3 Reference Program for M52x3 External Thread Repair
Repair process includes:
1. Preparation.
Complete marking-out. Ensure both marked lines align during clamping.
2. First-piece tool setting and trial cutting.
Use the coloring method to assist tool setting. Run the empty cutting segment from Table 3 and visually adjust the Z-axis tool offset value.
Conduct a micro-test cut, inspect with a thread ring gauge, and fine-tune X and Z tool offsets until requirements are met.
3. Batch Repair.
After confirming the first-piece parameters, record the current tool offset values.
For subsequent parts under uniform clamping standards, disable the M1 command and directly apply these offset values for batch machining.
4. Quality Control.
Implement periodic inspections during repair to ensure consistent repair quality.
-
Application Effect Comparison
After adopting the CNC rework method, all metrics showed significant improvement.
1. Quality:
Reworked threads exhibit clear profiles, low surface roughness values, and excellent dimensional consistency. First-pass inspection pass rate remains stable above 99%.
2. Efficiency:
Average rework time per part reduced to under 30 seconds, achieving over 80% efficiency improvement compared to manual methods.
3. Cost and Labor Intensity:
Reduced reliance on operator skill, decreased labor intensity, and eliminated die wear, resulting in a significant overall cost reduction.
Recommendations for Optimizing Thread Repair Processes
Based on theoretical analysis and practical validation, the following process optimization recommendations are proposed to ensure the quality and efficiency of CNC thread repair.
1) Thorough Pre-Repair Preparation
Standardize operations using the “zero-marking method” to ensure the chuck’s zero-reference line is clearly visible.
Provide standardized training for operators to achieve accurate workpiece marking and consistent clamping alignment.
2) Implement First-Piece Verification
Batch repairs must strictly follow the first-piece trial cutting, inspection, and parameter consolidation process.
Do not commence batch operations until the first piece meets qualification standards.
3) Optimize tool offset adjustments
For Z-axis tool offsets, prioritize positive micro-adjustments with increments not exceeding 0.1mm to prevent interference between tools and machined surfaces.
Establish a tool life management system for regular inspection and timely replacement of worn tools.
4) Optimize cutting parameters
Select appropriate cutting parameters based on the material type and heat treatment condition of reworked parts.
When machining galvanized parts, set the cutting line speed to the lower range of 50–70 m/min to optimize machining quality and prevent zinc layer adhesion to the tool. Calculate the spindle speed using the formula n = 1000v/(πd).
During trial cutting and tool setting, reduce the spindle speed to approximately 200 rpm for easier observation of the tool tip position.
5) Implement comprehensive quality control throughout the process
In addition to initial part inspection, establish a reasonable sampling frequency during batch production—recommended at 1 piece per 10 pieces.
Employ a combination of inspection methods including thread gauges, thread micrometers, and three-point measurement techniques, while maintaining detailed data records to ensure quality traceability.
Conclusions and Outlook
-
Research Findings
This study systematically explores application methods and process systems for CNC lathes in thread repair, addressing prominent issues in production practice.
By comparing the process characteristics of thread cutting commands like G32, G92, and G76, selection principles for repair applications were clarified.
The proposed “Axial Dynamic Tool Setting Method” and “Zero-Position Marking Method” establish precise tool setting solutions adaptable to varying batch requirements.
Using typical batch repair cases, the feasibility, efficiency, and stability advantages of the repair process centered on the G92 command and zero-marking method were verified.
Practical application demonstrates that this process system significantly improves the dimensional consistency, surface quality, and machining efficiency of repaired threads.
It effectively reduces scrap rates and production costs, providing enterprises with a reliable and standardized technical approach for threaded component repair.
This approach holds significant value for widespread application.
-
Research Limitations and Future Directions
Despite achieving practical results, this study has several limitations warranting further exploration.
1) High Reliance on Experience and Insufficient Intelligence
Current tool setting methods remain heavily dependent on operator experience and subjective judgment, requiring numerous trial cuts that constrain further efficiency gains.
Future research should explore automated and intelligent tool setting solutions based on machine vision and laser tool setting technologies.
2) Insufficient research on material and coating adaptability.
This study primarily focused on carbon steel hot-dip galvanized components, lacking systematic analysis of how different base materials and surface coatings influence repair process parameters.
A universally applicable parameter database remains unavailable.
Subsequent research should address these gaps by developing smarter, more efficient, and adaptable thread repair technologies and equipment, thereby advancing technical progress and engineering applications in this field.
FAQ
Impedit egestas aliquet?
Lorem ipsum dolor sit amet, consectetur adipiscing elit. Ut elit tellus, luctus nec ullamcorper mattis, pulvinar dapibus leo.
Sapien class quo temporibus?
Lorem ipsum dolor sit amet, consectetur adipiscing elit. Ut elit tellus, luctus nec ullamcorper mattis, pulvinar dapibus leo.
Elementum voluptate sodales?
Lorem ipsum dolor sit amet, consectetur adipiscing elit. Ut elit tellus, luctus nec ullamcorper mattis, pulvinar dapibus leo.

