Part production processes are a critical component of product manufacturing, playing a vital role in a company’s profitability and development. To enhance production efficiency and product quality while reducing costs, optimizing production processes is essential.
Taking vortex discs as a case study, this paper explores optimization methods for their production processes and provides a summary analysis.
Case Study
Based on a client’s production requirements, several vortex disc prototypes were developed. Using the prototyping process of one cast iron vortex disc as an example, we will examine the machining approach for such products.
The vortex disc is a critical separation device where material selection and manufacturing processes directly impact its performance and service life.
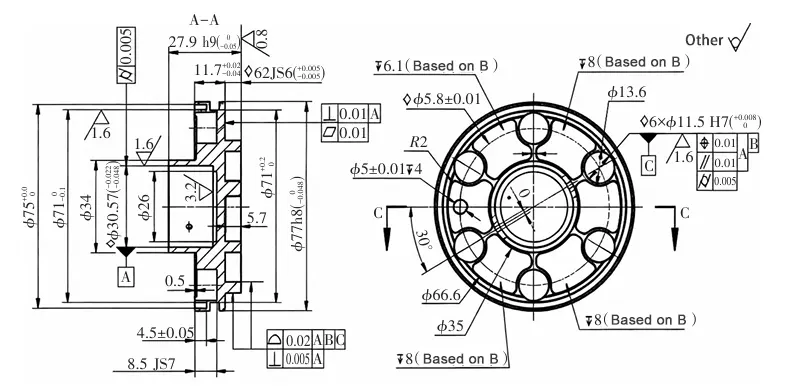
Therefore, appropriate materials and techniques must be chosen based on specific conditions during vortex disc production to ensure performance and quality. Key dimensions and geometric tolerances are shown in Figure 1.
Analysis of Drawings and Basic Machining Conditions
Analysis of the drawings and the customer-provided 3D model reveals the following fundamental details:
Product Dimensions: ϕ77 × 27.9 mm.
Blank Material: The customer does not supply blanks. Based on the machining process, a ϕ100 × 30 mm circular blank must be procured independently.
Blank Material: Cast iron HT250.
Analysis of the main machining difficulties of the parts
Key machining challenges include: Profile contour accuracy of 0.02mm along the reference contour, Profile perpendicularity of 0.005mm, Flatness of 0.01mm, Surface roughness of the bore inner wall, Bearing bore diameter tolerance: ϕ30-0.027-0.048, Roundness of 0.005mm, and Perpendicularity of 0.01mm.
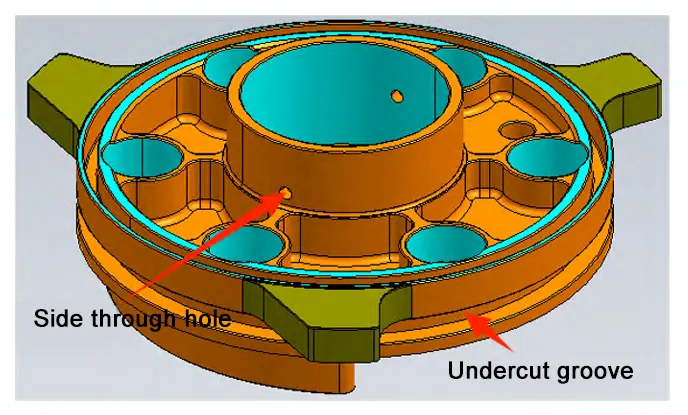
Processing challenges for this product: A 3.5mm wide, 2mm deep undercut groove (see Figure 2) along the product’s periphery complicates fixture design. Key considerations include: how to position the clamping fixture, how to machine this undercut groove, and when to perform this machining operation.
Initial processing scheme and code position design
Based on past machining experience and process optimization considerations, the clamping position was ultimately set as shown in Figure 2. The lifting screw holes were positioned between the gaps on the front face of the involute curve.
Figure 3 depicts the shape after rough machining in a single setup, reserving space for the clamping position and lifting screw holes for subsequent operations.
Using the lifting screw holes for clamping, the side through-holes and undercut groove shown in Figure 2 were machined on a 5-axis high-speed machining center.
Original process route and problems exposed
After completing the roughing of all features on the part’s back and sides on the 5-axis machine, the part was flipped.
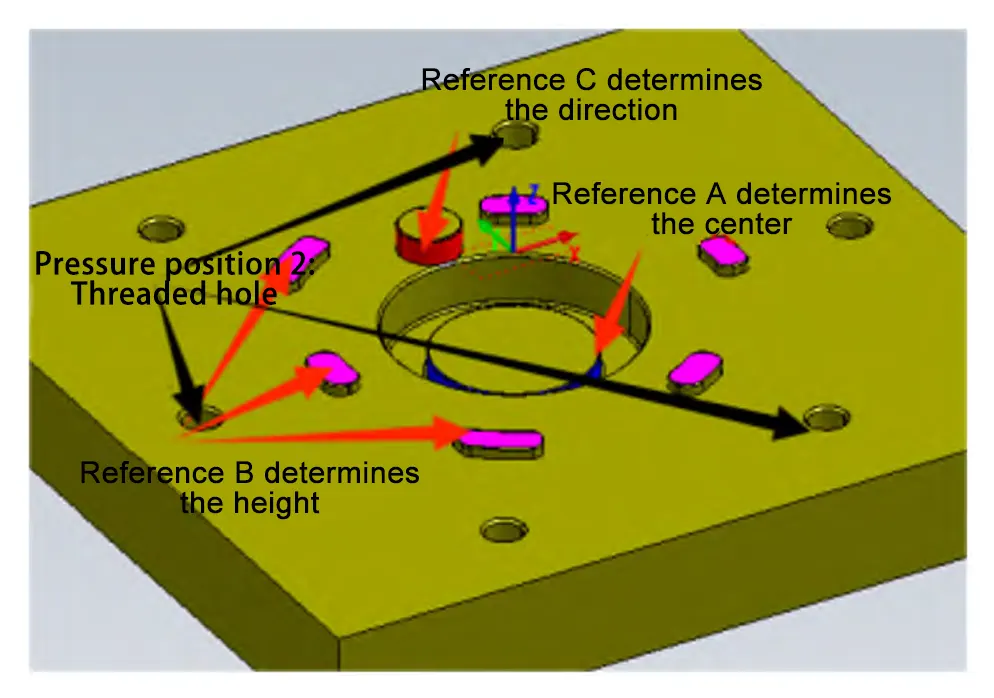
Reference holes A and C were used for center and orientation positioning, respectively, while reference plane B served as the height reference (see Figure 4) for machining the front contour features.
Using this process, two sets of parts (each set comprising one moving plate and one stationary plate) were initially machined. The machine’s in-process inspection system was employed to measure critical part dimensions.
Initial inspection data showed no issues, with dimensions and geometric tolerances within drawing specifications.
However, after isothermal treatment post-machining, CMM inspection revealed numerous dimensional and geometric deviations, with the spiral contour reaching a maximum deviation of 0.039 mm.
Analysis of the causes of deformation
Analysis of the CMM contour plots and the flatness of reference plane B revealed part deformation.
The investigation indicated that expediting production caused the deformation: the team finish-machined the reference plane ABC on the part’s back surface using a 5-axis machine before roughing the profile surface.
Consequently, when roughing the profile surface later—even after roughing and resting the reference plane ABC—the reference plane itself had already deformed, leading to inaccurate measurement data.
The excessive part error rendered delivery impossible.Revise the manufacturing process and fabricate two new fixtures. After roughing the part’s back surface, rough the profile surface before finishing the reference ABC.
Optimized detailed processing flow
The revised machining sequence is as follows:
Step 1: Rough-machine the blank’s flat surface, machine the clamping pin positions and lifting screw holes. The result is shown in Figure 3.
Step 2: Secure the part with magnetic clamping. Align using the straight edge shown in Figure 3, then rough-machine the part’s back surface as shown in Figure 3, leaving the clamping code position.
Step 3: Using the lifting holes and fixtures, transfer to a 5-axis machining center for finishing the undercut groove and side through-holes. Benchmarks ABC are not finished.
Step 4: Using a fixture similar to Figure 4, clamp the clamping code position and rough-machine the front profile features with allowance.
Step 5: After roughing, let stand for 24 hours to relieve stress.
Step 6: Fabricate the fixture. Secure the part using the clamping position. After aligning the part’s center and orientation using in-machine inspection technology, finish-machine the back features and reference surfaces ABC on the HGT600TH_A15SH three-axis high-speed machining center.
Step 7: Using the fixture shown in Figure 4, secure the part and finish-machine the front profile features.
Step 8: Secure the part using the threaded hole at clamping position 2 of the fixture shown in Figure 4. Remove the clamping pins and screws from the clamping positions, and eliminate the clamping positions reserved during previous machining operations.
Using this process, four sets of parts were machined. Both in-machine inspection data and CMM inspection data fully met the machining requirements specified on the drawings.
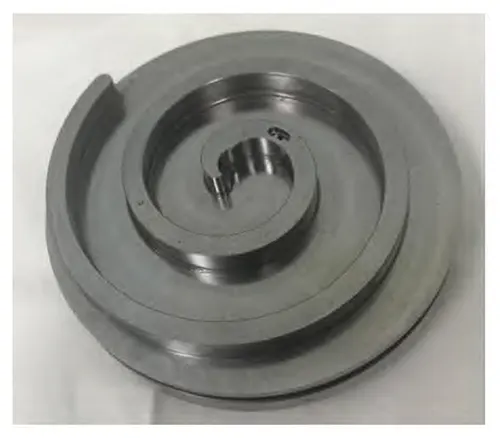
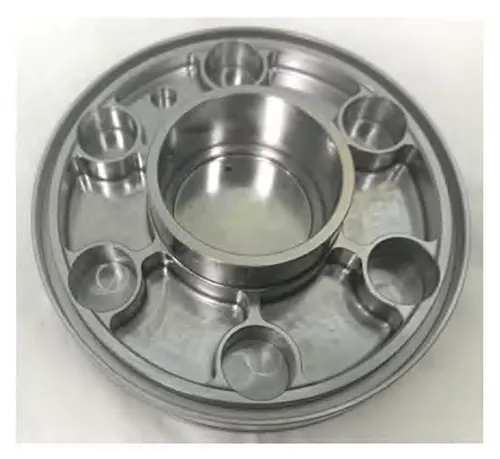
The profile accuracy of the vortex line with reference contour was within 0.02mm. Flatness, perpendicularity, roundness, cylindricity, parallelism, and all dimensional tolerances were within specifications. The finished parts are shown in Figures 5 and 6.
Conclusion
The prototyping process of the cast iron vortex disc part analyzed and optimized the machining process, leading to the following conclusions:
(1) Never underestimate the machining difficulty of any part. Even parts with seemingly low drawing requirements may encounter issues during processing due to other factors, resulting in out-of-tolerance inspection results.
(2) When machining parts, always consider factors that may cause deformation during processing. Do not overlook this possibility simply because the material itself is not prone to deformation.
(3) During prototype machining, avoid rushing or cutting corners. Anticipate and prevent foreseeable issues whenever possible.
Even if the process becomes more complicated, it is faster than starting over and improves prototype machining efficiency.
(4) Professional part inspection requires qualified personnel and specialized equipment. During prototyping, unqualified inspectors have caused excessive profile deviation readings, hindering accurate identification of manufacturing root causes.
(5) Vortex disc-type parts demand appropriate machining methods to achieve both speed and quality.
(6) Fixtures for batch production require specialization and stability. Simplified fixtures like those used in this prototype phase are only suitable for single-piece or low-volume prototyping.
Process optimization is a continuous improvement journey. By continually refining products and production workflows, we can effectively enhance production efficiency and product quality.
Simultaneously, conducting regular assessments and reviews allows us to summarize lessons learned, continuously introduce new application technologies and equipment, and drive the development and innovation of new processes.
FAQ
What are the main machining challenges of cast iron vortex disc parts?
Cast iron vortex discs present multiple machining challenges, including high profile contour accuracy (0.02 mm), strict flatness and perpendicularity requirements, tight bearing bore tolerances, and demanding roundness and surface roughness specifications. Undercut grooves along the periphery further complicate fixture design and machining strategy.
Why did deformation occur during the initial machining process?
Deformation occurred because the reference plane (ABC) was finish-machined too early in the process. Subsequent rough machining of the profile introduced internal stress, causing the already-finished reference surface to deform. This led to inaccurate measurement results and out-of-tolerance parts after heat treatment.
How was the machining process optimized to solve deformation issues?
The process was optimized by changing the machining sequence. Rough machining of both the back surface and profile was completed before finishing the reference surfaces. Additional stress-relief time was introduced, and specialized fixtures were fabricated to improve positioning stability and machining accuracy.
Why is fixture design critical in vortex disc machining?
Fixture design directly affects positioning accuracy, rigidity, and deformation control. Vortex discs require fixtures that can handle undercut grooves, maintain stable clamping, and ensure repeatable alignment. Simplified fixtures may work for prototyping but are unsuitable for batch production.
What role does in-machine inspection and CMM measurement play in process optimization?
In-machine inspection helps monitor key dimensions during machining, while CMM inspection provides high-precision verification after processing. Accurate measurement is essential for identifying deformation, validating process changes, and ensuring all geometric tolerances meet drawing requirements.
What key lessons can be learned from optimizing the vortex disc machining process?
Key lessons include never underestimating machining difficulty, always considering deformation risks, avoiding rushed prototyping, relying on qualified inspection personnel, and using appropriate fixtures and machining strategies. Continuous process optimization is essential to improve efficiency, quality, and repeatability.
