Fixtures play a crucial role in modern manufacturing. They enhance efficiency and reduce costs, yet traditional fixture designs often struggle to meet high-precision, high-efficiency machining demands, leading to unstable quality and low productivity.
For complex structures, specialized fixtures must be developed to improve machining efficiency and reduce processing difficulty.
A batch order requires machining 35,000 shaft-type components. These parts have already undergone sawing, turning of inner diameters, turning of outer diameters, and hexagonal milling. The next process involves machining tapered holes on thin-walled cylinders.
Tapered hole machining on cylindrical surfaces is a common manufacturing process. Developing innovative fixture designs for thin-walled cylindrical tapered holes is crucial for improving machining efficiency and reducing production costs.
Analysis and Selection of Solutions
Three primary methods exist for machining angled holes.
The first method involves using a five-axis machining center. Five-axis machining offers high processing speeds and production efficiency, enabling the completion of multiple inclined holes with a single setup.
However, due to the mismatch between the equipment’s operating costs and the value of the processed products, a five-axis machining center was not allocated for this order.
Therefore, alternative methods must be employed to achieve the inclined hole machining on thin-walled cylinders.
The second method involves indexing with a dividing head. This approach allows processing only one part per setup.
After completing one tapered hole, the indexing plate must be rotated to position for the next hole. Its disadvantage lies in single-part processing capability, resulting in low efficiency unsuitable for high-volume orders.
The third approach involves designing a specialized fixture for clamping and machining.
This fixture ensures precise part positioning, guarantees compliance with all process requirements, and enhances product quality. It reduces auxiliary time spent on manual clamping, alignment, and indexing, thereby improving efficiency.
The fixed positioning significantly lowers the required skill level and labor intensity for operators, making the process easier to handle. It also expands the range of tools that can be used and imposes minimal demands on the equipment itself.
After theoretically comparing the three oblique hole machining methods, the dedicated fixture design proves most suitable for this high-volume, high-precision production requirement.
The following section details and compares the design practice of the dedicated fixture for machining oblique holes in this batch of parts.
Fixture Design
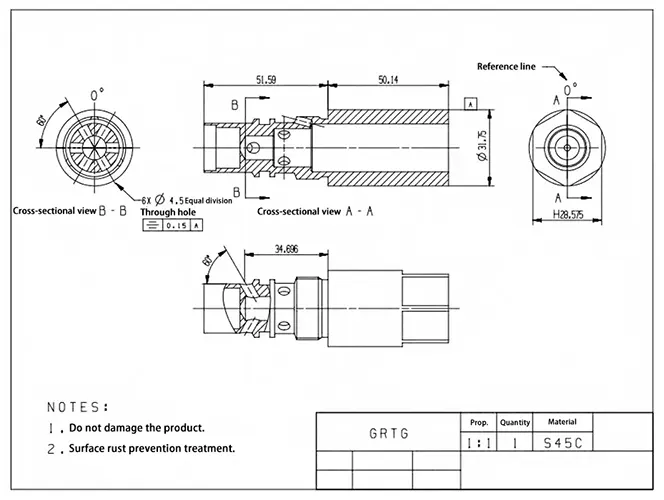
The two-dimensional drawing of the ordered part is shown in Figure 1.
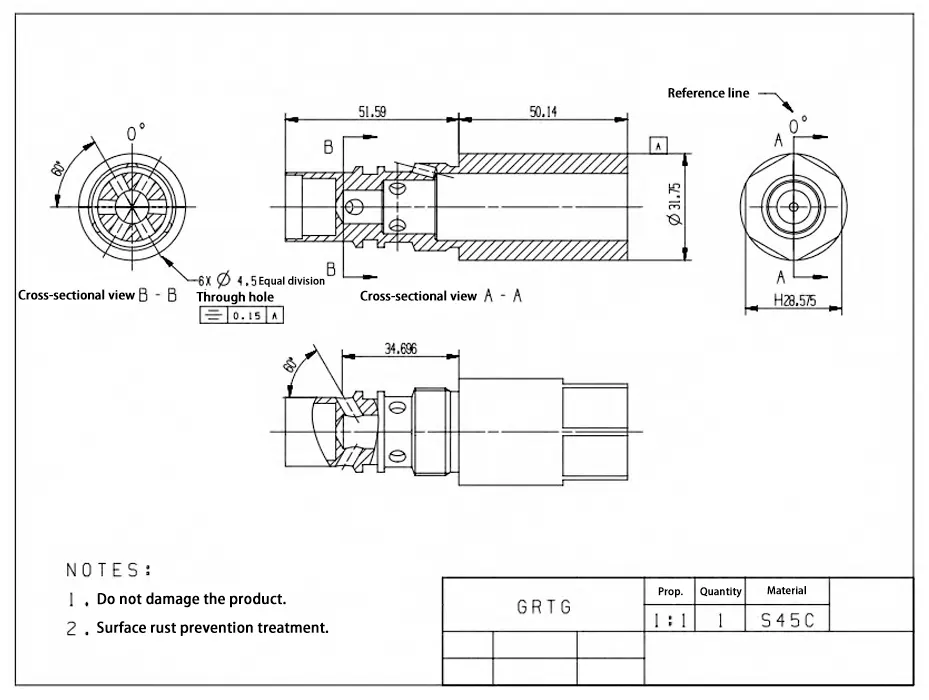
The inclined hole machining required in Figure 1 includes six holes evenly distributed at 60° intervals around the cylindrical surface and three holes evenly distributed at 15° intervals around the cylindrical surface.
The following analysis focuses on the fixture design for the six evenly spaced Ø4.775mm inclined holes; the fixture for the three evenly spaced inclined holes can be designed using similar steps.
Structural Analysis of the Part
The 60° tapered holes in Figure 1 are uniformly distributed on the left-end cylindrical surface. The center of the tapered hole on the outer cylindrical surface is 34.696 mm from the left-end face of the Ø31 mm cylindrical surface.
These six tapered holes serve as oil passages to lubricate the outer cylindrical surface of the shaft. They have no locating relationship with the hexagonal end face at the part’s right end.
To machine the six equally spaced Ø4.775 tapered holes shown in Figure 1, it is only necessary to ensure that the axis of each tapered hole forms a 60° angle with the shaft’s central axis, and that the angle between each tapered hole is 60°.
The hexagonal end face on the part’s right end can be utilized as a clamping surface to position and machine each of the six inclined holes.
Since these tapered holes are machined on a thin-walled cylinder, direct milling and drilling may cause the drill bit to deviate from the ideal hole center.
To address this, first use a flat-bottomed milling cutter to create a small flat surface, then switch to a center drill to drill the center hole, followed by drilling the tapered holes.
Considering the characteristics of existing conventional three-axis machining centers and the client’s order requirements, the fixture can be designed as a multi-station fixture capable of clamping 10 parts at once.
After completing the inclined hole machining at one position, the clamping surface is changed to process the next inclined hole. This approach simultaneously meets the order production requirements and ensures part consistency.
Part Mounting and Positioning Design
The designed fixture must place the part in the correct machining position upon mounting, eliminating the need for additional alignment or adjustment operations.
Based on the part’s characteristics, a locating groove can be designed to accommodate two of the shaft’s hexagonal end faces. When the shaft is placed in the locating groove, its centerline forms a 30° angle with the worktable.
The shaft’s right end face is constrained against axial displacement by a tapered surface on the fixture perpendicular to the locating groove.
A clamping plate secures the surface directly opposite the locating groove. The clamping plate connects to the fixture via bolts. A single long clamping plate secures multiple parts simultaneously.
Loosening the nuts allows parts to be removed for flipping, saving setup, positioning, and indexing time while meeting batch production requirements.
Overall Fixture Design
The fixture incorporates ten locating grooves, accommodating ten parts simultaneously. To prevent over-constraint, the groove design ensures no mutual force interaction between the groove base and part base after placement.
Parts’ degrees of freedom in all directions are controlled through positioning grooves, inclined surfaces perpendicular to the grooves, and clamping plates.
Double-ended studs connect the clamping plates to the fixture body, ensuring consistent clamping force for all parts.
Three Ø12.5mm countersunk holes are designed on the fixture body to mount M12 bolts, securing the fixture body to the workbench.
With the clamped part’s axis forming a 30° angle to the workbench, the machined tapered holes maintain a 60° angle to the part’s axis.
Through CNC programming, the inclined holes at the same position on all 10 parts are machined. After completing the inclined holes at one position, the nuts can be loosened.
The parts are then sequentially removed, flipped over, and reinserted into the locating recesses. After tightening the nuts, the inclined holes at another position are machined.
Fixture Machining
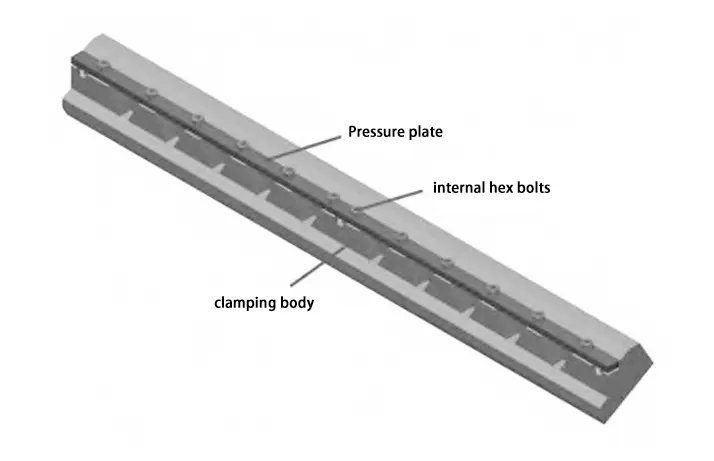
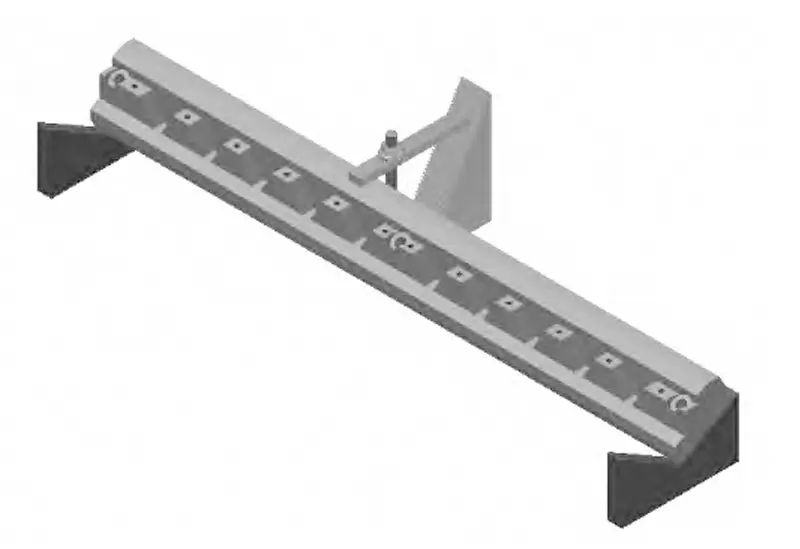
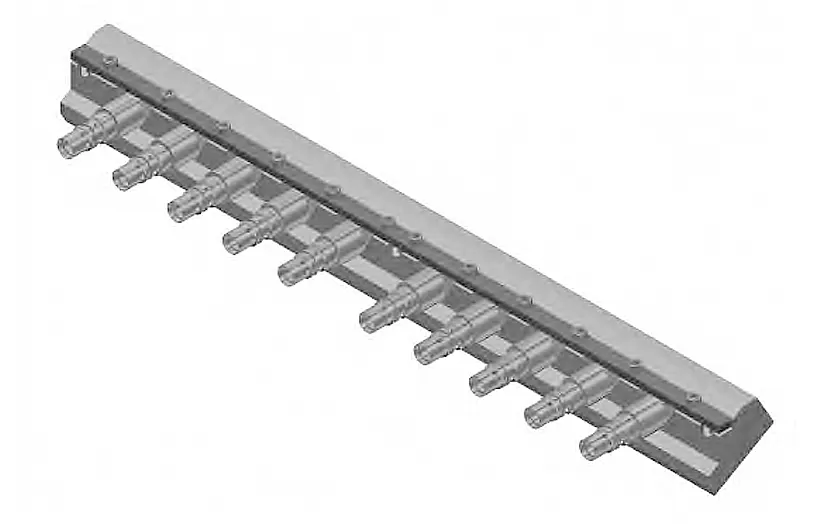
As shown in Figure 2, the fixture structure comprises three components: fixture body, clamping plate, and hex socket head cap screws. Machining the fixture entails completing these three parts.
Fixture Body Machining
Figure 3 shows the structural diagram of the fixture body.
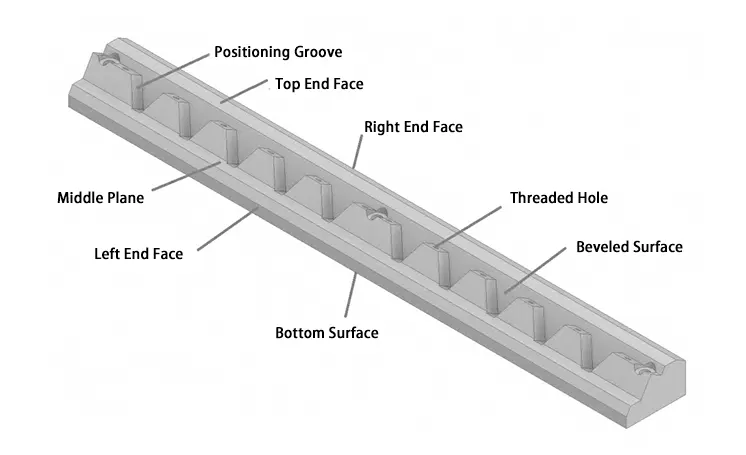
Table 1 presents the CNC machining process card for the fixture body.
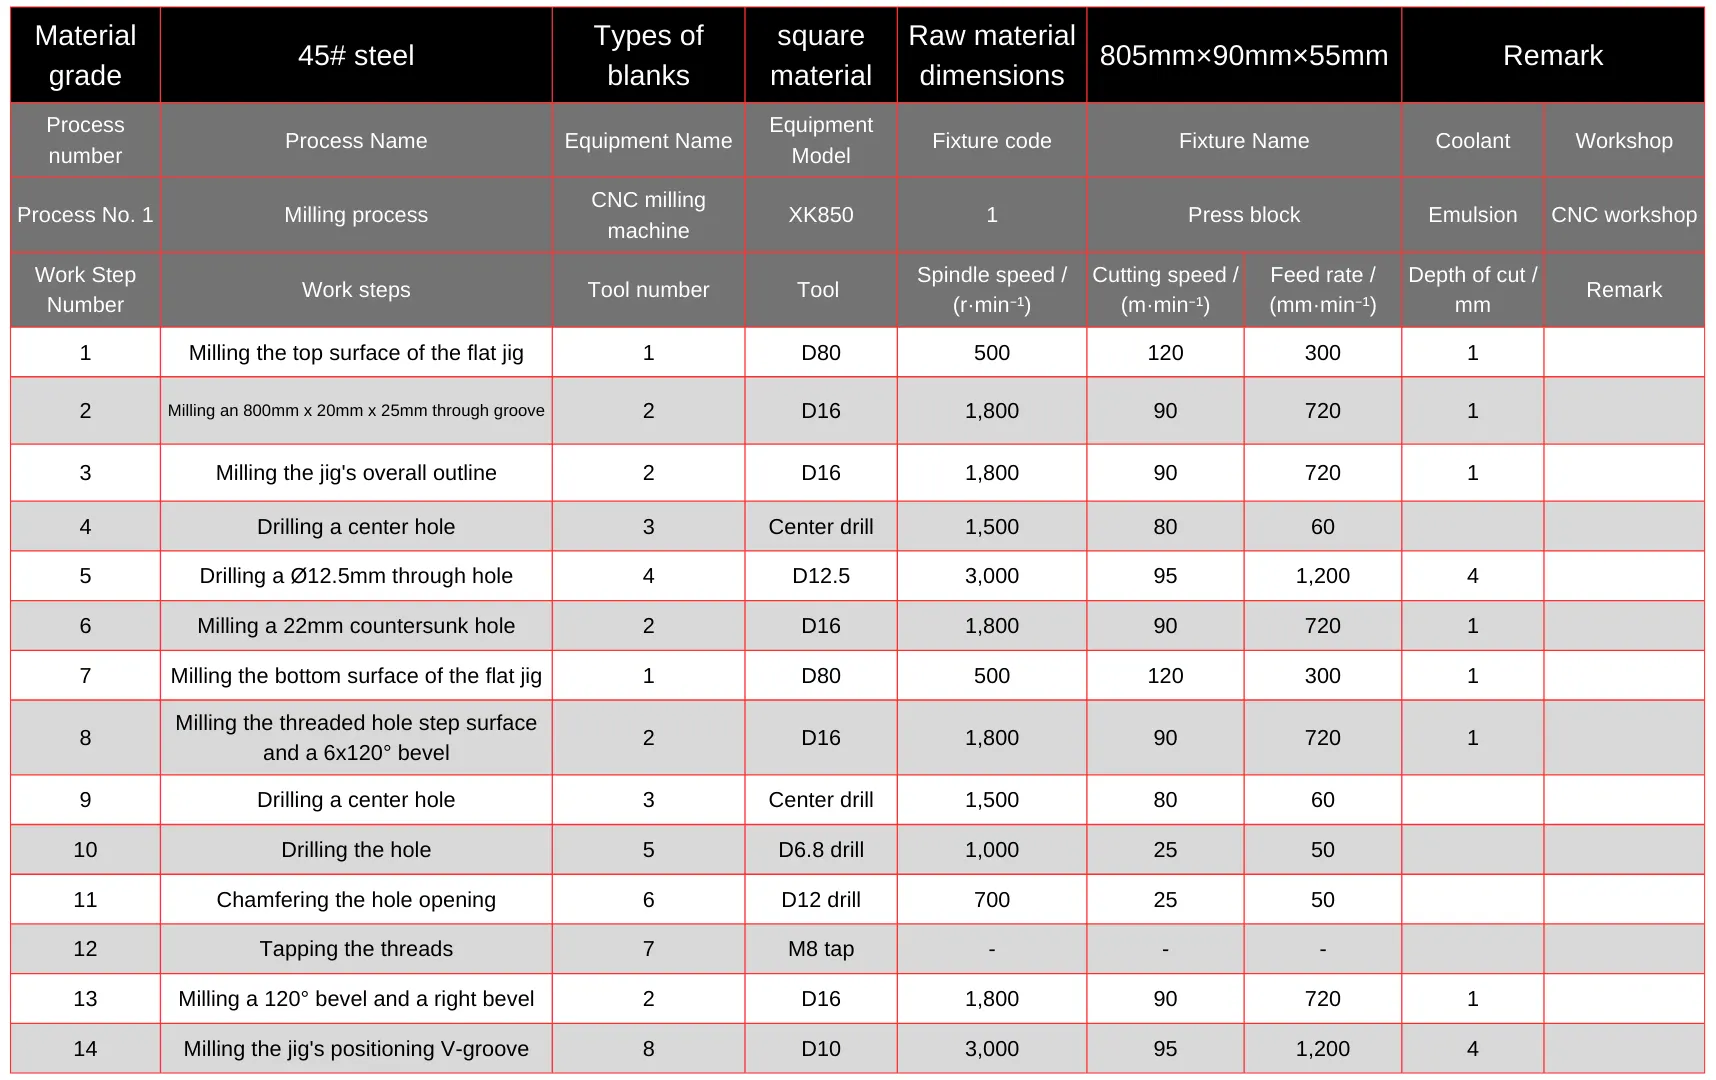
The fixture body is machined from 45 steel using an 805mm × 90mm × 55mm blank. First, secure the blank to the worktable using clamping blocks and align it.
♦ Machining of Main Reference Surfaces and Mounting Holes
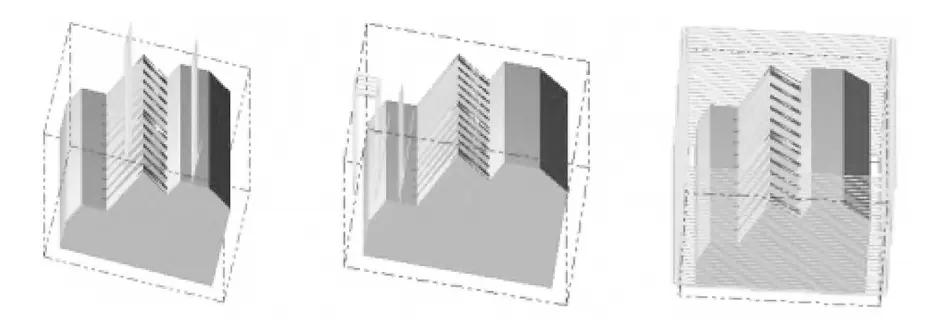
This setup allows for rough and finish machining of the left and right end faces, top face, middle plane, and outer contour as shown in Figure 4.
Additionally, machine the three countersunk holes for connecting the fixture to the worktable as depicted in Figure 5.
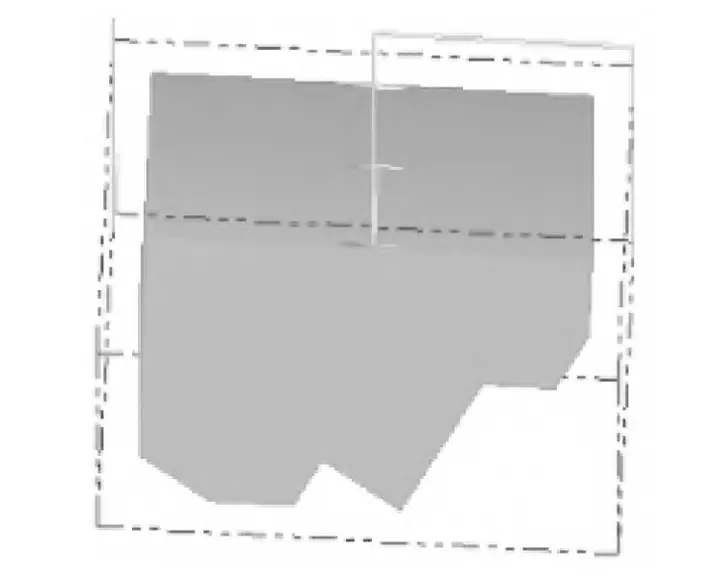
Then clamp the workpiece upside down. This setup completes rough and finish machining of the clamping body bottom surface as shown in Figure 6.
♦ Machining of Threaded Holes and Inclined Surfaces
To enable the clamping block to secure the workpiece, one threaded hole is machined on each side of each groove. To ensure even force distribution when the clamping plate secures the part, the threaded holes are positioned at the center of the inclined surface.
Since the threaded holes form a 60° angle with the bottom surface, the workpiece can be placed on a 120° V-block as shown in Figure 7. with the left end face of the workpiece contacting one side of the V-block.
This orientation creates a 30° angle between the workpiece bottom surface and the workbench. This clamping method ensures the required 60° threaded holes can be machined. Secure the workpiece with the clamping plate.
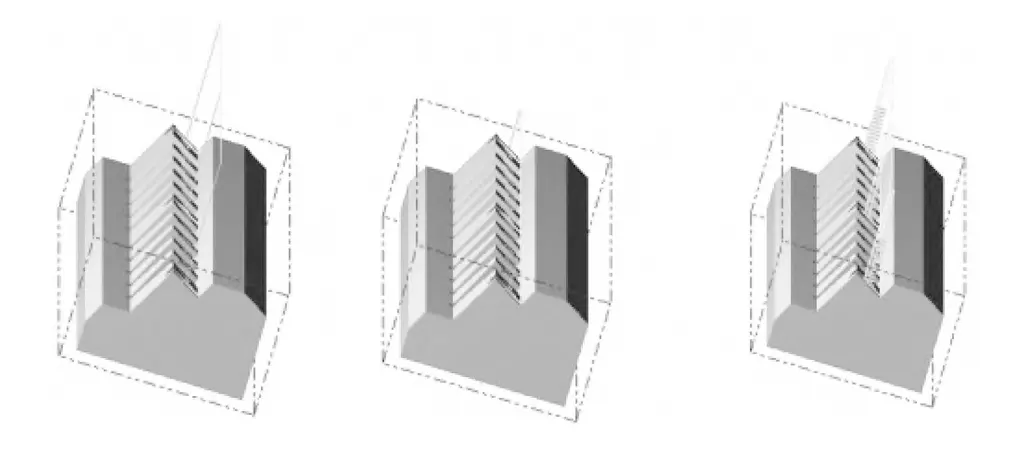
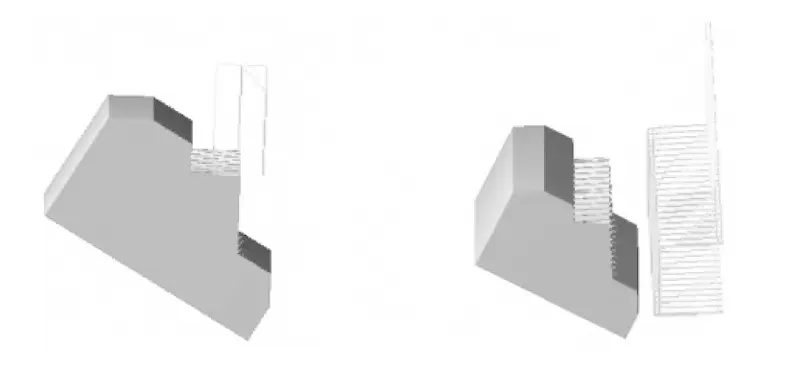
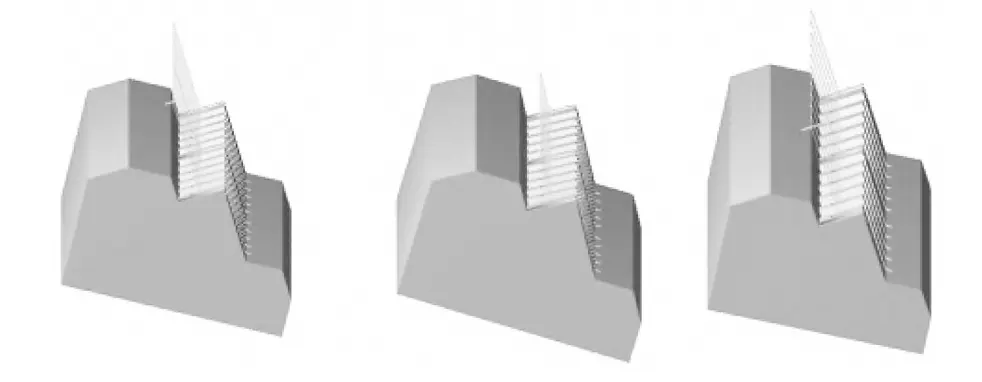
After completing the fixturing, machine the threaded hole step surface and 6×120° bevel on the clamping block as shown in Figure 8. Then change tools to complete the threaded hole machining as shown in Figure 9.
♦ Machining of the Locating V-Groove and Chamfered Surfaces
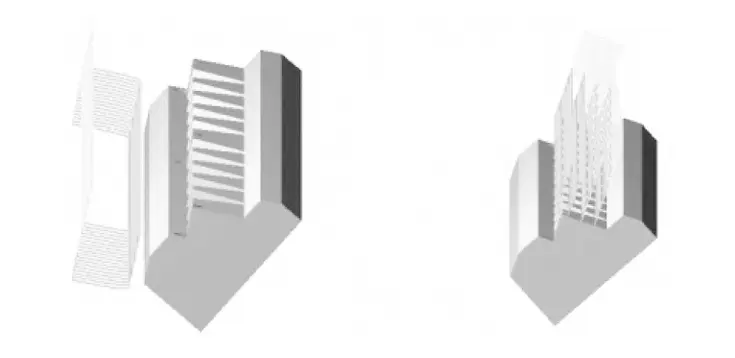
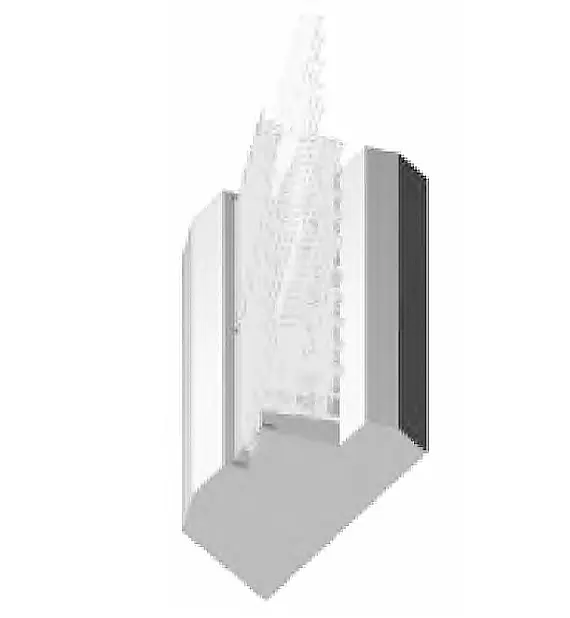
When machining the locating V-groove, 120° bevel, and right bevel of the clamping fixture, clamp it using the same principle as the previous machining, as shown in Figure 10. Place the workpiece base between the V-block and a 30° shim for stable positioning.
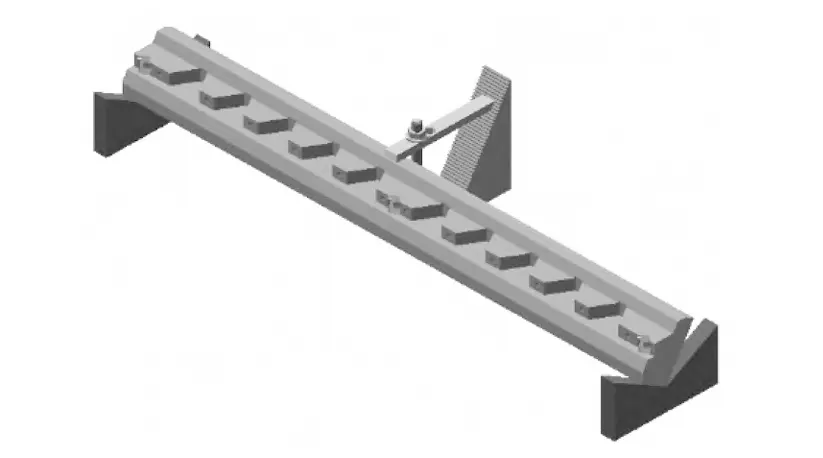
Figure 10: Fixture clamping for machining the locating V-groove, 120° chamfer, and right-hand chamfer After clamping, machine the fixture’s 120° chamfer and right-hand chamfer as shown in Figure 11.
Then change tools to complete machining the locating V-groove as shown in Figure 12.
Machining of the Pressure Block
Figure 13 shows the structural diagram of the pressure block.
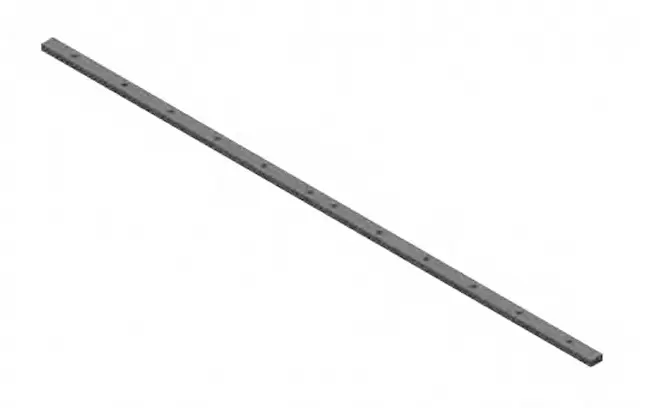
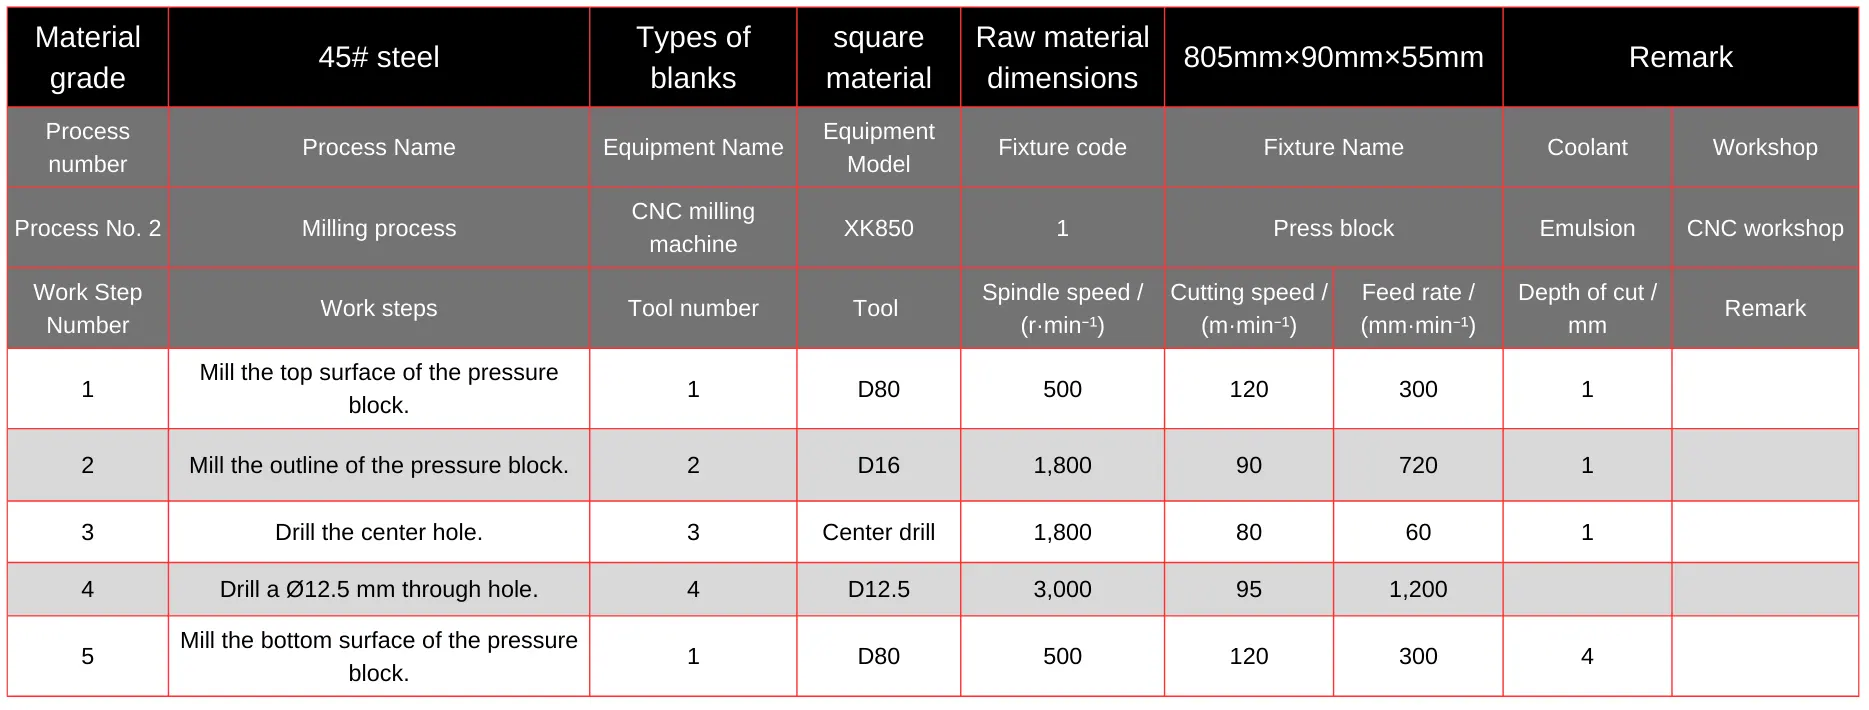
Table 2 shows the CNC machining process card for the clamping block.
After machining the clamping body, mount the blank clamping plate for processing. Mill the four surfaces (top, bottom, left, right) of the clamping plate, then drill ten Ø8.5mm through holes. Use M8 hex socket head cap screws to connect the clamping body and clamping plate.
Part Clamping
For fixture usage, secure the clamping body to the machining center table via three countersunk holes using Ø12mm bolts. Insert 12 Ø8mm hex socket bolts through the pressure plate’s through holes into the clamping body’s threaded holes.
However, only insert the bolts without tightening them, ensuring sufficient clearance between the clamping plate and the locating groove of the fixture body.
This design allows the workpiece requiring inclined hole machining to be placed freely into the groove. After placing the workpiece, tighten each bolt to complete the part mounting and commence machining.
Complete inclined-hole machining at the same position on 10 parts, then loosen the bolts. After flipping the parts, retighten the bolts to machine the inclined holes at the opposite position on the 10 parts. Complete machining of all six inclined holes before replacing the parts.
Figure 14 shows a schematic diagram of part clamping using the dedicated fixture for machining.
Comparative Analysis of Three Methods
Following the design and fabrication of the fixture, we applied it in actual production at our university’s factory and compared its performance with two alternative machining methods, as summarized in Table 3.

As shown in Table 3, for this batch order, utilizing the specialized fixture represents the optimal solution to meet requirements for production volume, deadlines, and manufacturing processes.
Conclusion
Through the above analysis and research, we designed a rational fixture that utilizes the part’s own structure for clamping and machining, which not only fulfills the process requirements of the order but also ensures the schedule, enabling completion of the order on time, in quantity, and with high quality.
This demonstrates that the application of specialized fixtures plays a pivotal role in machining. The perfect integration of structure and process helps solve machining challenges and produce qualified products on schedule.
In summary, many mechanical production facilities still operate with outdated equipment. Designing specialized fixtures tailored to specific parts is crucial for producing qualified products with limited resources.
For components presenting processing challenges, fixture design must be both meticulous and flexible in leveraging mechanical characteristics.
Such fixtures not only meet the technical requirements of the workpiece but also reduce labor input, achieving the goals of enhancing processing efficiency, shortening processing time, and saving processing costs.
FAQ
Why is a specialized fixture necessary for machining inclined holes on thin-walled cylindrical parts?
Traditional clamping methods can cause deformation or tool deviation when machining thin-walled structures. A specialized fixture stabilizes the part, ensures accurate positioning, prevents drill wandering, and delivers consistent high-precision results in mass production.
Why not use a five-axis machining center for angled hole machining?
Although five-axis machines offer excellent flexibility and precision, their operating cost is significantly higher than the value of this batch’s shaft-type components. For large-volume, lower-value parts, a dedicated fixture paired with a three-axis machine provides the best cost-performance ratio.
What are the disadvantages of using a dividing head to machine the inclined holes?
A dividing head only allows machining one part per setup. Each hole requires re-indexing, resulting in low efficiency and long cycle time. This makes it unsuitable for large batch orders like the 35,000-piece production in this case.
How does the dedicated fixture improve production efficiency?
The fixture clamps 10 parts simultaneously, reduces alignment and repositioning time, simplifies operator workload, and ensures consistent hole angles and spacing. This dramatically increases throughput compared to single-part machining.
How does the fixture ensure accurate 60° inclined hole machining?
The fixture precisely positions each shaft using V-grooves, inclined reference surfaces, and clamping plates. By setting the shaft axis at a 30° angle to the worktable, the machined hole automatically matches the required 60° inclination to the central axis, ensuring geometric accuracy.
What machining challenges does the fixture help overcome for thin-walled cylinders?
Thin-walled parts are prone to deformation, vibration, and drill deviation. The fixture provides rigid support, allows pre-machining a flat spot before drilling, prevents tool drift, maintains dimensional accuracy, and ensures all six evenly spaced tapered holes meet tolerance requirements.

