Five-axis CNC machining technology has emerged as a key technique for achieving high-precision, high-efficiency manufacturing due to its multi-axis interpolation capability and ability to complete complex surface machining in a single setup [1].
Particularly when processing complex components featuring deep cavities, irregular surfaces, and high-precision hole patterns, traditional three-axis machining requires multiple setups.
This not only increases positioning errors but also struggles to meet modern manufacturing demands for both precision and efficiency [1-3].
Structural Characteristics and Machining Challenges
As a core component in fluid systems, pump bodies present significant machining challenges due to their complex structural integration, deep cavities, intersecting multi-directional hole patterns, and intricate features like variable curvature surfaces and irregular blade grooves.
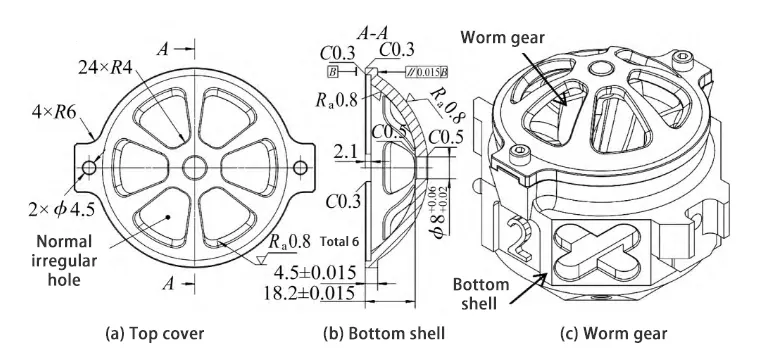
Taking a specific pump body model as an example (shown in Figure 1), it consists of three parts: the bottom shell, the worm gear, and the top cover. Among these:
The bottom shell features a complex structure requiring multi-axis rotational symmetrical machining.
It includes six irregular blade slots demanding five-axis simultaneous machining, imposing stringent requirements on tool edge length.
Additionally, deep holes and five-axis angle-drilling operations demand exceptional machining precision, necessitating reaming processes;
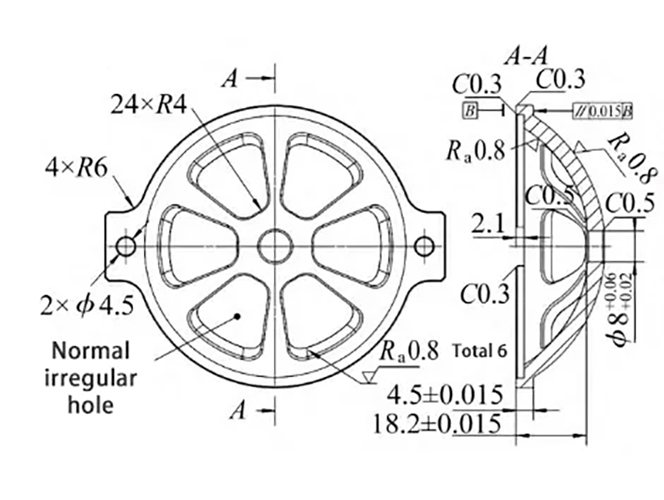
The upper cover features a thin-walled hollow structure with abundant curved surfaces and complex spatial angles, subject to stringent surface quality and geometric accuracy requirements (e.g., ϕ(73±0.025) mm, parallelism 0.015, roughness Ra 0.8 μm, etc.).
Fabricated from 6061 aluminum alloy, it exhibits lightweight properties and good machinability but is prone to deformation, posing significant challenges for clamping processes.
While scholars have achieved certain results in five-axis CNC machining process planning, toolpath optimization, and fixture design [3-10], systematic process research on integrated multi-feature composite pump body parts remains insufficient.
Significant improvement potential exists particularly in multi-process transitions, programming strategy optimization, and simulation verification.
Research Objectives and Innovative Contributions
This paper employs the UG software platform to systematically analyze five-axis CNC machining processes and programming methods for pump body components.
It focuses on developing a comprehensive solution spanning part structure analysis, process planning, programming implementation, simulation optimization, and actual machining.
Research content encompasses critical technical aspects including toolpath optimization, coordinate system setup, cutting parameter configuration, and fixture design, aiming to address issues such as deformation susceptibility, difficult clamping, and low precision in five-axis machining of complex structural parts [11-21].
Innovative contributions of this paper include:
Innovative contributions of this paper:
- First, proposing a five-axis machining process planning method based on structural feature recognition to achieve efficient path planning for multi-feature parts;
- Second, it integrates the UG CAM module to optimize the five-axis programming workflow, enhancing programming efficiency and machining accuracy;
- Third, through simulation and actual machining validation, it establishes a replicable and scalable five-axis machining process solution.
The research findings will provide theoretical support and practical guidance for CNC machining of similar complex parts, holding significant practical implications for advancing the application of five-axis CNC technology in high-end manufacturing.
Analysis of Pump Housing Component Structure and Technical Requirements
The pump housing base serves as the mounting surface for the upper cover and worm gear, demanding high assembly positional accuracy.
Its complex feature composition is illustrated in Figure 1(b). Multiple locations require five-axis rotational symmetrical machining with stringent dimensional precision requirements.
Six irregular blade slots require 5-axis simultaneous machining, imposing specific tool length requirements.
Two cavity deep holes and four 5-axis fixed-angle deep holes demand high precision, with reaming operations required.
Machining Strategy and Equipment Selection for the Housing Base
Therefore, based on the analysis of the bottom housing part’s features, high-precision machining equipment and flexible five-axis toolpaths are required.
Consequently, the bottom housing part is scheduled for machining on Machine A (dual-swivel table five-axis machining center) in two operations on both sides.
The pump body upper cover part, as shown in Figure 1 (a) , which secures the impeller and balances the inlet ports.
It demands high dynamic balance, features complex and intricate surfaces, and exhibits a complex structure with multiple curved surfaces, irregular holes, and variable cross-section features.
These include deep cavities (depth 18.2 mm), thin walls (minimum wall thickness 2.1 mm), arc transitions (R4/R6), and multiple C0.5 chamfers, necessitating multi-axis machining.
High geometric accuracy is required, with dimensional tolerances typically controlled within ±0.05 mm and surface roughness demanding Ra ≤ 0.8 μm.
Material Characteristics and Machining Challenges of the Upper Cover
The aluminum alloy material exhibits poor heat dissipation, low strength, susceptibility to deformation, and presents significant machining challenges.
Conventional clamping and positioning methods fail to meet machining requirements, resulting in low efficiency and complex process routes.
Multiple operations and workstations must coordinate to complete roughing, finishing, inspection, and other stages.
Therefore, optimizing machining steps, improving clamping methods, refining programming parameters, and enhancing part processing efficiency and quality assurance are essential and critical to resolving these challenges.
The worm gear in Fig. 1 is a pre-machined standard component used solely for assembly purposes; its manufacturing process is not analyzed herein.
Pump Body Machining Process Planning
The pump body assembly requires three components and standard bearings. Process analysis and optimization are as follows:
(1) The worm gear is a standard part used solely for assembly and has been batch-processed;
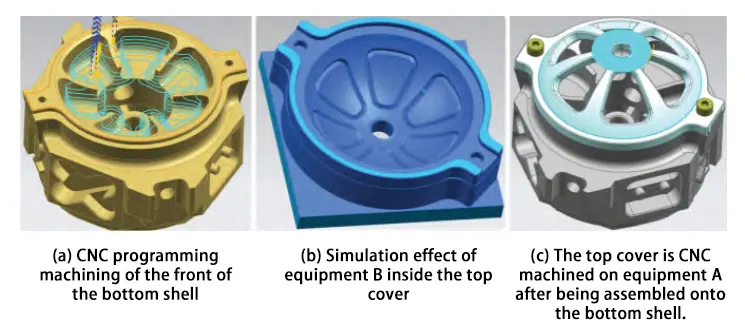
(2) The pump body base is the primary component. As shown in Fig. 2(a), it is produced on high-precision main equipment A.
First, five-axis CNC machining of the pump body’s bottom surface is completed. Then, after disassembly and repositioning, five-axis CNC machining of the front surface is performed.
The part remains assembled and awaits assembly with the top cover after the inner surface machining is completed before further production;
(3) The upper cover is scheduled for end cap internal machining on Machine B, as shown in Figure 2(b);
(4) After removing the internally machined upper cover, it is assembled onto the pump body top via M6 bolts on Machine A.
No re-centering is required; only height data needs to be set to complete all external machining processes for the upper cover part;
(5) After completing 90% of the upper cover’s external machining, secure it to the pump body with M5 screws. Remove the M6 bolts and finish the remaining 10% of machining.
Total processing time is approximately 20 minutes, significantly improving production efficiency, as shown in Fig. 2 (c).
Pump Body Machining Sequence Planning
The base shell blank material is 90 mm × 90 mm × 60 mm aluminum alloy. Equipment A selected is a Renick system dual-swing table five-axis machining center.
Initial Machining of the Base Shell Bottom Features
First, machine the 60 mm × 60 mm square platform at the bottom of the housing, along with the octagonal peripheral contours, countersunk holes, and numeric markings.
Complete two cavity deep drilling operations and four five-axis angle-controlled deep drilling operations. Subsequently, perform reaming and sharp-edge chamfering.
After disassembly and re-clamping at the 60 mm × 60 mm square platform position, the bottom is centered and aligned.
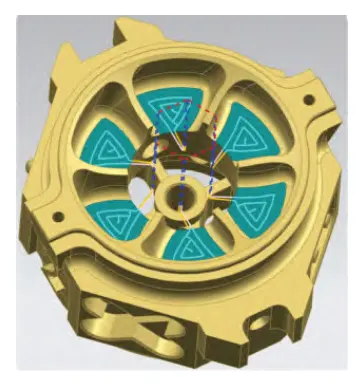
The workpiece coordinate origin is set at the bottom surface. Machining of all front-face features on the base shell is completed, with emphasis on processing the six blade slots and M4 threaded holes, as shown in Figure 3.
Upper Cover Internal Machining Process
The upper cover blank is a 75 mm × 75 mm × 25 mm aluminum alloy block. Equipment B, a dual-swivel table five-axis machining center, is selected.
- A D12 flat-bottom end mill is chosen to perform rough machining of the upper end’s internal and external contours using fixed contour milling and depth contour milling.
- A D6 flat-bottom end mill was then used to perform finish milling of the bottom surface and walls via depth contour milling and a bottom wall milling path;
- Subsequently, a 4.2 mm drill bit was used to drill M5 threaded pilot holes; an M5 tap was used for threading;
- and a D6 chamfering tool was employed to chamfer all sharp edges with a C0.5 radius;
- Finally, select an R3 ball-nose end mill for finishing the internal curved surfaces of the end cover. Total machining time for the upper cover interior is approximately 15 minutes, with results shown in Figure 4;

Assembly-Based Positioning and External Machining of the Upper Cover
After completion, disassemble and reassemble onto Device A. Mount onto the pump body using M6 bolts without centering. Simply measure the total height post-assembly laterally and input it into the coordinate system compensation.
Since the workpiece coordinate system is already set at the workpiece base surface and matches the programming coordinate system, proceed to the next machining step as shown in Fig. 5.
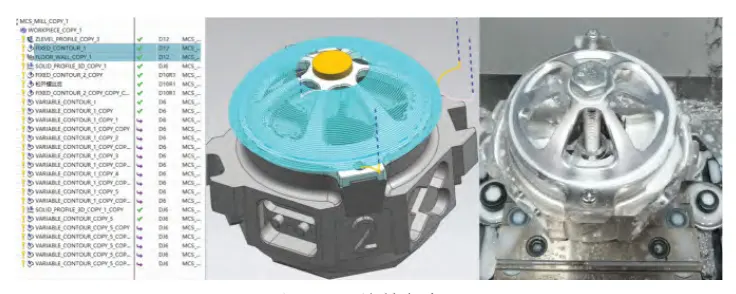
- After assembly positioning, select a D12 flat-bottom end mill. Use fixed contour milling and depth contour milling to complete rough machining of the cover’s exterior.
- Programming must avoid the M6 bolts while machining the bottom wall.
- Call the D6 chamfering tool to chamfer the M5 threaded holes;
- Then call the D10R1 round nose end mill to finish-machine the external curved surfaces of the end cover;
- Subsequently, call the D6 flat-bottom end mill and select fixed contour milling for roughing and finishing six normal-shaped holes;
- Next, install M5 screws to secure the cover to the pump body. Remove the M6 bolts and perform rough and finish machining on the M6 bolt areas;
Program toolpaths with attention to tool change handling. Finally, chamfer the ϕ8 hole positions to complete all machining on the cover part.
Five-Axis Toolpath Planning and Programming Techniques Based on UG
Back Side Machining of the Base Shell Part
(1) D12 Flat-End Mill Pocket Roughing Setup Parameters
Select the D12 flat-bottom milling cutter for roughing. Choose the “Pocket Milling” toolpath, set the cutting depth to 51 mm, select “Follow Perimeter” for the toolpath cutting mode, set the step size to 60% of the tool straightness, and set the maximum cutting distance to 3 mm.
(2) Profile Milling, Path Duplication, and Inclined Feature Finishing Setup
Switch to the “Profile Milling” toolpath, designate the “Wall,” and automatically generate an auxiliary bottom surface at -1 mm. Select “Profile Milling” as the drive method. select “Auto” for Spindle Orientation.
Use path conversion to rotate and duplicate the path, completing fixed-axis machining for the remaining 4 45° inclined surfaces.
Duplicate the path, modify the feature geometry to select 4 45° inclined holes, use a 5.5 mm drill bit, and set the toolpath cycle to “Deep Hole Chip Breaking.” Complete the 34° inclined surface 5-axis contour finishing.
(3) Select the 5-axis drilling toolpath
Specify the feature geometry as 4 x 45° inclined holes. Use a 5.5 mm drill bit.
Set the toolpath cycle to “Deep Hole Chip Breaking” mode to complete 4 five-axis fixed-angle deep holes.
Subsequently, complete 2 cavity deep holes and reaming operations.
(4) Bottom Wall Milling Toolpath Configuration and Finishing
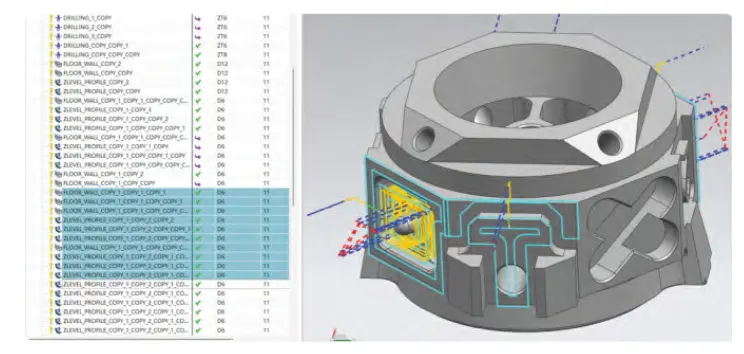
Select the “Bottom Wall Milling” toolpath as shown in Fig. 6. Specify the bottom surface of the cutting area, set the tool axis to “Perpendicular to the First Surface,” select “Bottom Surface” for the spatial range, and choose “Follow Perimeter” as the cutting mode.
Complete the finishing of other bottom surfaces by replicating and transforming the toolpath with parameter adjustments.
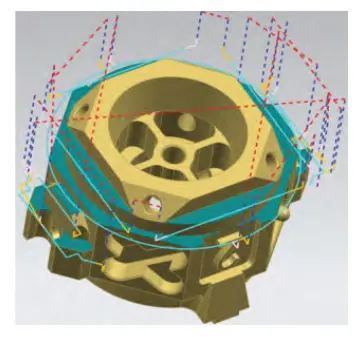
(5) Deep Contour Milling Toolpath Setup and Outer Profile Finishing
Select the “Deep contour milling” toolpath as shown in Fig. 7. Adjust the “Part side allowance” and “Part bottom allowance” parameters.
Specify different “Vector” orientations for tool axes based on distinct surfaces. Complete the finishing of the part’s outer contour through toolpath replication transformations and parameter adjustments, concluding with sharp edge chamfering.
Front Face Machining of Bottom Housing Part
(1) Machining the tapered surface around the ϕ68 blade slot, as shown in Fig. 8.
Select the R3 ball-nose cutter and choose the “Fixed contour milling” toolpath.
Set the drive method to “Area milling,” select “Follow contour” for non-steep cutting mode, choose “Inward” for toolpath direction, ‘Sequential’ for cutting direction, “Constant” for step size, and set the maximum distance to 0.1 mm.
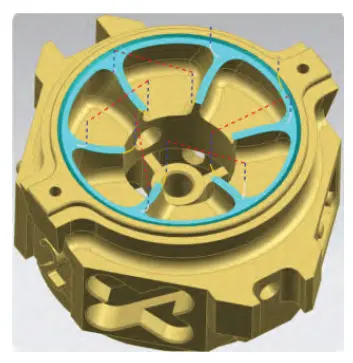
(2) Blade groove wall finishing, as shown in Fig. 9. Select a custom ball-nose cutter.
Select the 5-axis “Contour Milling” toolpath. In parameter settings, specify the wall by selecting the blade groove wall.
Choose “Contour Milling” as the drive method, select ‘Auto’ for the spindle axis, and configure other debugging parameters.
Note: Set non-cutting movement parameters, set feed type to “Linear,” and set rapid traverse distance to 200% of the tool diameter.
Set the part safety distance to 3 mm. For safety settings, select the Envelope Block option with a safety distance of 3. Review the toolpath simulation to verify the safe cutting path and prevent collisions.
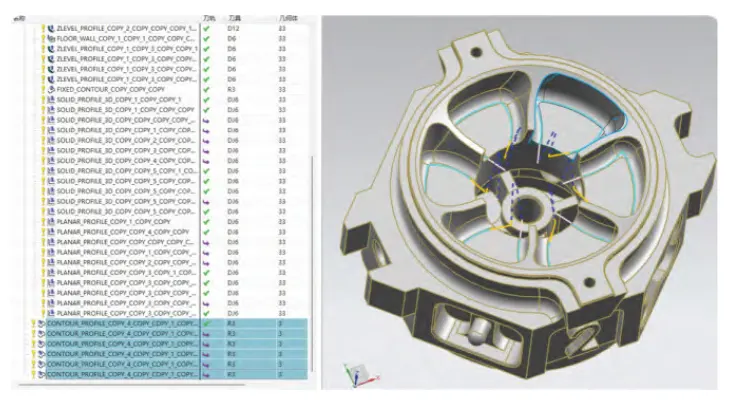
Upper Cover Part Machining
(1) Fixed Contour Milling for Upper Cover Interior Roughing
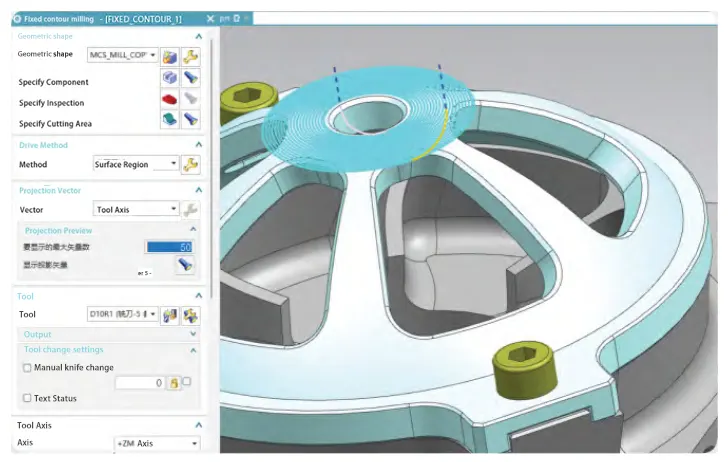
Rough machining of the upper cover interior: Select fixed contour milling. For the drive method, choose surface area. Set the cutting mode to spiral with 50 pitch points. Maintain a 0.2 mm surface offset allowance.
Projection vector: Tool axis. Feed type: Arc (parallel to tool axis) with 50% radius.
The feed position is 1 mm above the surface, employing a top-to-bottom spiral machining path. The tool operates smoothly with high efficiency, as shown in Fig. 10.
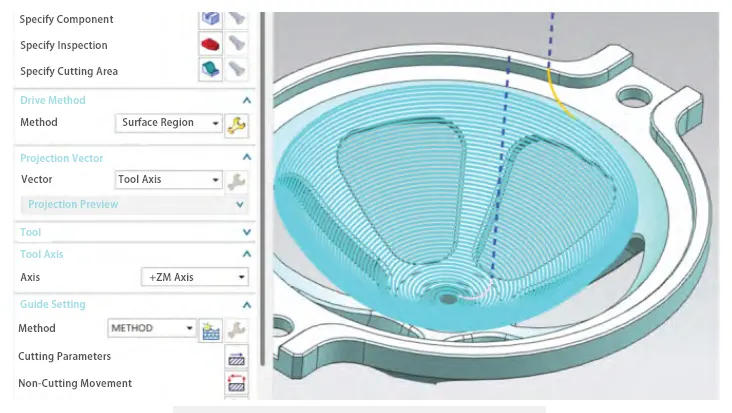
(2) Five-Axis Variable Contour Milling for Upper Cover External Machining
To prevent deformation during external machining of the upper cover and maintain structural integrity, the six internal tapered holes shall remain unmachined. However, a 0.5 mm chamfer shall be applied.
Select five-axis variable contour milling. For drive method, choose surface area; for tool position, select tangential; for cutting mode, choose unidirectional; for step count, select 0; for projection vector, select tool axis.
Select the tool axis relative to the drive body, set the front tilt angle to 0, and the side tilt angle to -45°.
For non-cutting motion parameters, set the feed type to plunge, the feed position to distance, and the height to 200% of the tool length.
Transfer common safety settings option: Select “Sphere,” specify point radius as 40, as shown in Fig. 11.
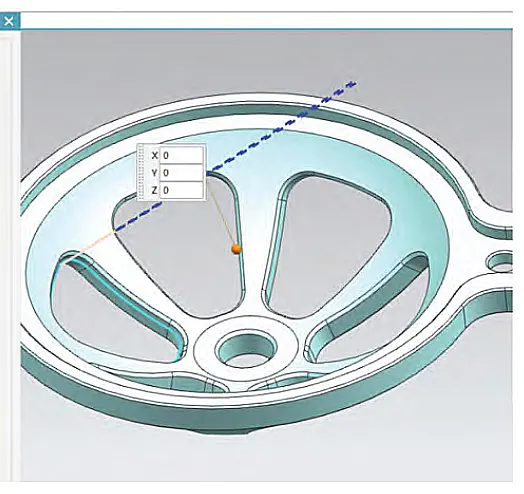
(3) Upper Cover Assembly and Fixed Contour Roughing of Lid Margin
Assemble the upper cover onto the pump body. After setting the coordinate system height, select the D12 flat-bottom end mill.
Choose the fixed contour milling toolpath with surface domain drive method. Set the drive cutting mode to “helical,” leaving a 0.2 mm part allowance with 50 step counts.
Select “Tool Axis” for projection vector and perform roughing in a bottom-up spiral to remove the end cover shell stock, as shown in Fig. 12.
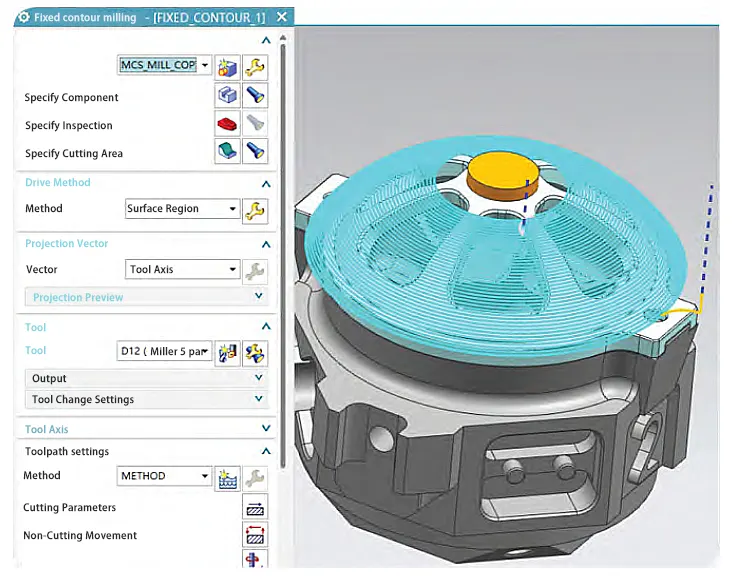
(4) Five-Axis Variable Contour Roughing of Six Irregular Holes
Rough the six normal-shaped holes using a D6 flat-bottom end mill.
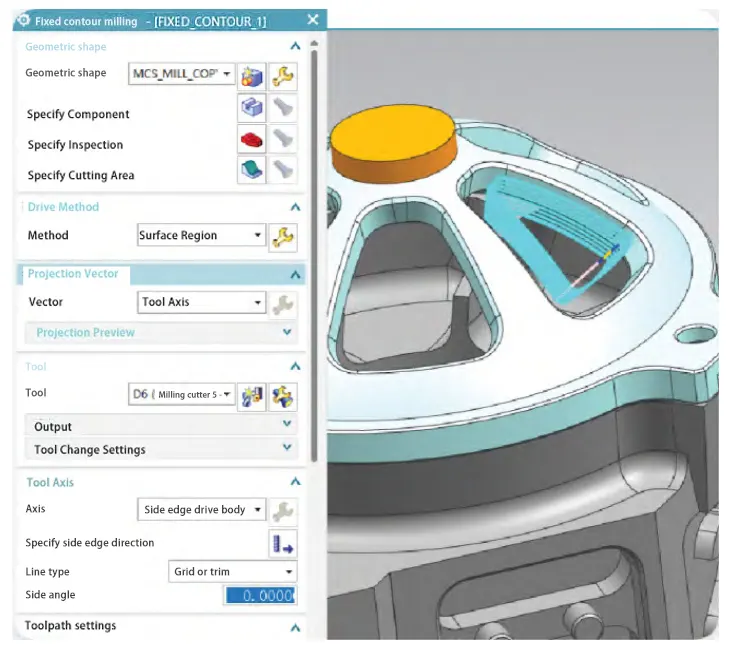
Select “5-axis variable contour milling path,” choose “Surface area” as the drive method, set the internal parameter surface offset to 0.2 mm, select ‘Helical’ for the drive cutting mode, set the pitch count to 8, and choose “Side-cutting drive body” for the tool axis.
Ensure the side-cutting direction is outward. Select “Grid or trim” for the scribing type and set the helix angle to 0°.
After configuring toolpath parameters, apply toolpath transformation by selecting “Rotate Around Point.” Duplicate the path 6 times at 360° intervals to complete roughing of the remaining normal irregular holes, as shown in Fig. 13.
(5) Finishing and Feed Optimization for Six Irregular Holes
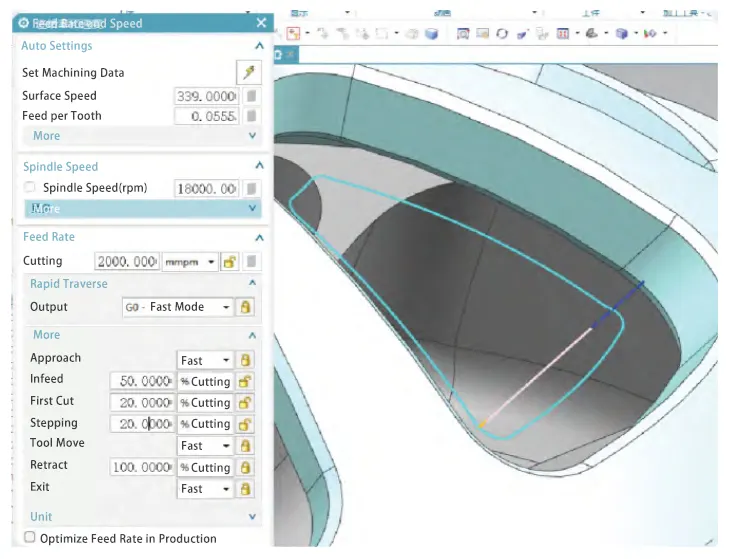
Finishing of the six normal irregular holes is shown in Figure 14. Select a D6 flat-bottom end mill. Simply duplicate the roughing toolpath and modify the parameters.
Again choose the “5-axis variable contour milling toolpath,” with the drive method set to “Surface area.”
For internal parameters, select a surface offset of 0.2 mm. In the drive settings, choose “Helical” for the cutting mode and set the pitch count to 0. leaving other settings unchanged. However, optimize the “Feed Rate and Speed” parameters.
In the “More” options, adjust the “Initial Feed” to 50% of the cutting speed and the “First Cut Feed” to 20% of the cutting speed.
This significantly reduces impact forces during initial penetration, minimizing the risk of deformation in the end cover workpiece.
Similarly, after configuring the toolpath parameters, use toolpath transformation. Select “Rotate Around Point” and replicate the path 6 times at 360° angles to complete finishing of the other normal-shaped holes.
(6) Fixed Contour Finishing of End Cover Outer Surface and Bolt Area
Select a D10R1 round-nose end mill for finishing the outer curved surface of the end cover using a fixed contour milling path. The toolpath must avoid the M6 bolt.
After machining, remove the M6 bolt and perform roughing and finishing on the M6 bolt area.
When programming the toolpath, pay attention to tool-change handling and selecting the cutting direction for the surface area drive method.
Finally, chamfer the ϕ8 hole positions. All machining operations on the end cover part are completed, as shown in Fig. 15.
Conclusion
This paper systematically addresses the challenges of five-axis machining for pump body components through process analysis and design, fixture positioning strategies, toolpath planning, and programming techniques, yielding the following core achievements:
(1) Precision assurance through process and clamping optimization:
Five-axis machining technology reduces clamping frequency.
A unified coordinate system is established via assembly debugging, aligning the programming datum with the workpiece coordinate system to eliminate repeat positioning errors (positioning accuracy ≤ 0.01 mm).
This ensures positional accuracy for multi-surface machining (geometric tolerance ≤ 0.02 mm).
This approach minimizes coordinate conversion errors affecting toolpath accuracy at the source, establishing an efficient “single setup, multi-directional machining” process logic.
(2) Efficiency breakthrough in programming strategy:
Using UG12.0 software, typical toolpaths for complex surfaces are modularly encapsulated.
Reuse is achieved through toolpath transformations (rotation, mirroring), reducing programming cycles for similar parts by over 40%.
Innovative “3+2” directional machining post-processing settings combined with five-axis simultaneous finishing optimized pump cover machining time to 35 minutes (35% reduction over traditional processes), achieving dual optimization of machining efficiency and cost while maintaining precision.
(3) Technical innovation in toolpath design:
Flexibly employs fixed contour milling and five-axis variable contour milling. Optimizes (with tool axis vector variation error ≤0.5°), combined with tool tilt angle regulation (avoiding interference within the 5°–15° range).
This overcomes machining challenges in deep cavities, hollow structures, and thin-walled features, achieving aluminum alloy part surface roughness below Ra 0.8 μm and thin-wall deformation ≤0.05 mm.
Furthermore, by implementing layered allowance homogenization (each layer ≤0.1 mm), corner feed rate reduction (30% decrease), and regional spindle speed adaptation (20% reduction at curved corners), cutting stability and surface quality are further enhanced.
This paper establishes a comprehensive technical workflow for five-axis machining of complex pump body components through systematic optimization of “process-programming-toolpath.”
It overcomes multi-feature machining bottlenecks, providing a reusable solution for similar parts.
Addressing current limitations where toolpath optimization relies on manual intervention and empirical parameter design, it clarifies the upgrade direction toward digital twin virtual verification and AI algorithm-driven automatic optimization.
This offers practical reference for the intelligent development of CNC machining within the context of smart manufacturing.
References:
[1] Wang Xiankui. Multi-axis CNC Machining Technology [M]. Beijing: China Machine Press, 2021.
[2] Yao HM, Guo HJ, Wang XY, et al. Numerical Control Milling Processing of Complex Slot Parts Based on UG12.0 Automatic Programming [J]. Mechanical & Electrical Engineering Technology, 2024, 53(1): 185-188.
[3] Zhang Wei, Liu Chuang. Study on Deformation Control in Five-Axis Machining of Thin-Walled Aluminum Alloy Parts [J]. Aviation Manufacturing Technology, 2023(10): 45-50.
[4] LI T, HE E Q, BAI J F, et al. Research on Numerical Control Machining Technology and Simulation of Large Centrifugal Compressor Shell Based on VERICUT [J]. Mechanical & Electrical Engineering Technology, 2024, 53(5): 30-33.
[5] LIU Xianli. Five-Axis Interlocking CNC Machining Technology[M]. Harbin: Harbin Institute of Technology Press, 2020.
[6] LI Jiangang. Research on Post-Processing Technology for Five-Axis CNC Machining[J]. Machine Tools & Hydraulics, 2023(3): 65-68.
[7] LIAO F, GUO W K, HUANG D, et al. Research on Modal Testing and Analysis of Spindle Box in High Speed Five Axis Interlocking Machining Center [J]. Mechanical & Electrical Engineering Technology, 2024, 53(11): 161-164.
[8] LIN H B. Five-Axis CNC Machining of Facer [J]. Die & Mould Manufacture, 2019, 19(10): 81-84.
[9] LU X, LU Y, SHI S Y. Research on the Combined Machining of the Spindle Taper Hole [J]. Mechanical & Electrical Engineering Technology, 2023, 52(12): 58-62.
[10] Tian Ye, Wang Gang, Li Ming. Interference Detection and Avoidance Strategies in Five-Axis Simultaneous Machining[J]. Machine Tools & Hydraulics, 2023, 51(15): 112-119.
[11] WU Z B, LIU J L, ZHANG W X, et al. NC Machining Simulation of Roller Cone Bit Cones Using UG and VERICUT Software[J]. Mechanical & Electrical Engineering Technology, 2024,53(2):177-182.
[12] Zhu Zhijun, Zhu Si’an. Design and Machining of Multi-Cavity Flat Plate Long-Profile Aluminum Extrusion Dies [J]. Electromechanical Engineering Technology, 2024, 53(7): 287-291.
[13] Zhang Li, Zhang Desheng, Zhang Liyong. Research on Four-Axis CNC Machining and Simulation Using NX and VERICUT Software [J]. Journal of Shaanxi University of Technology (Natural Science Edition), 2015, 31(2):11-14.
[14] Siemens. NX CAM Multi-Axis Machining Help Documentation [Z]. 2024.
[15] Chen, B. G. Research on Toolpath Optimization for Five-Axis Machining of Complex Surfaces [J]. Manufacturing Technology and Machine Tools, 2022(8): 78-82.
[16] Wan, W. Design of an Experimental Platform for Statistical Analysis of Part Machining Accuracy [J]. Electromechanical Engineering Technology, 2024, 53(11): 153-155. (11):153-155.
[17] Huang Wei, Qian Xuesen, Wu Yu. Machining Process and Quality Control of Bent Tube Components for Aeroengines [J]. Precision Manufacturing Technology for Aviation, 2023, 59(4): 67-74.
[18] Zhang Hongwei. Research Progress on Key Technologies of Five-Axis Simultaneous CNC Machining [J]. Transactions of the Chinese Society of Mechanical Engineering, 2021, 57(5): 1-16.
[19] Zhou Ji, Li Peigen. Fundamental Theories and Key Technologies of Intelligent Manufacturing [J]. Transactions of the Chinese Society of Mechanical Engineering, 2022, 58(1): 1-15.
[20] XI X Y, WANG H, DONG J D, et al. Design and Simulation of Conjugate Cam Multi-Link Mechanism for Packaging Box Handling [J]. Electromechanical Engineering Technology, 2024, 53(7):190-194.
[21] Wang Weibing. Application Examples of UG NX CNC Machining Programming [M]. Beijing: China Machine Press, 2018.
FAQ
Impedit egestas aliquet?
Lorem ipsum dolor sit amet, consectetur adipiscing elit. Ut elit tellus, luctus nec ullamcorper mattis, pulvinar dapibus leo.
Sapien class quo temporibus?
Lorem ipsum dolor sit amet, consectetur adipiscing elit. Ut elit tellus, luctus nec ullamcorper mattis, pulvinar dapibus leo.
Elementum voluptate sodales?
Lorem ipsum dolor sit amet, consectetur adipiscing elit. Ut elit tellus, luctus nec ullamcorper mattis, pulvinar dapibus leo.
